
The best DIY projects combine creativity, practical value, and affordable materials. These 50 top diy ideas offer something for every skill level, whether you want to decorate your home, organize a cluttered room, personalize everyday accessories, or make thoughtful gifts. Many projects use thrifted pieces, leftover supplies, natural materials, or inexpensive craft-store basics. That means you can experiment without committing to a large budget. Before starting, protect your work surface, read product labels, and gather every tool you need. Accurate measuring and patient drying time usually produce a cleaner result. From painted furniture and handmade wall art to garden upgrades and simple fabric crafts, the projects below provide approachable inspiration. Explore these 50 top diy ideas to find your next creative weekend project.
1. DIY Painted Front Door
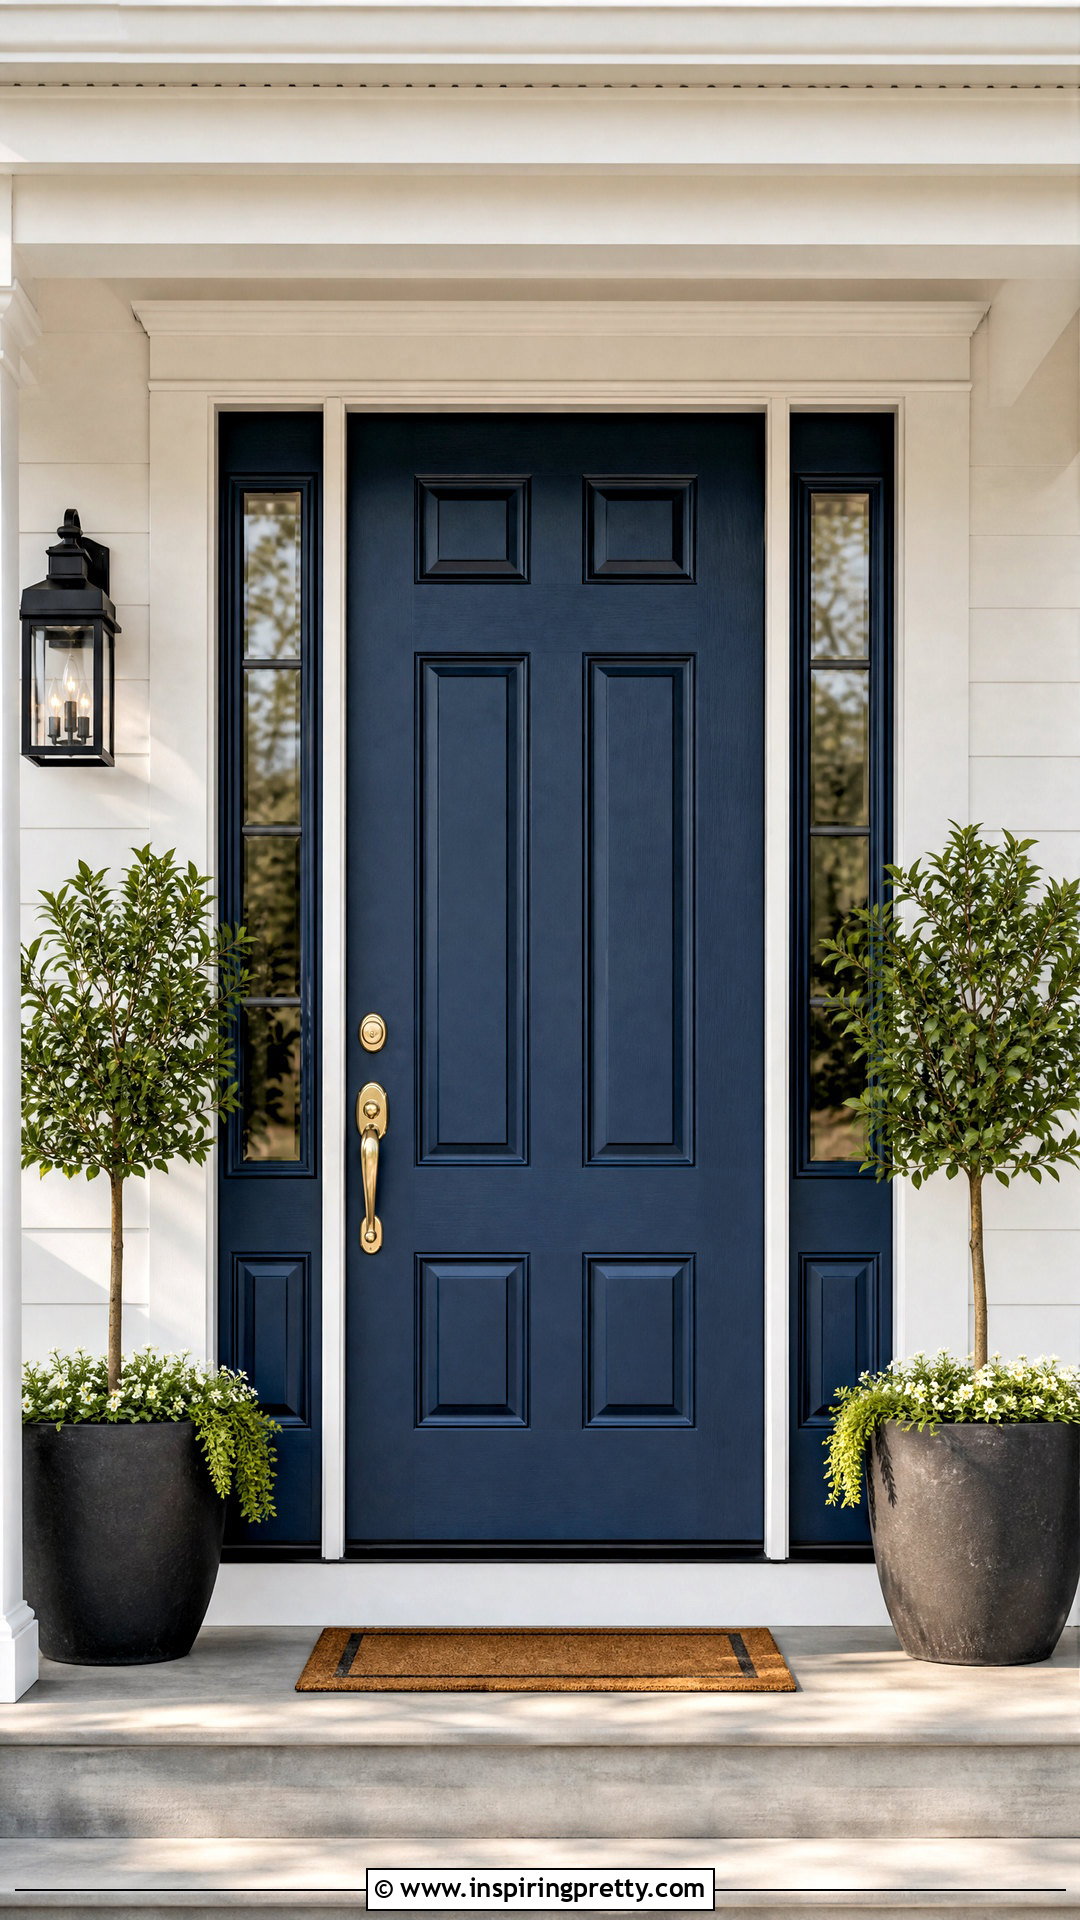
A painted front door can refresh your entrance without requiring a complete exterior makeover. Begin by choosing exterior-grade paint in a color that complements your siding, trim, and hardware. Remove or carefully cover the knob, lock, and knocker before cleaning and lightly sanding the surface. Apply a suitable primer if the existing finish is glossy, damaged, or dramatically different from your new color. Use an angled brush around panels and a small foam roller across flat areas for a smooth result. Allow each coat to dry fully before adding another. Once the paint cures, reinstall the hardware and add a simple doormat or planter. Avoid painting when rain, excessive humidity, or extreme temperatures could affect the finish.
2. DIY Floating Wood Shelves
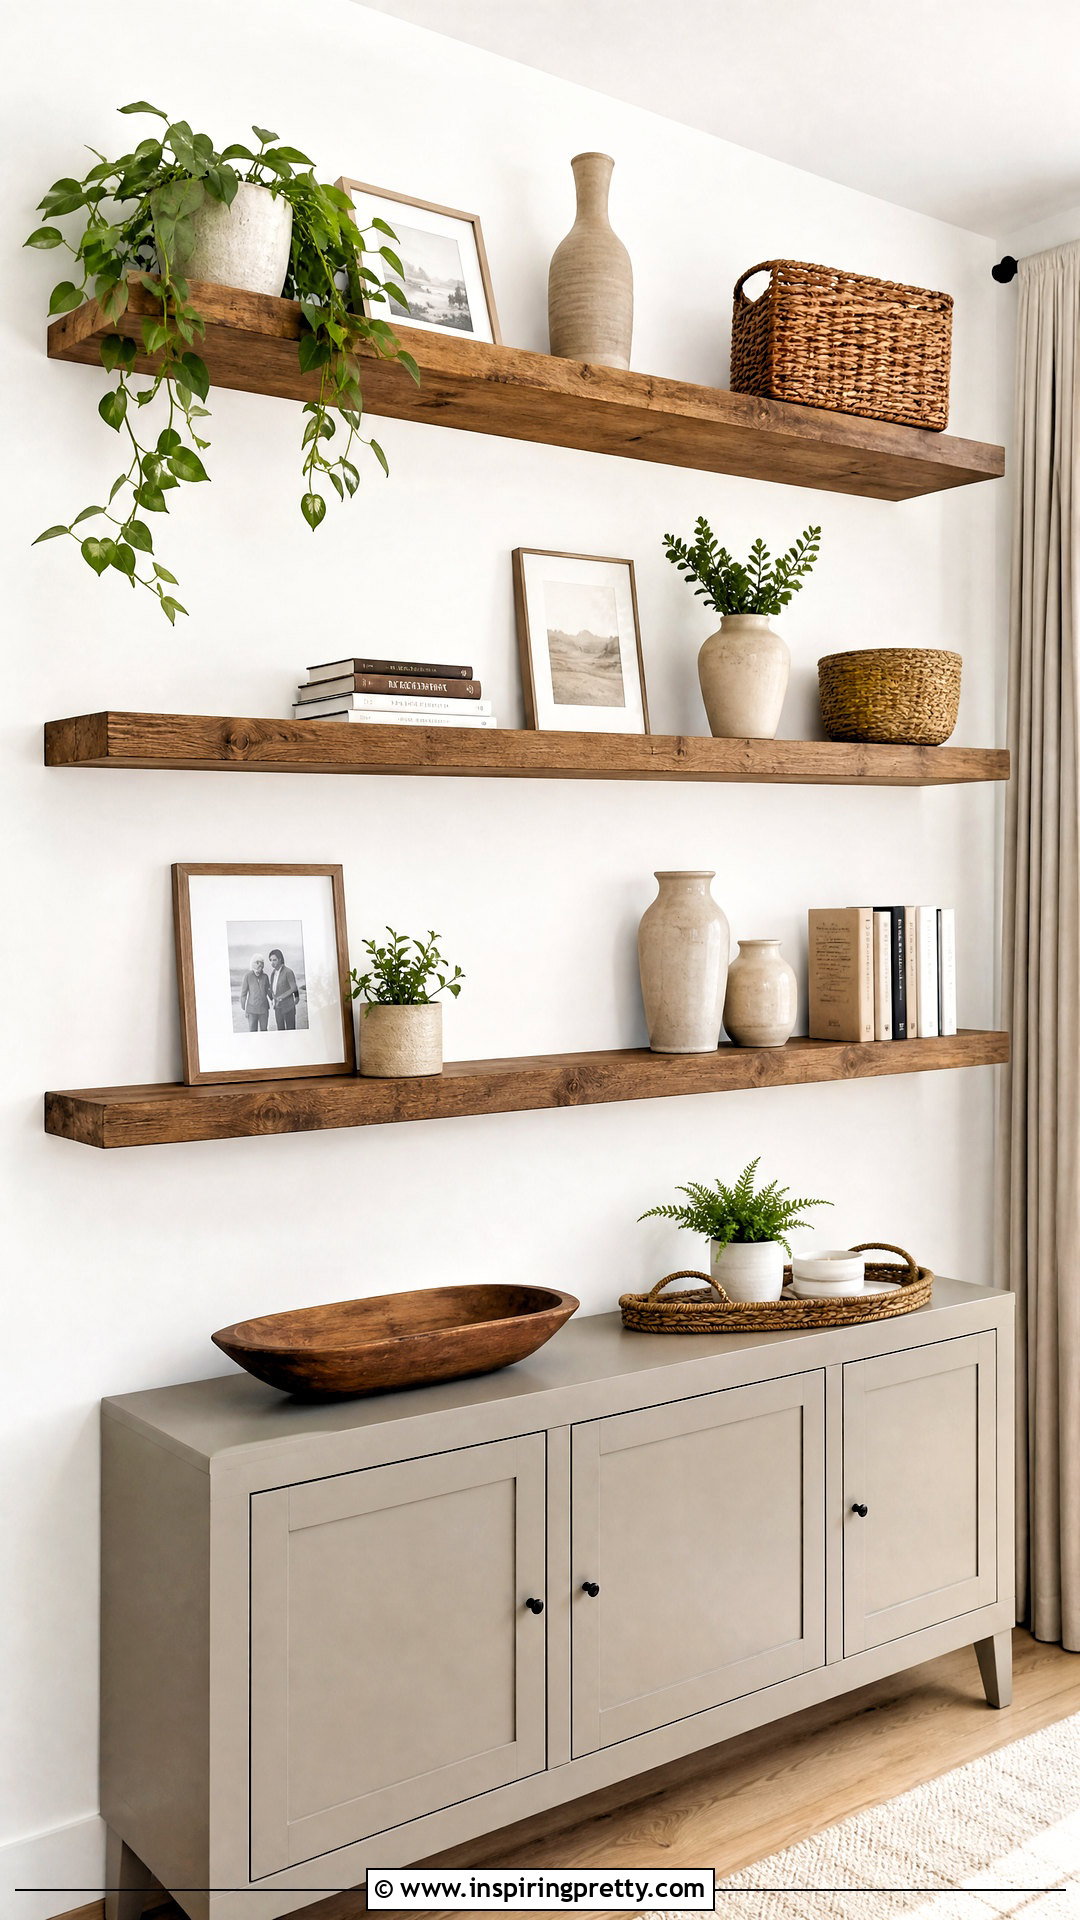
Floating shelves add storage while keeping a room feeling open and uncluttered. Select straight, dry boards and cut them to fit the available wall space. Sand every surface, soften sharp edges, and apply stain, paint, or a clear protective finish. Use a stud finder to locate secure mounting points, especially when the shelves will hold books, dishes, or heavy decor. Install brackets with a level so the finished shelves sit evenly. Arrange objects with a mix of practical storage and open space rather than covering every inch. Small baskets, framed photos, ceramics, and trailing plants work particularly well. Always check the bracket manufacturer’s weight rating and use wall anchors appropriate for your wall type when studs are unavailable.
3. DIY Textured Wall Art
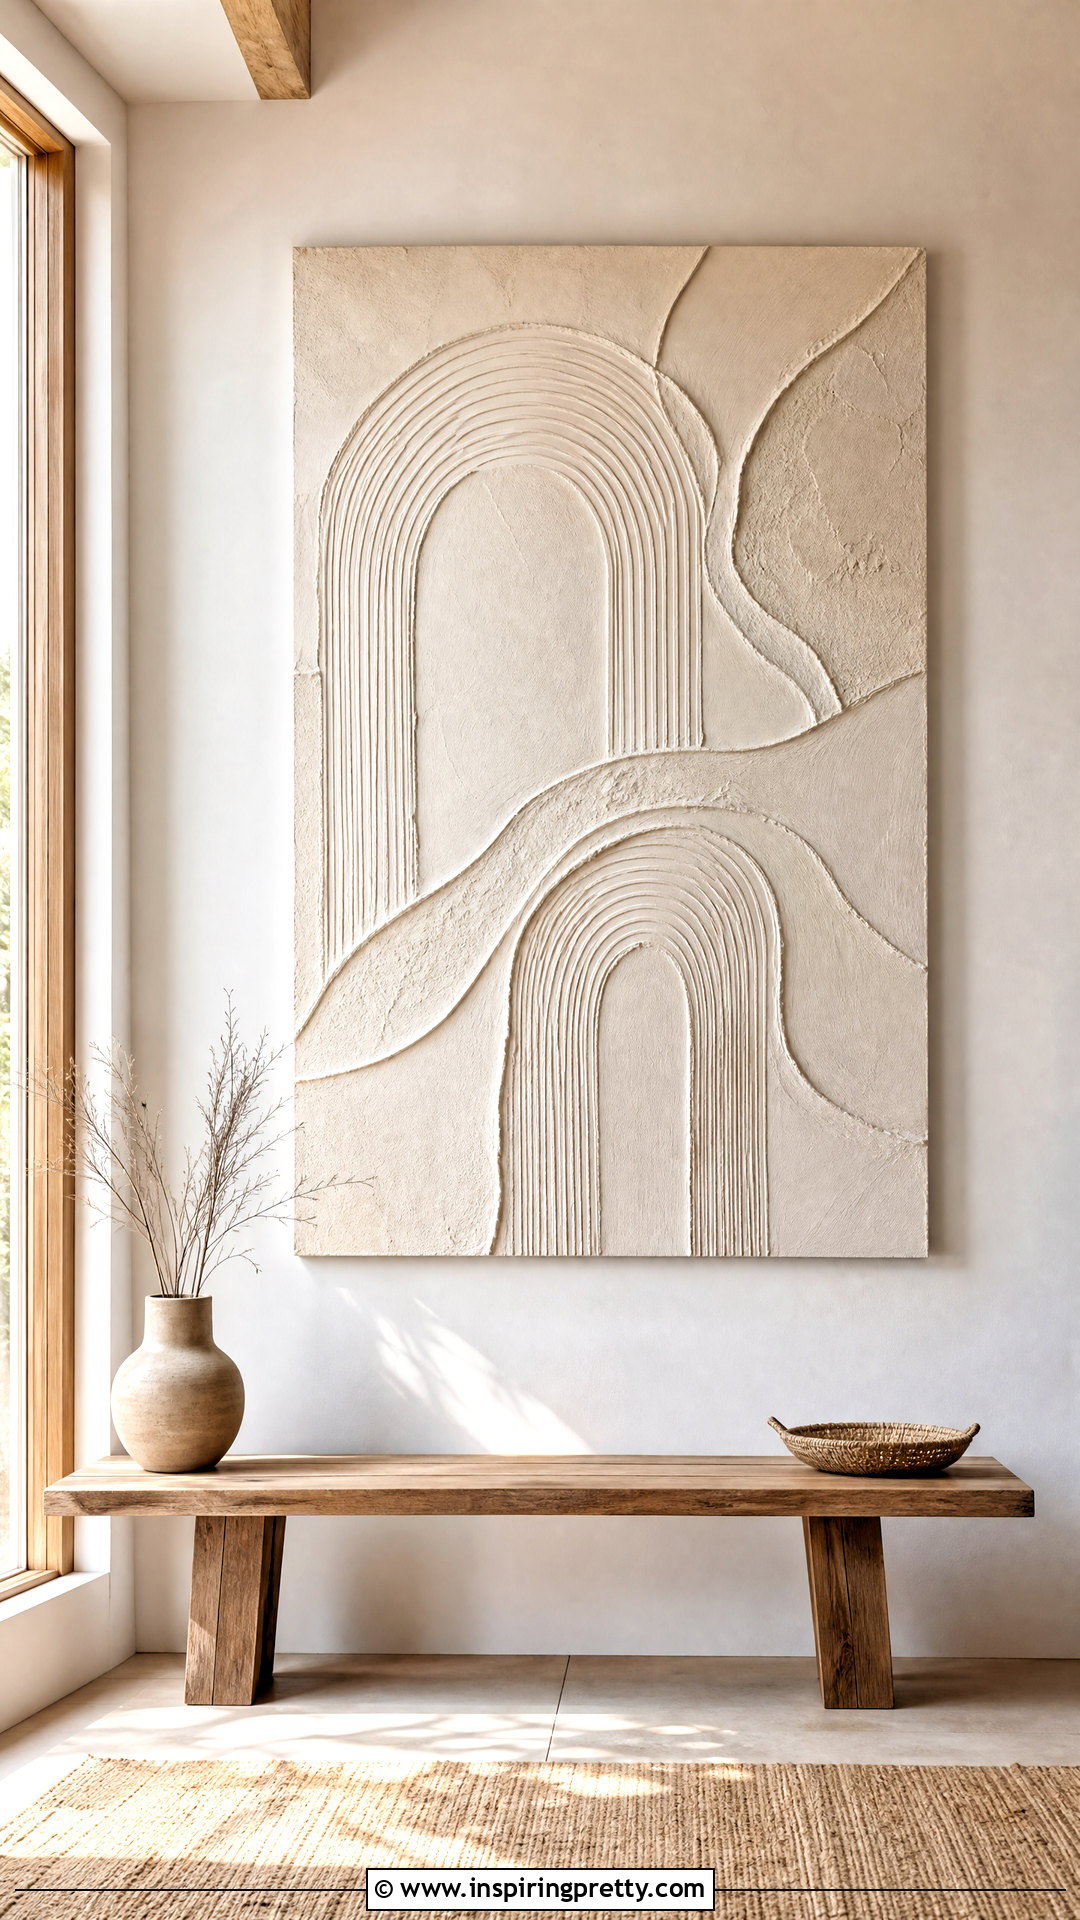
Textured wall art creates an expensive-looking focal point using simple art supplies. Start with a blank canvas, wood panel, or repurposed framed print. Apply modeling paste or lightweight joint compound with a putty knife, forming arches, waves, lines, or abstract raised shapes. Keep thicker areas reasonably shallow so the material dries evenly and remains attached. After the surface is completely dry, lightly sand rough spots and paint the entire piece in one neutral shade. You can also layer two related colors to emphasize the texture. Finish with a simple wood frame if you want a polished appearance. Work in a ventilated area, follow the compound’s instructions, and hang the completed piece with hardware rated for its final weight.
4. DIY Thrift Store Vase Makeover
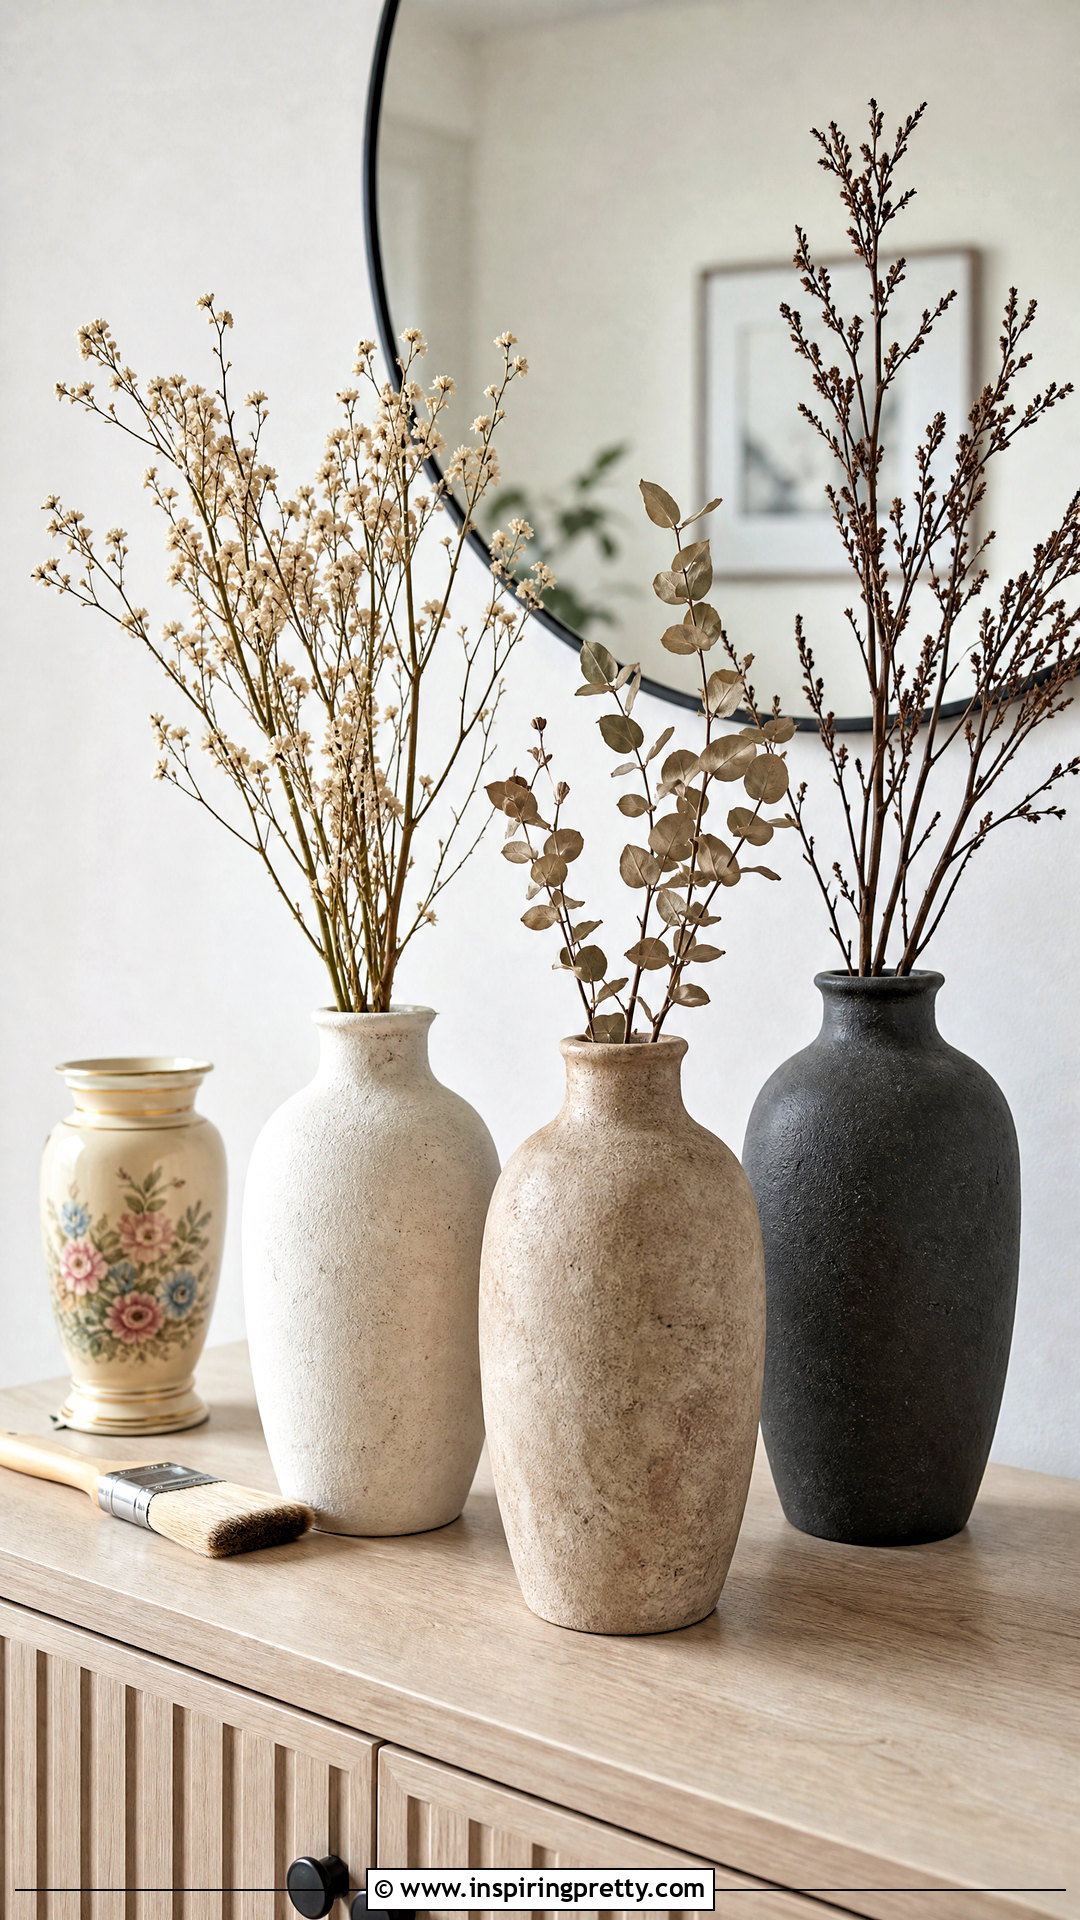
Turn an outdated thrift-store vase into modern decor with paint and subtle texture. Look for a sturdy ceramic, glass, or metal vessel with an appealing shape, even if its color feels dated. Wash it thoroughly, remove residue, and lightly scuff glossy surfaces when recommended for your chosen primer. Apply a bonding primer followed by several thin coats of matte paint. For a stone-like effect, mix a small amount of baking soda into water-based paint and dab it on with a brush. Let every layer dry before handling the vase. Style the finished piece with dried branches or artificial stems. If the paint is not waterproof, place a smaller watertight container inside before displaying fresh flowers and water.
5. DIY Gallery Wall
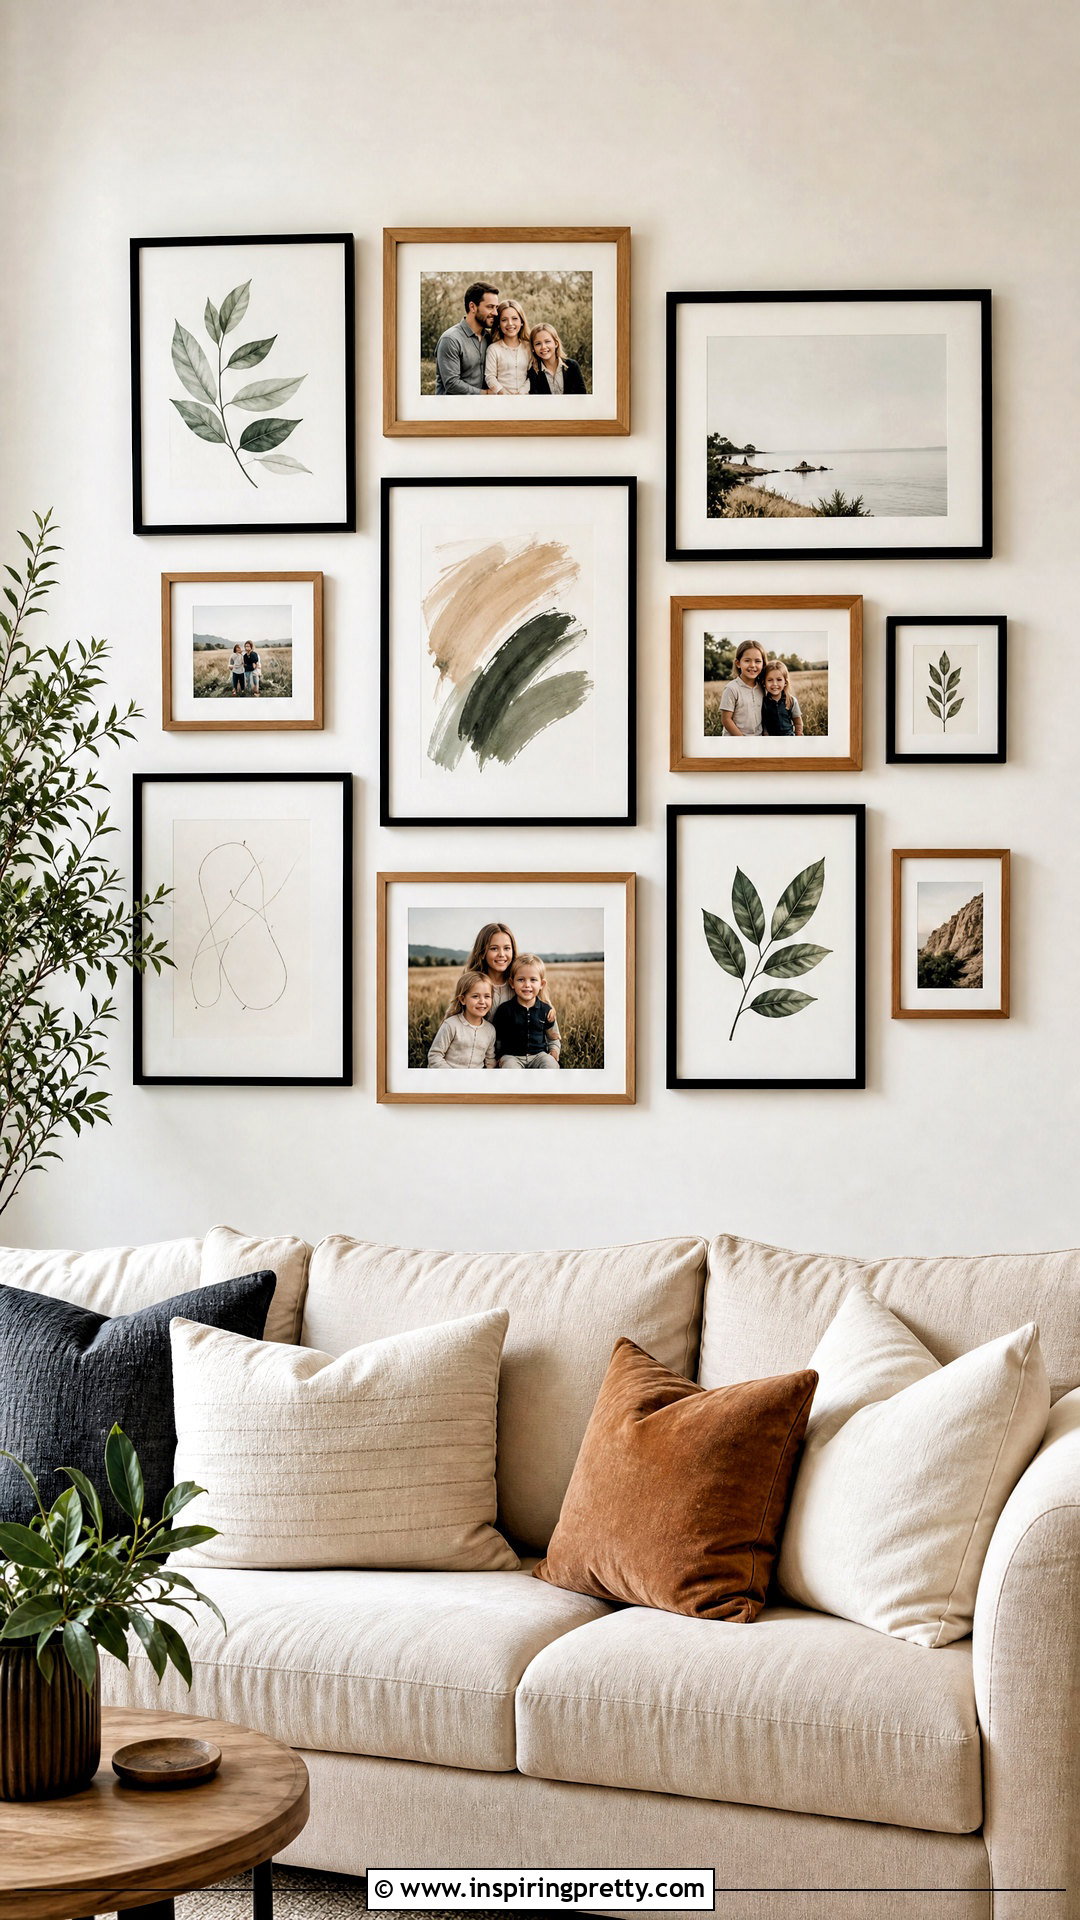
A DIY gallery wall makes personal photographs, prints, and keepsakes feel intentional. First, choose a unifying detail such as matching frames, a limited color palette, or consistent matting. Trace each frame onto scrap paper, cut out the shapes, and tape them to the wall. This allows you to test spacing without making unnecessary holes. Keep gaps fairly consistent and position the visual center near eye level. Once the arrangement feels balanced, mark the hanging points and install suitable hooks or anchors. Mix horizontal and vertical pieces for movement, but avoid using so many sizes that the display becomes chaotic. Family photos, printable artwork, postcards, pressed botanicals, and children’s drawings can all become part of a meaningful finished collection.
6. DIY Rope Storage Basket
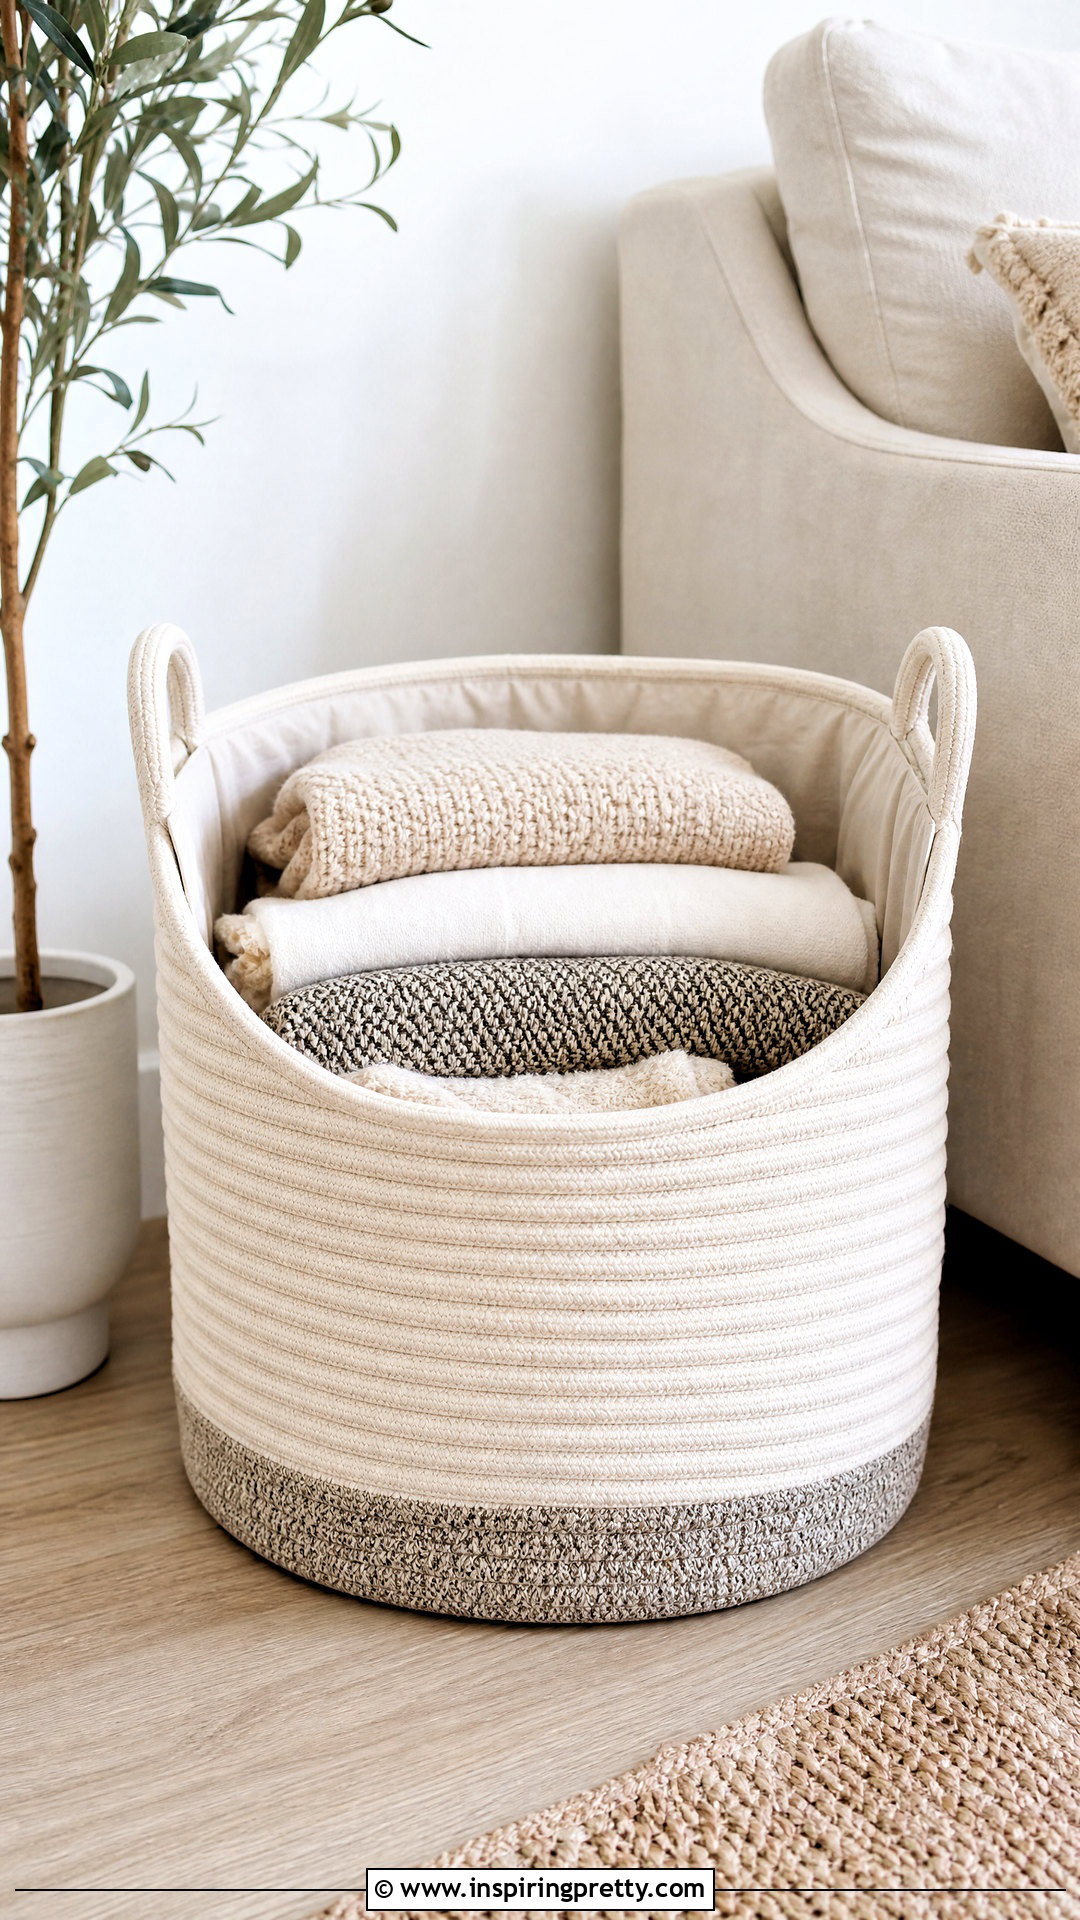
A rope basket is useful for storing blankets, toys, craft supplies, or laundry. Use thick cotton rope for a soft finish or natural jute for a rustic look. Begin by coiling the rope tightly into a flat circle, securing each new row with strong adhesive or stitching. Continue building outward until the base reaches your preferred size. Then angle the rope upward and stack the coils to create the sides. Add looped rope handles near the top, reinforcing them carefully so they can support light contents. A fabric liner can hide the interior seams and create a neater appearance. If using hot glue, protect your fingers and work slowly. This basket is best for lightweight storage unless the construction is professionally sewn.
7. DIY Peel And Stick Backsplash
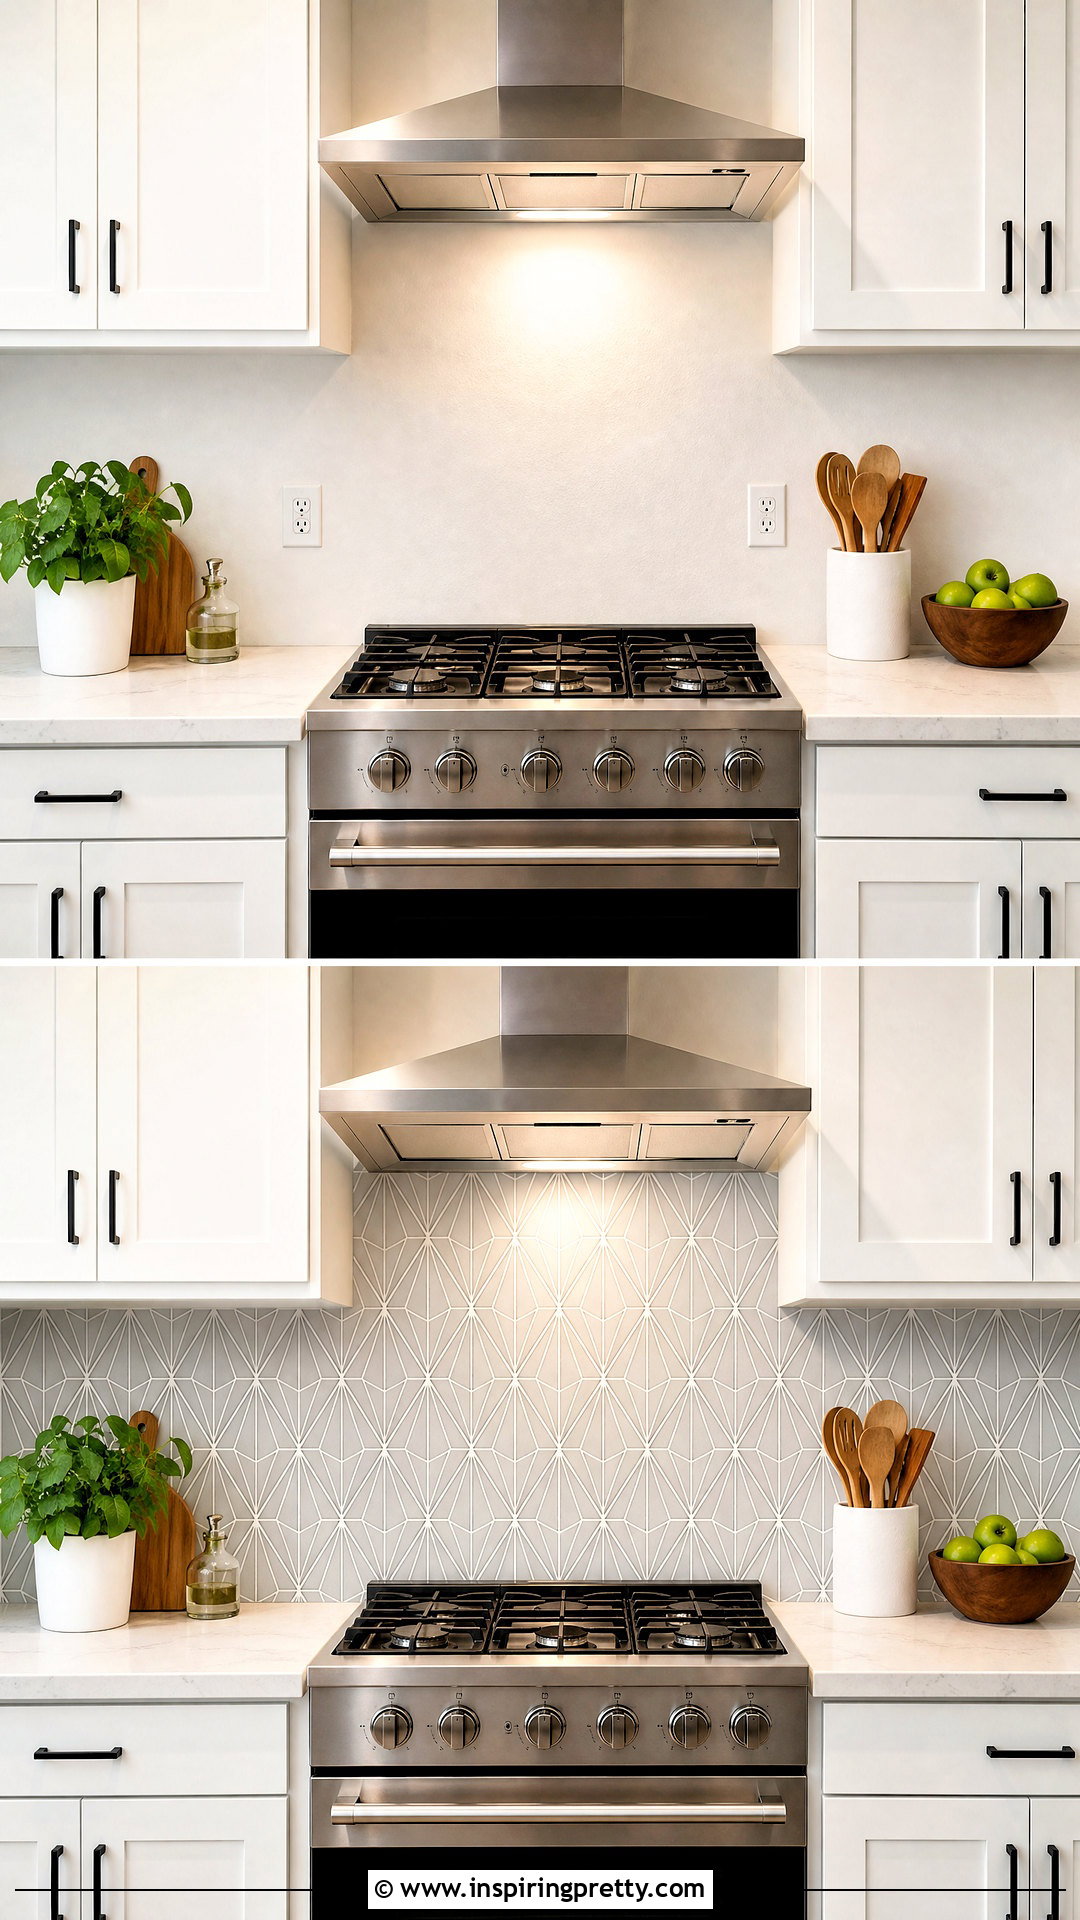
Peel-and-stick tile can give a kitchen, laundry area, or bathroom wall a fast decorative update. Measure the surface carefully and order enough material to account for cuts and pattern matching. Clean away dust, grease, and soap residue, then allow the wall to dry fully. Establish a straight starting line with a level rather than relying on a countertop that may be uneven. Apply each section gradually, smoothing from the center toward the edges to reduce trapped air. Use a sharp utility knife and cutting mat for clean edges around outlets and corners. Choose a product approved for the intended location, particularly near water or heat. Keep spare tiles so damaged sections can be replaced later if necessary.
8. DIY Painted Plant Pots
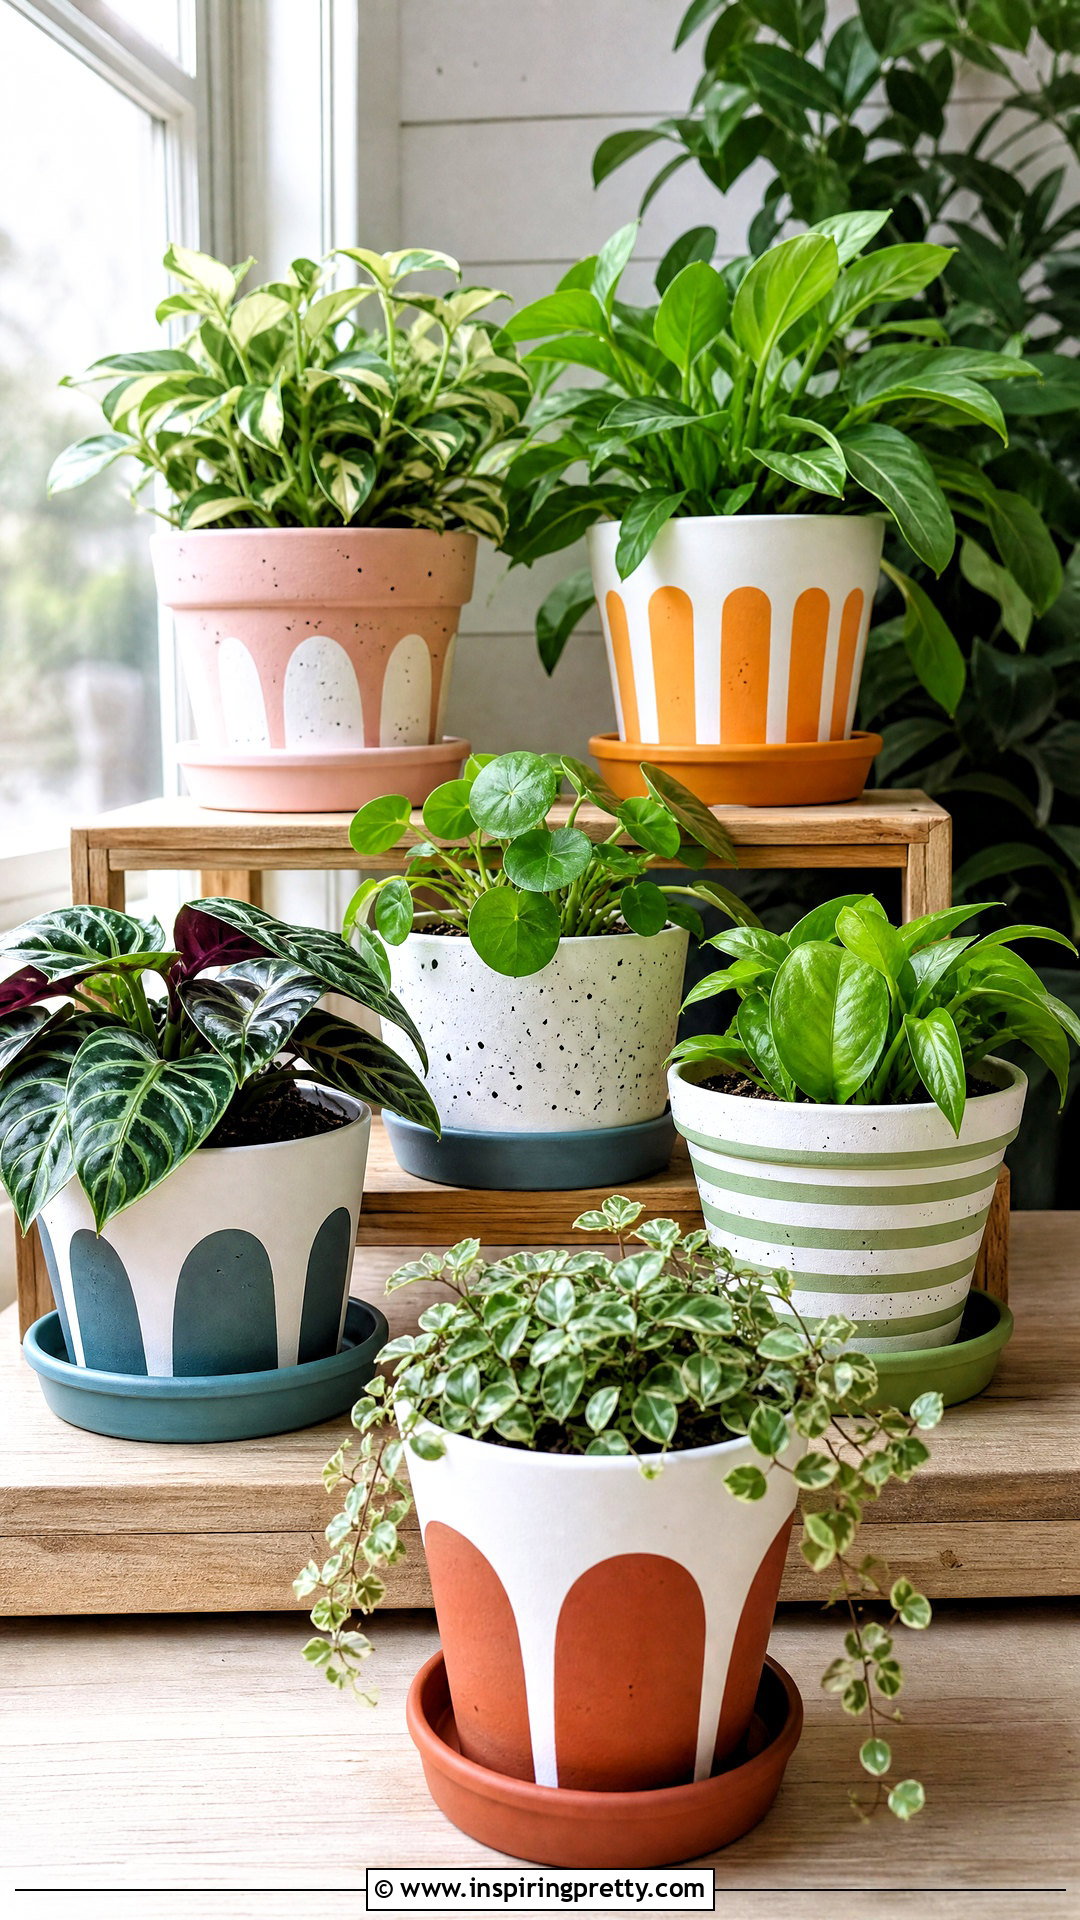
Painted plant pots offer an easy way to coordinate greenery with your room or patio. Terracotta pots are especially beginner-friendly because their simple surface accepts many decorative treatments. Clean used pots and let them dry completely before applying paint. Create stripes with painter’s tape, add hand-painted arches, or use a sponge for a speckled stone effect. Paint only the exterior unless the product is specifically considered safe for interior contact with soil and plants. Preserve the drainage hole and place a saucer underneath. An appropriate clear sealer can improve durability outdoors, although it may need periodic reapplication. Group finished pots in different sizes while repeating two or three colors to create a cohesive display rather than a mismatched collection.
9. DIY Upholstered Headboard
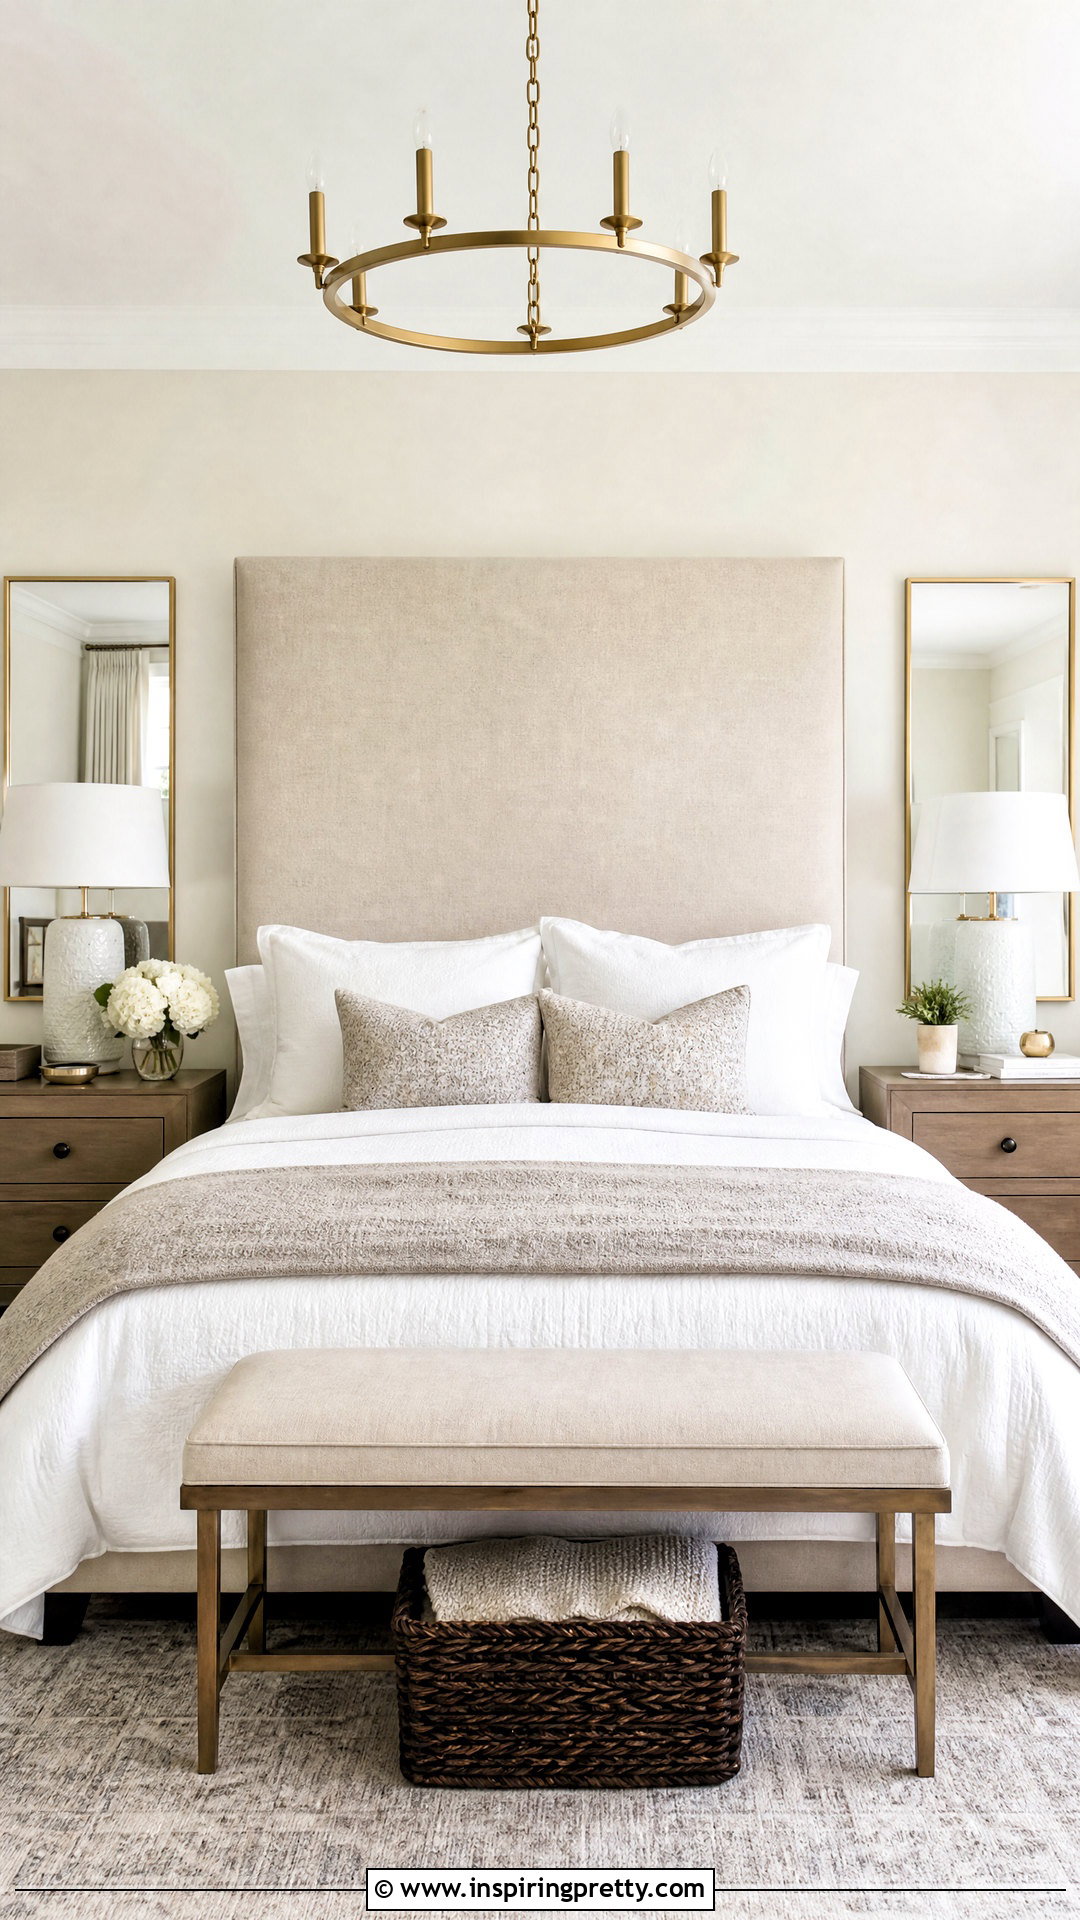
An upholstered headboard can soften a bedroom and introduce color, pattern, or texture. Cut a sturdy plywood panel to the desired width and height, or ask a home-improvement store to make the cut. Layer upholstery foam and batting over the front, pulling the batting smoothly around the edges before stapling it to the back. Repeat the process with durable fabric, keeping the grain or pattern straight. Fold corners neatly and trim excessive material without weakening the staples. Mount the headboard securely to the wall or attach it to the bed frame using appropriate hardware. Performance fabric is practical for easy cleaning, while linen-look fabric creates a relaxed finish. Confirm that the completed headboard cannot shift, tip, or interfere with electrical outlets.


10. DIY No Sew Pillow Covers
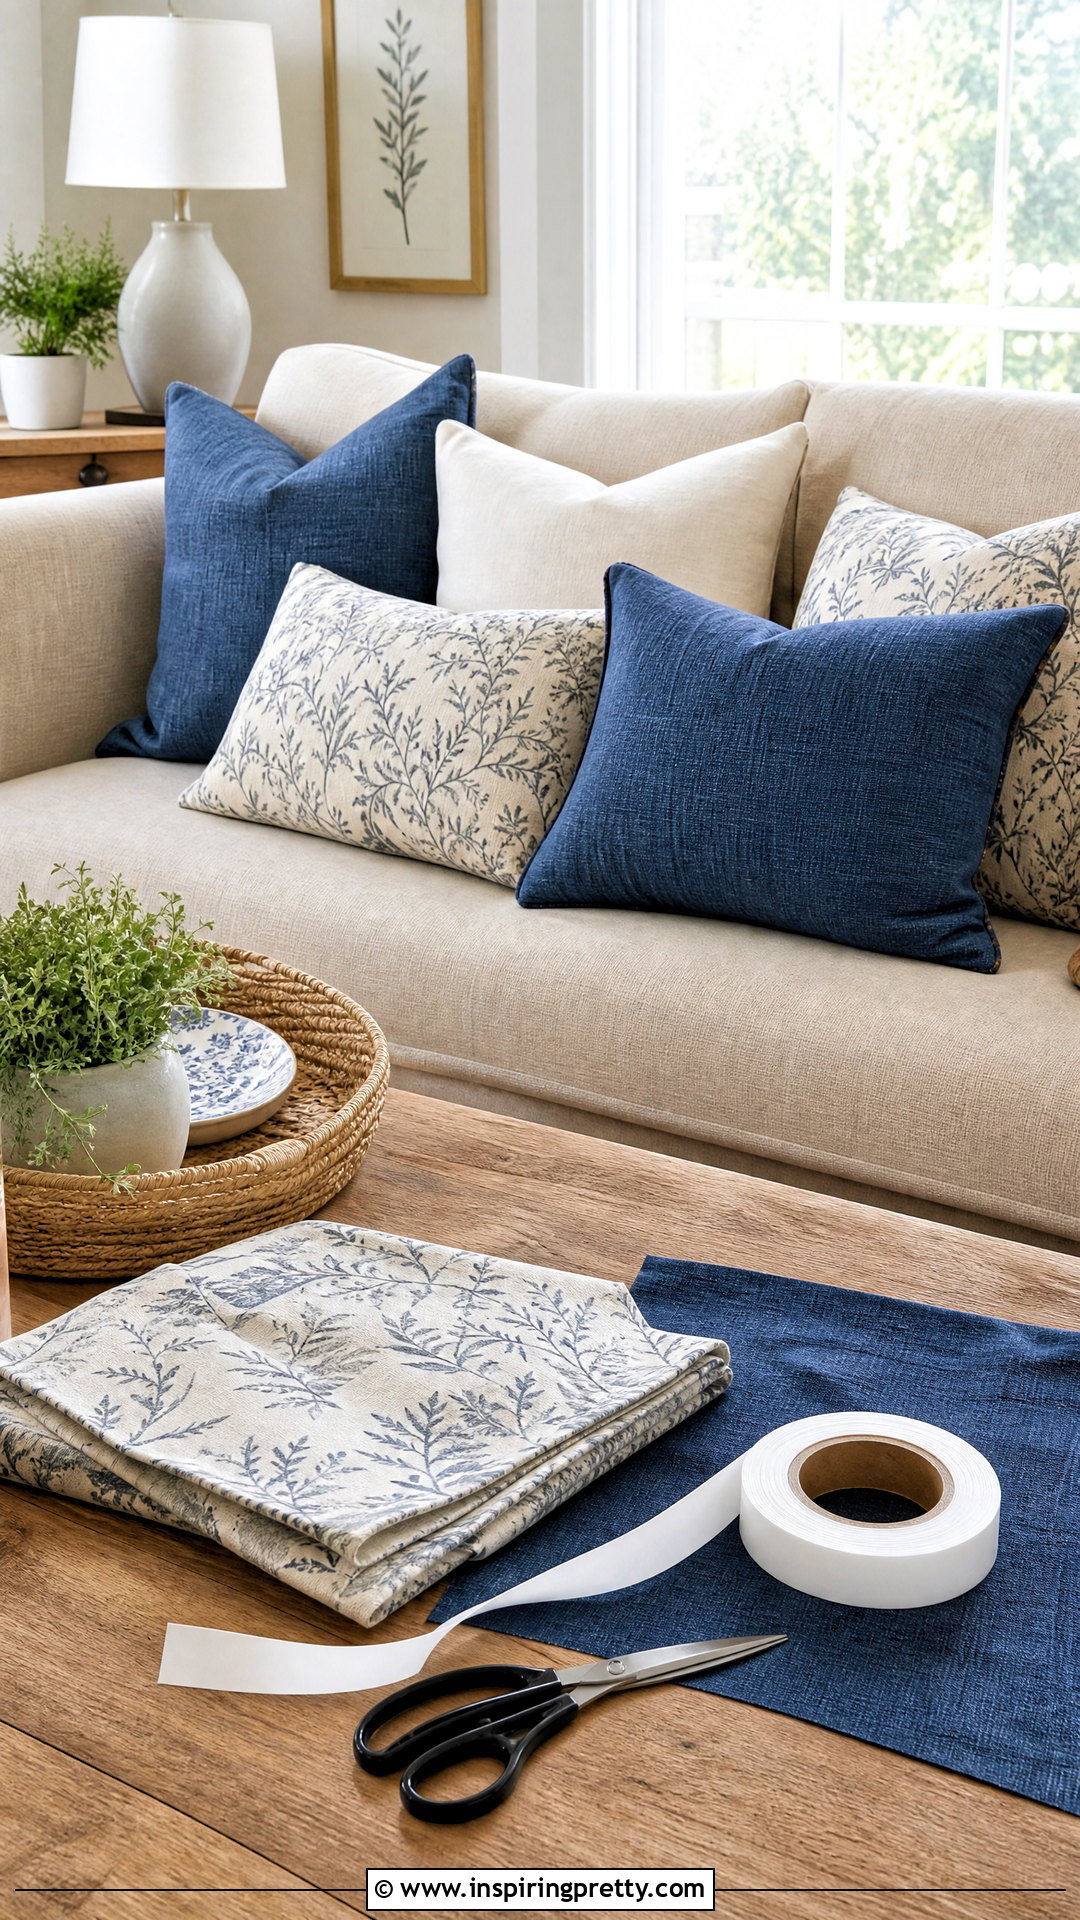
No-sew pillow covers provide a quick way to update a sofa or bed without using a sewing machine. Select fabric that is large enough to wrap around the insert with generous overlapping edges. Iron the material first so measurements and folds remain accurate. For a simple envelope design, use permanent fabric adhesive or iron-on bonding tape along the side seams. Leave overlapping panels at the back so the pillow insert can be removed. Follow the bonding product’s temperature, drying, and washing instructions carefully. Medium-weight cotton, canvas, and home-decor fabric usually hold their shape better than very thin material. Add fabric paint, stencils, or tassels if desired. Test decorative products on a scrap before applying them to the finished cover.
11. DIY Coffee Table Makeover
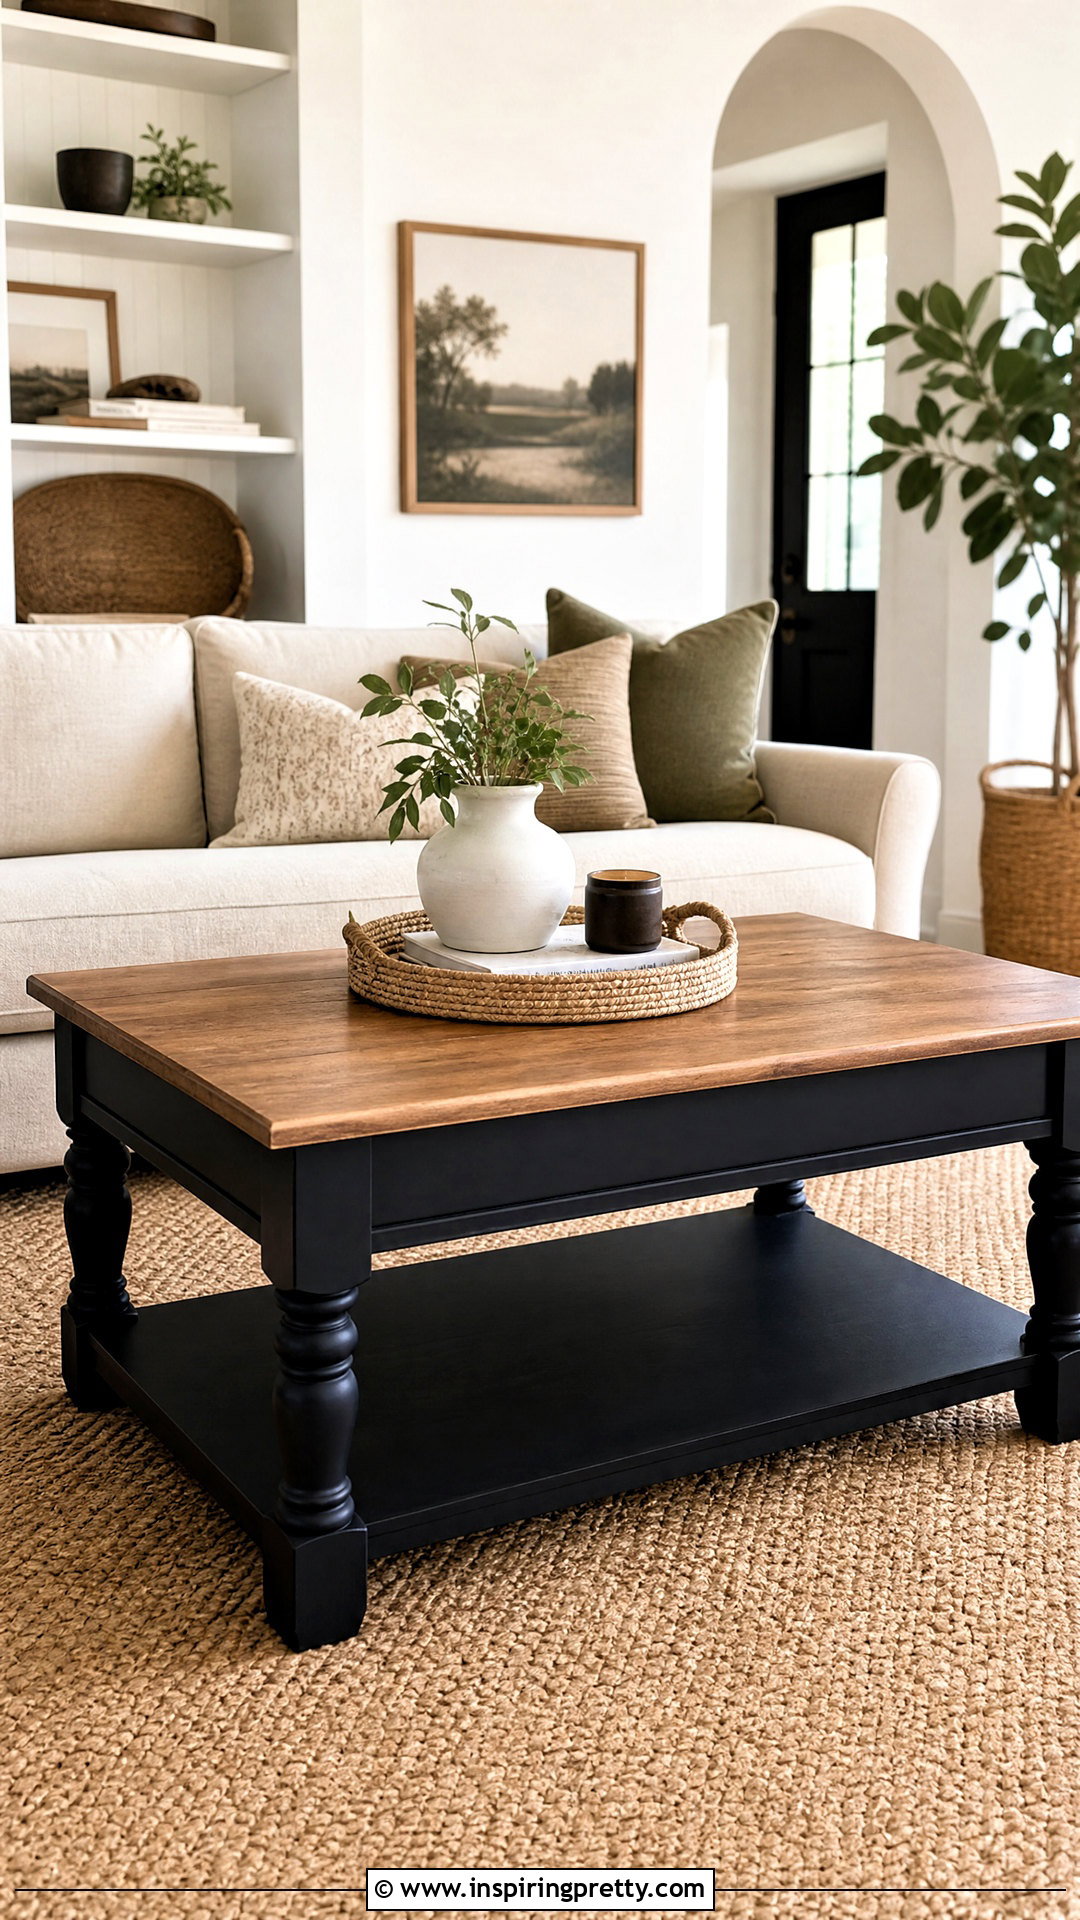
A worn coffee table can become a stylish centerpiece with cleaning, repair, and a new finish. Tighten loose hardware and fill obvious dents before sanding the surface in the direction of the wood grain. If the table has veneer, sand gently to avoid cutting through the thin top layer. Remove all dust and apply furniture paint, stain, or clear finish according to the product directions. Several thin coats generally look smoother than one heavy coat. You can paint the base and stain the top for subtle contrast. Allow the finish to cure before placing decor, drinks, or books on the table. Complete the makeover with a tray that gathers small items while leaving enough open space for the table to remain functional.
12. DIY Entryway Coat Rack
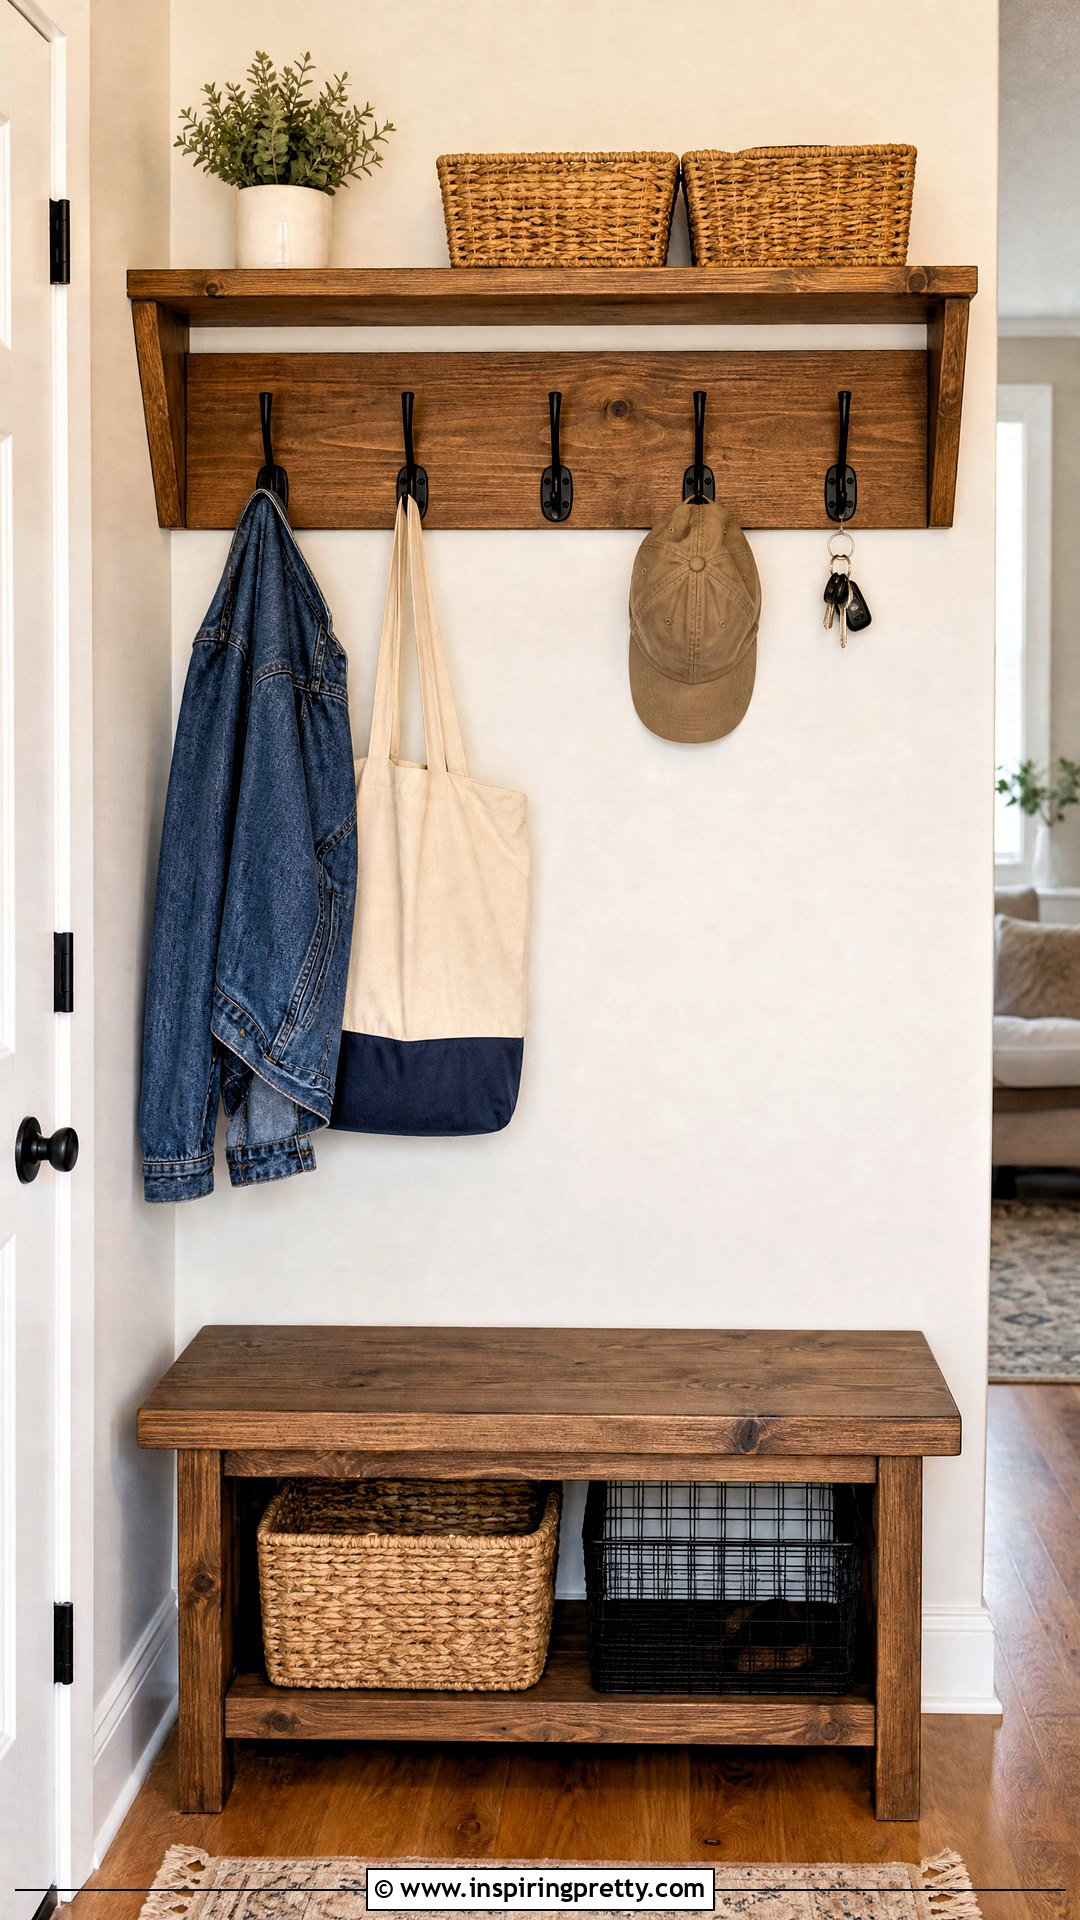
A wall-mounted coat rack helps control bags, jackets, hats, and keys near the entrance. Start with a solid wood board sized to your available wall. Sand it smooth, then stain or paint it to coordinate with the room. Position durable hooks at equal intervals and mark their screw holes before drilling pilot holes. Hooks at different heights can make the rack easier for children and adults to use. Mount the board directly into studs whenever possible, or choose anchors designed for the wall material and expected weight. Add a narrow shelf above the hooks if you need space for mail or small baskets. Keep the design shallow enough that it does not obstruct doors or walkways, particularly in a narrow hall or apartment entry.
13. DIY Mason Jar Organizers
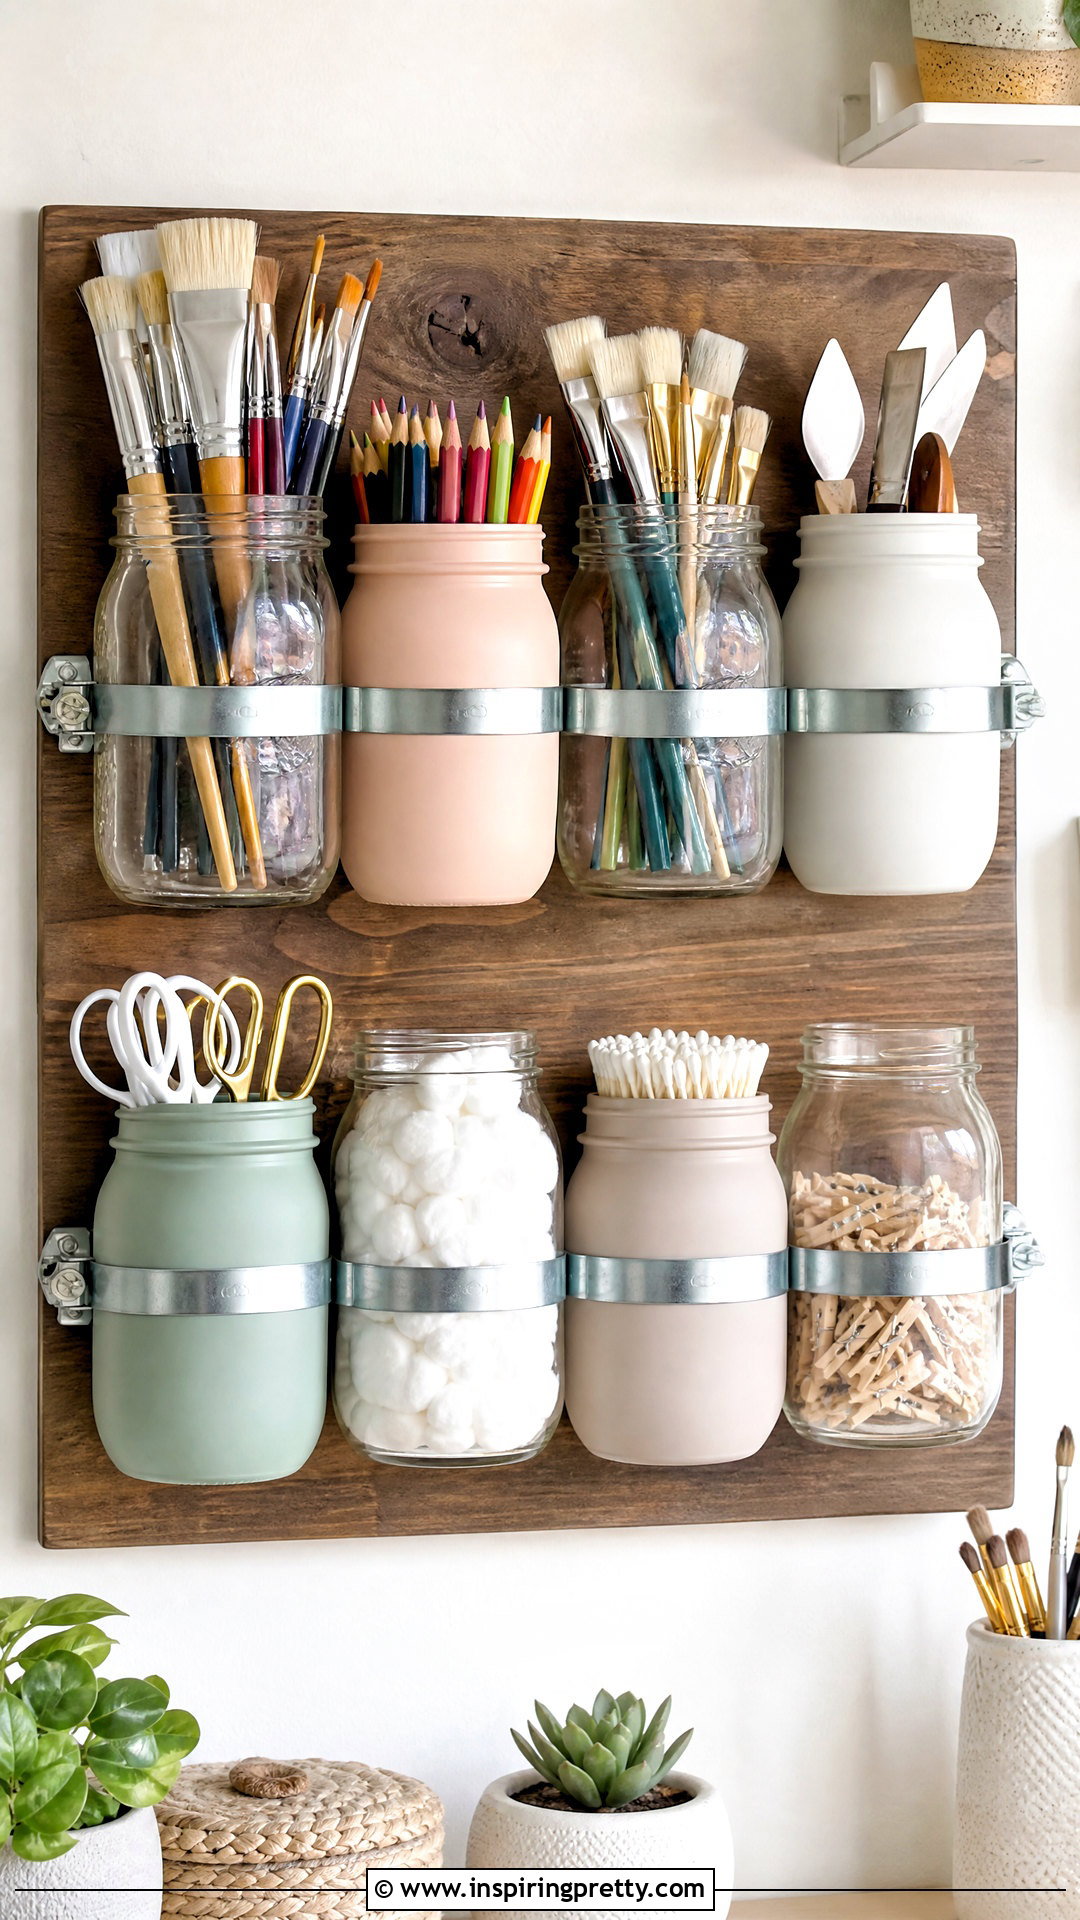
Mason jars can organize small supplies while keeping frequently used items visible. Clean the jars thoroughly and remove any lingering labels or adhesive. Leave the glass clear for a simple look, or paint the exterior with suitable craft paint. Add labels using vinyl letters, chalkboard tags, or waterproof markers. Use the finished jars for paintbrushes, cotton swabs, pencils, sewing notions, or kitchen tools. For wall storage, secure metal clamps to a finished wood board and tighten them around the jars. Mount the board with hardware appropriate for the combined weight. Avoid hanging glass containers in locations where they could be knocked loose. Smooth any sharp lid components, and replace chipped or cracked jars rather than repurposing them.
14. DIY Fluted Side Table
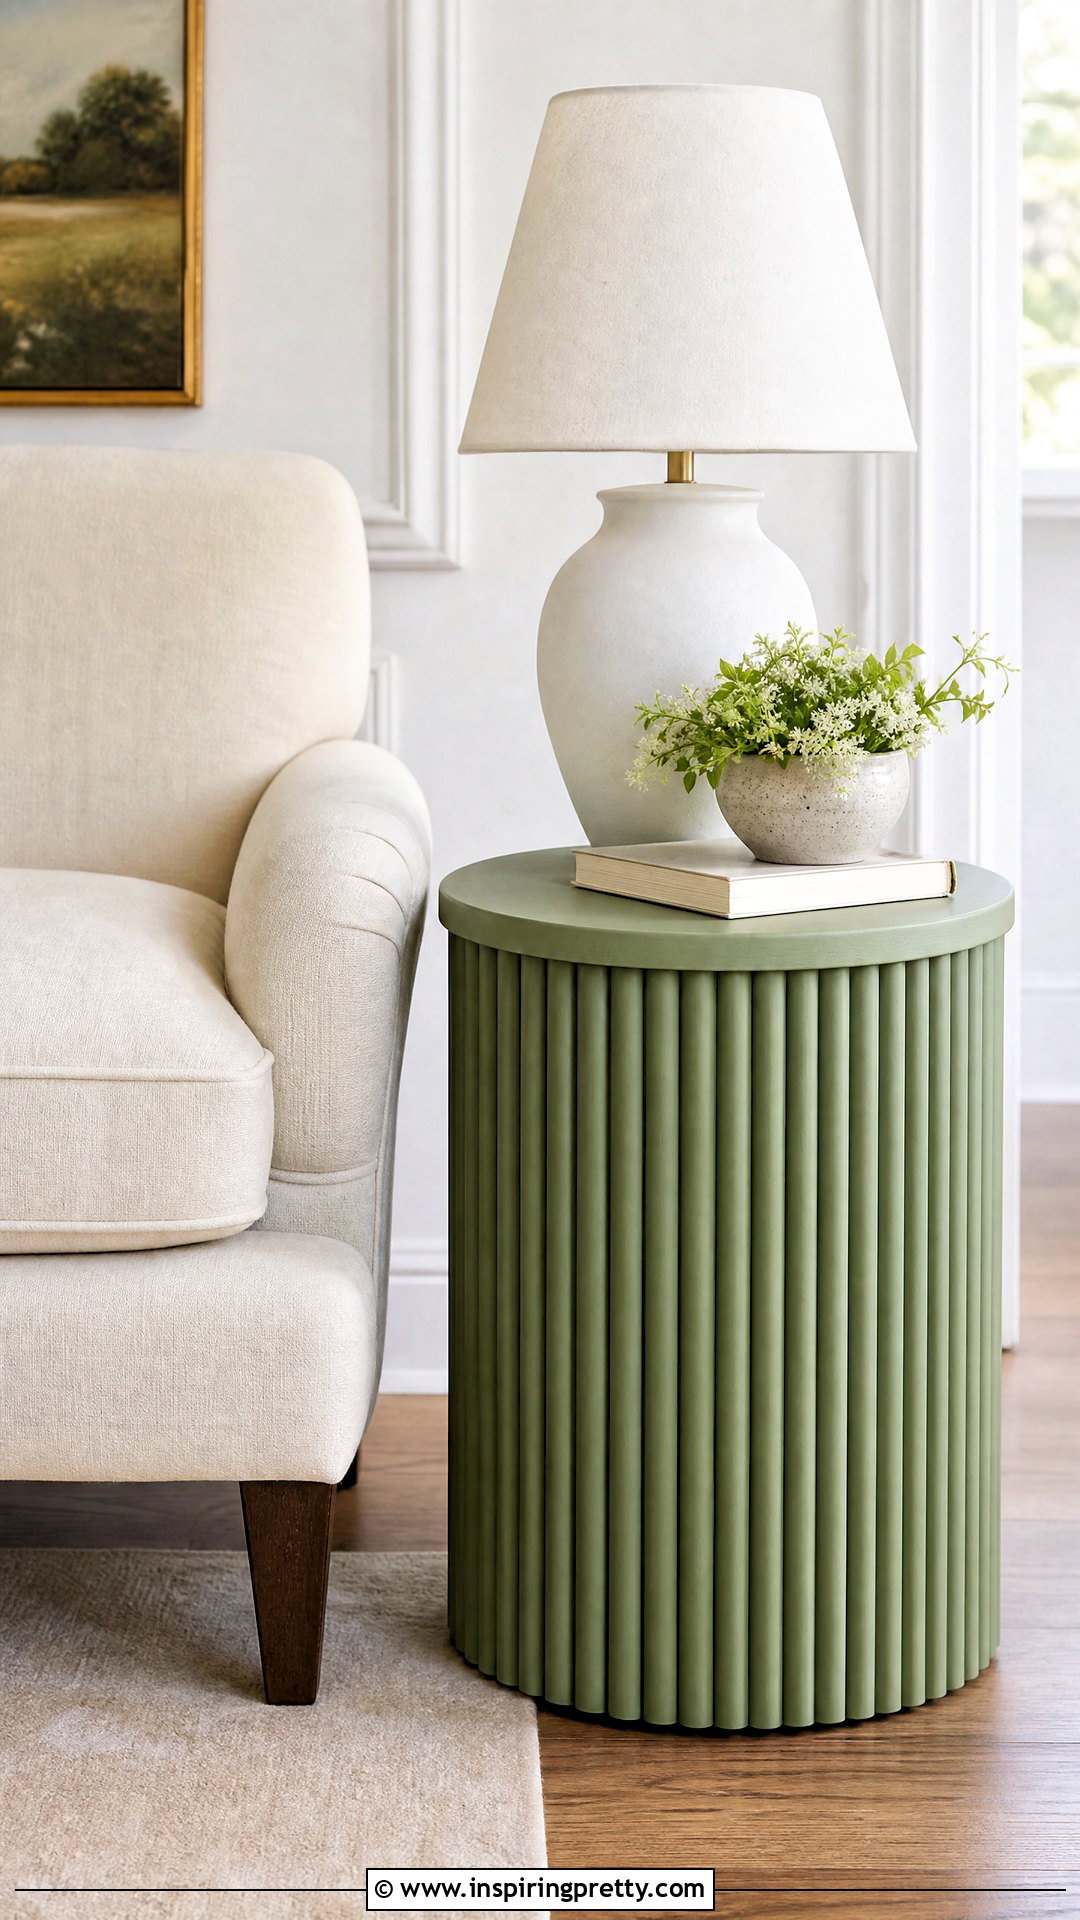
A fluted side table delivers sculptural texture using a basic round table, half-round molding, or evenly spaced wood dowels. Measure the table base and calculate how many vertical pieces you will need. Cut each piece to the same length, sand the ends, and attach them around the base with suitable wood adhesive. Maintain consistent spacing as you work. Fill visible gaps if necessary, then prime and paint the base and tabletop in one color for a seamless appearance. A satin finish is practical because it is easier to wipe clean than a completely flat surface. Allow the adhesive and paint to cure before using the table. Keep the top visually balanced with one lamp, a small book stack, or a compact decorative object.




15. DIY Pressed Flower Frames
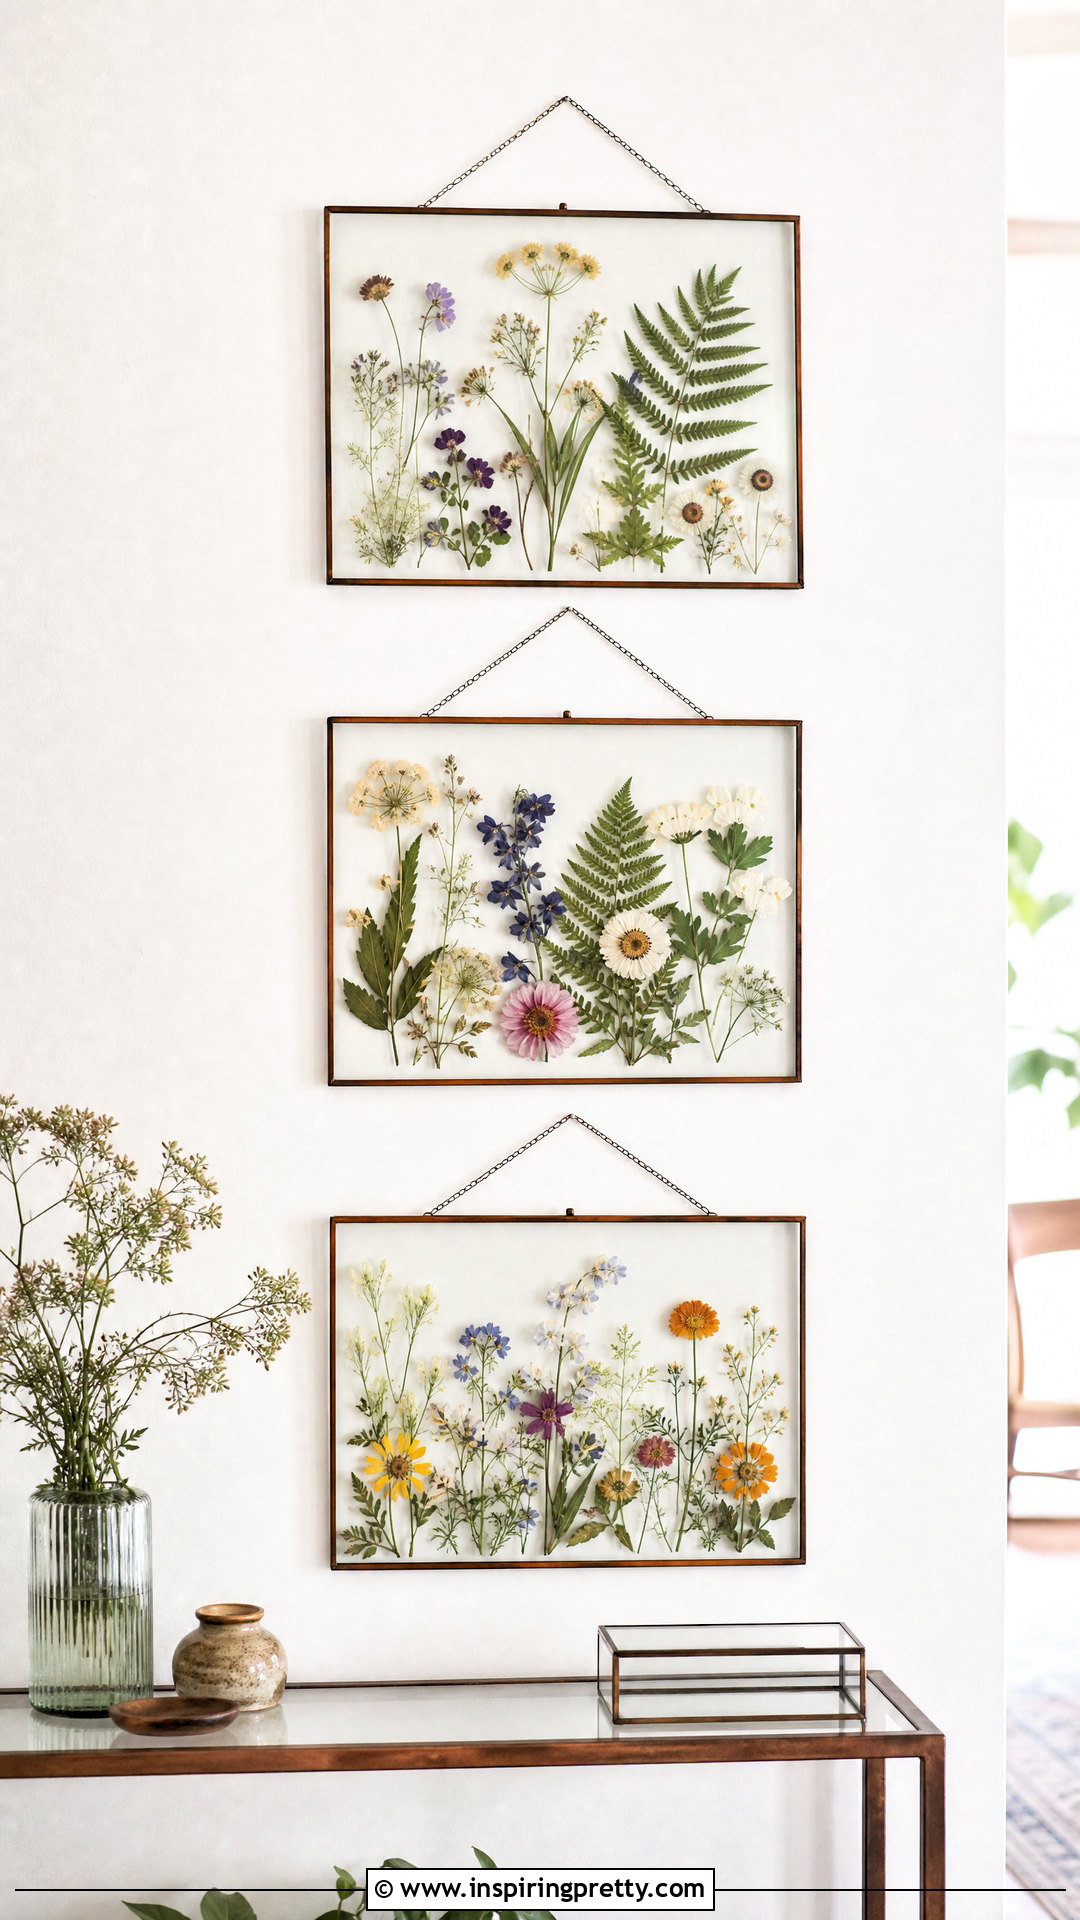
Pressed flower frames preserve the colors and shapes of leaves, petals, and small blossoms. Gather dry, undamaged botanicals and place them between absorbent sheets inside a heavy book or flower press. Leave enough time for moisture to disappear before framing. Arrange the flattened pieces on archival paper, clear glass, or a neutral backing. Use tiny amounts of acid-free adhesive only where needed. Floating glass frames create a delicate effect, while traditional frames provide more protection from movement. Display the artwork away from strong direct sunlight, which can cause natural colors to fade. Label the back with the plant name, location, and date for a personal detail. Never collect protected species or remove flowers from private property without permission.
16. DIY Fabric Bulletin Board
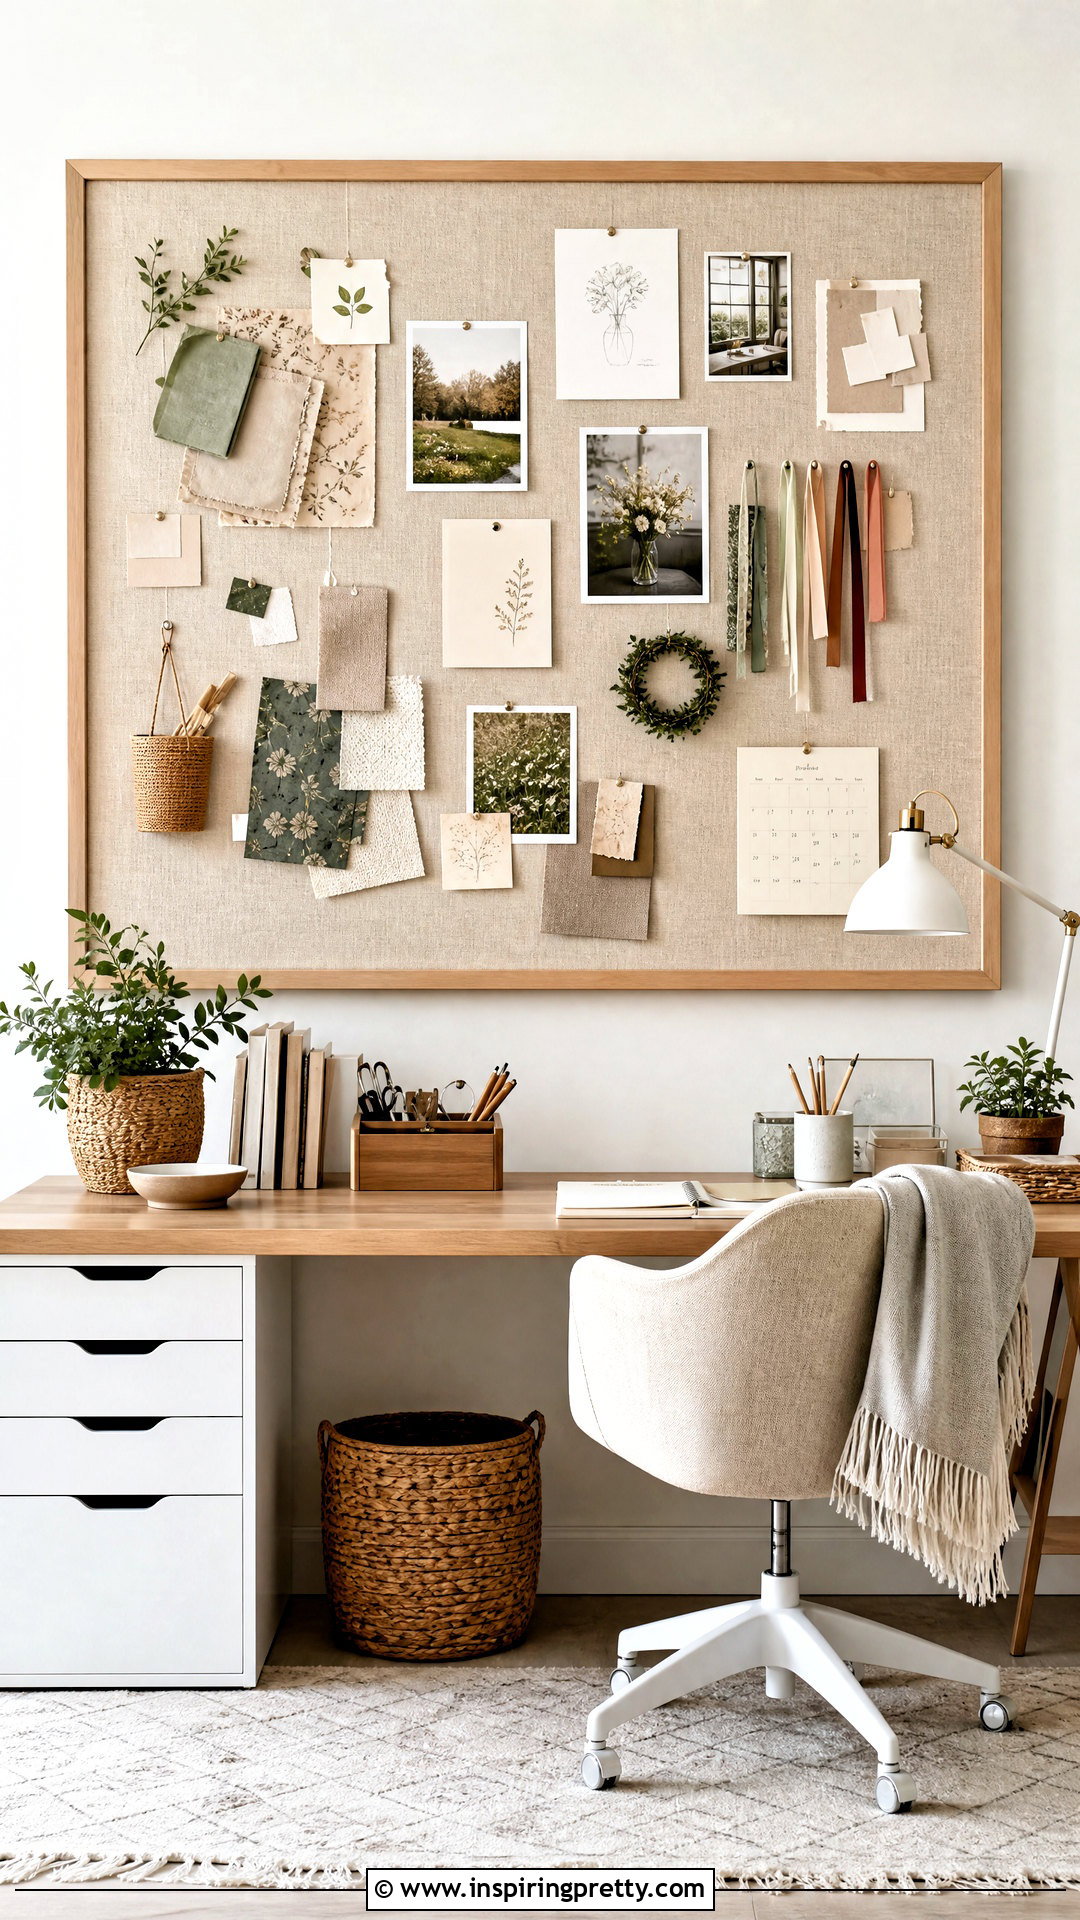
A fabric bulletin board combines useful organization with soft color and pattern. Begin with a corkboard, foam insulation panel, or sturdy backing material cut to fit your workspace. Lay batting over the front for slight padding, followed by a piece of durable fabric. Pull the material firmly but evenly around the edges and staple it to the back. Check the front frequently to prevent wrinkles or distorted patterns. Cover raw edges with ribbon, wood trim, or a simple frame. You can add crossing ribbons to hold photographs and notes without pins. Mount the board securely above a desk, command center, or craft table. Choose fabric that complements the surrounding room so the organizer looks like intentional wall decor rather than temporary office equipment.
17. DIY Candle Holder Set
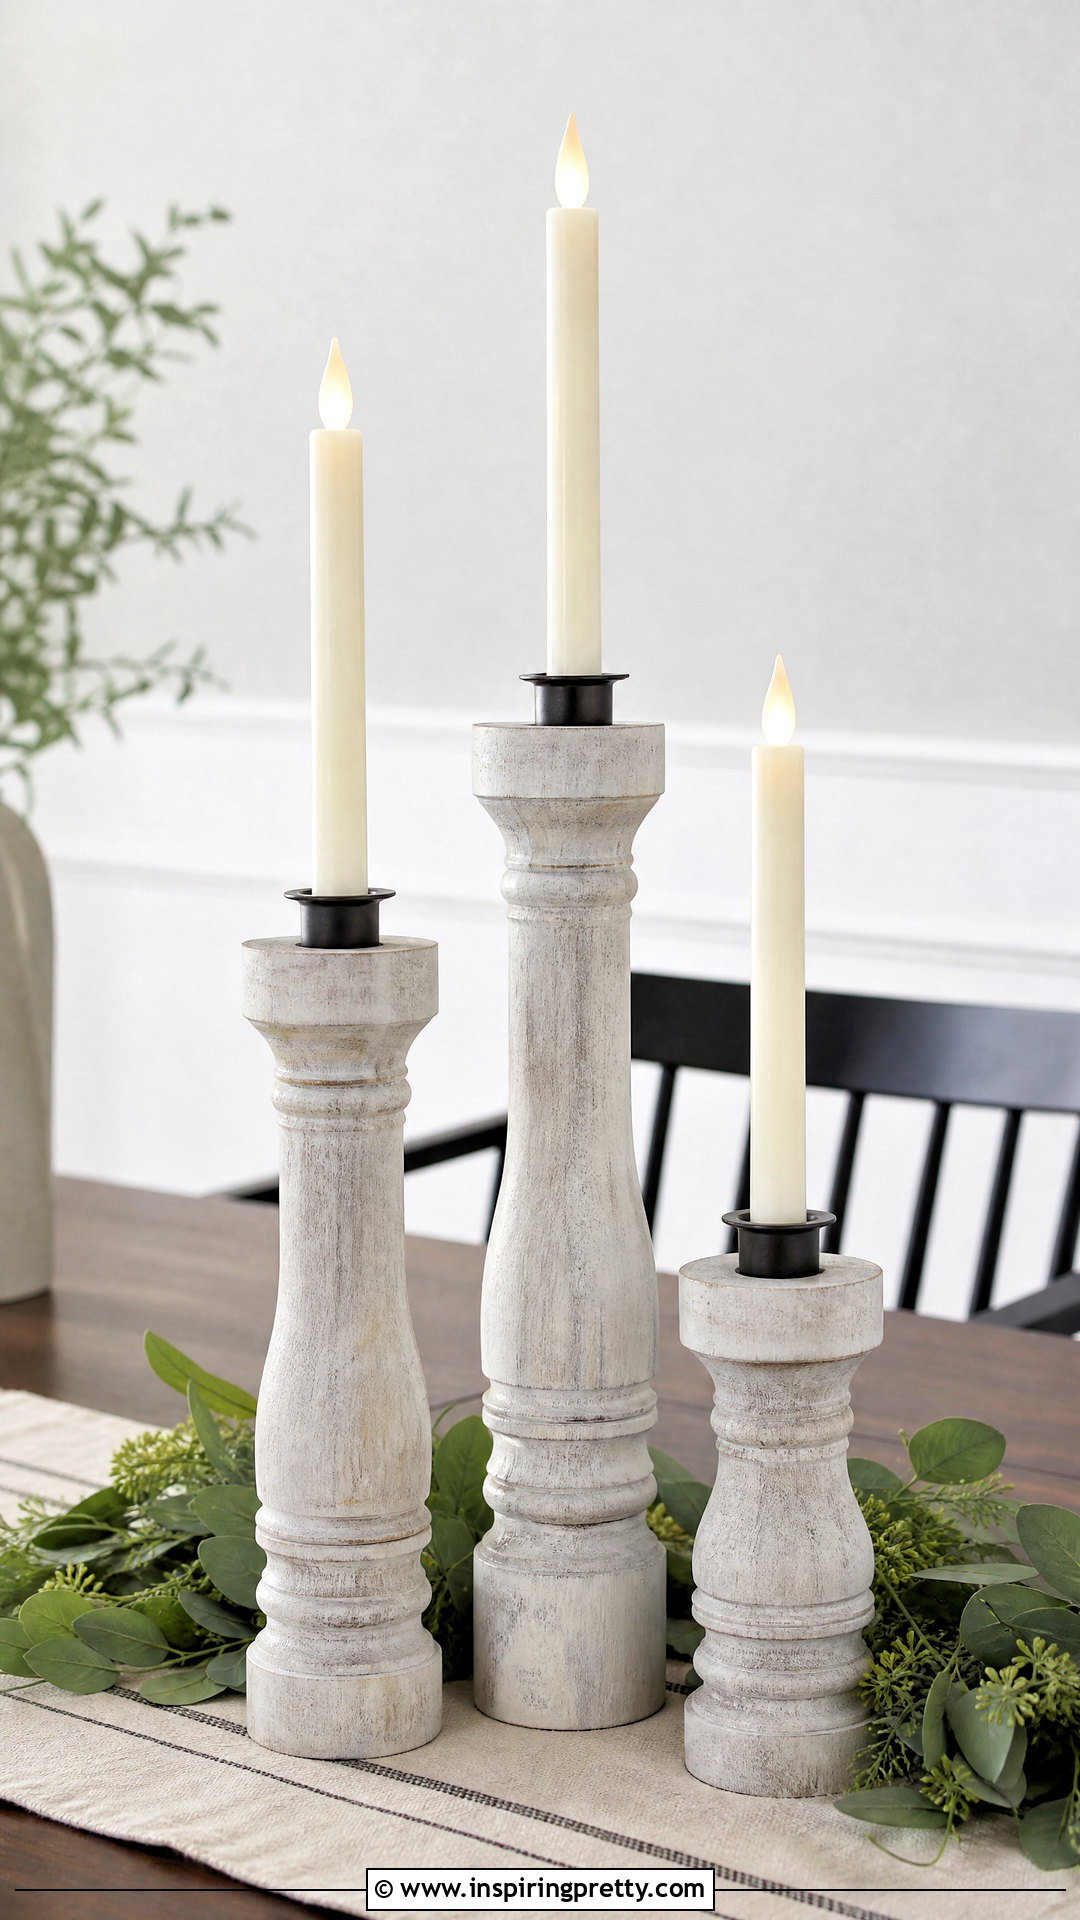
Handmade candle holders can create an attractive table or shelf display without complicated tools. Use unfinished wood blocks, small terracotta pieces, or heat-safe ceramic bases. Sand rough surfaces and apply paint, stain, or decorative details before assembling the design. Confirm that each candle cup fits securely and remains level. Metal candle inserts can help separate a taper candle from painted or wooden material. Keep the finished holders simple by repeating one shape in several heights. For the safest everyday display, use realistic flameless candles. If you choose traditional candles, never leave them unattended and keep flames away from fabric, paper, dried plants, children, and pets. Make sure every holder stands on a stable, heat-resistant surface and cannot tip easily.
18. DIY Wood Bead Garland
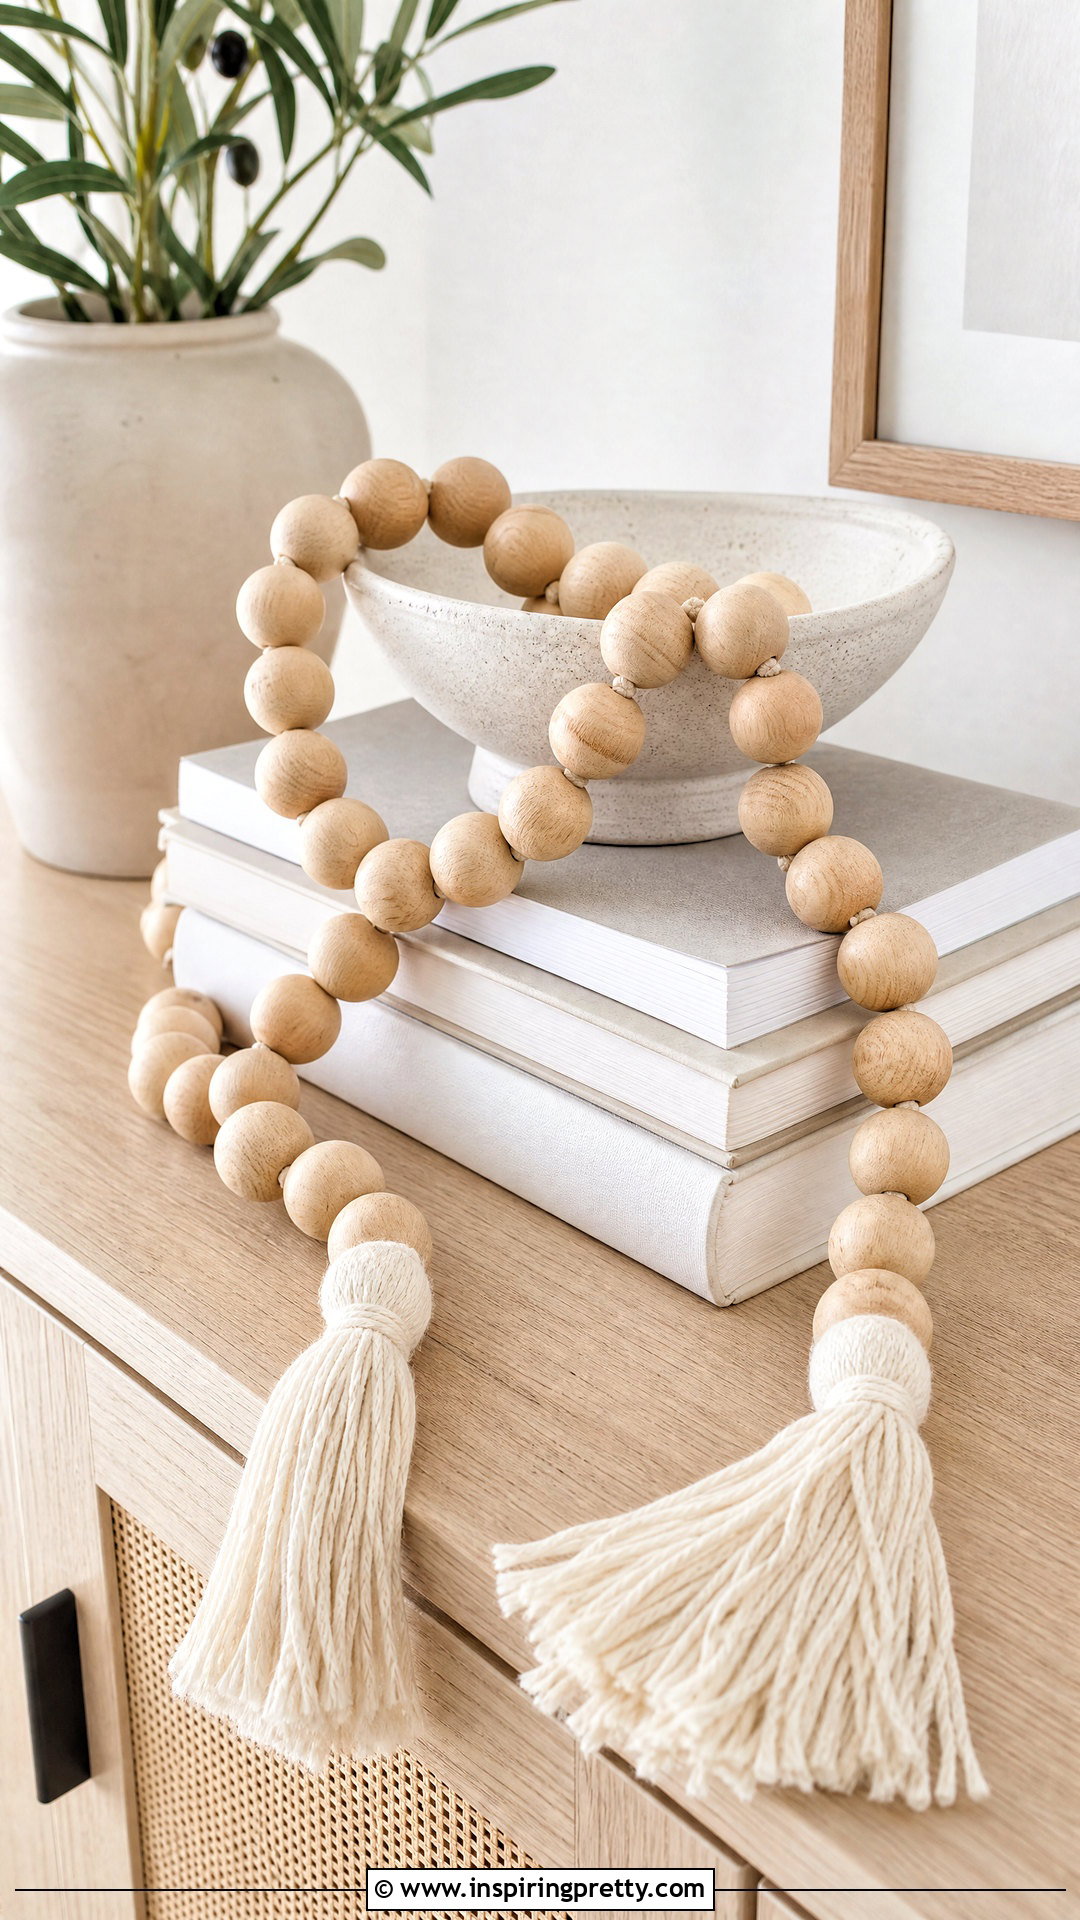
A wood bead garland is a simple decorative project for trays, shelves, baskets, and stacked books. Choose unfinished beads in one size for a clean look or combine several sizes for more texture. Paint, stain, or leave the beads natural. Once dry, thread them onto sturdy cotton cord, leaving enough length at both ends for knots. Make tassels from yarn or cord and attach one to each end. Keep the garland loose when styling it so the arrangement appears relaxed rather than tightly coiled. This project is decorative and should not be used as a toy, necklace, or nursery object because small beads and cords can be hazardous. Store it safely when young children or pets could reach and pull apart the components.
19. DIY Stenciled Accent Wall
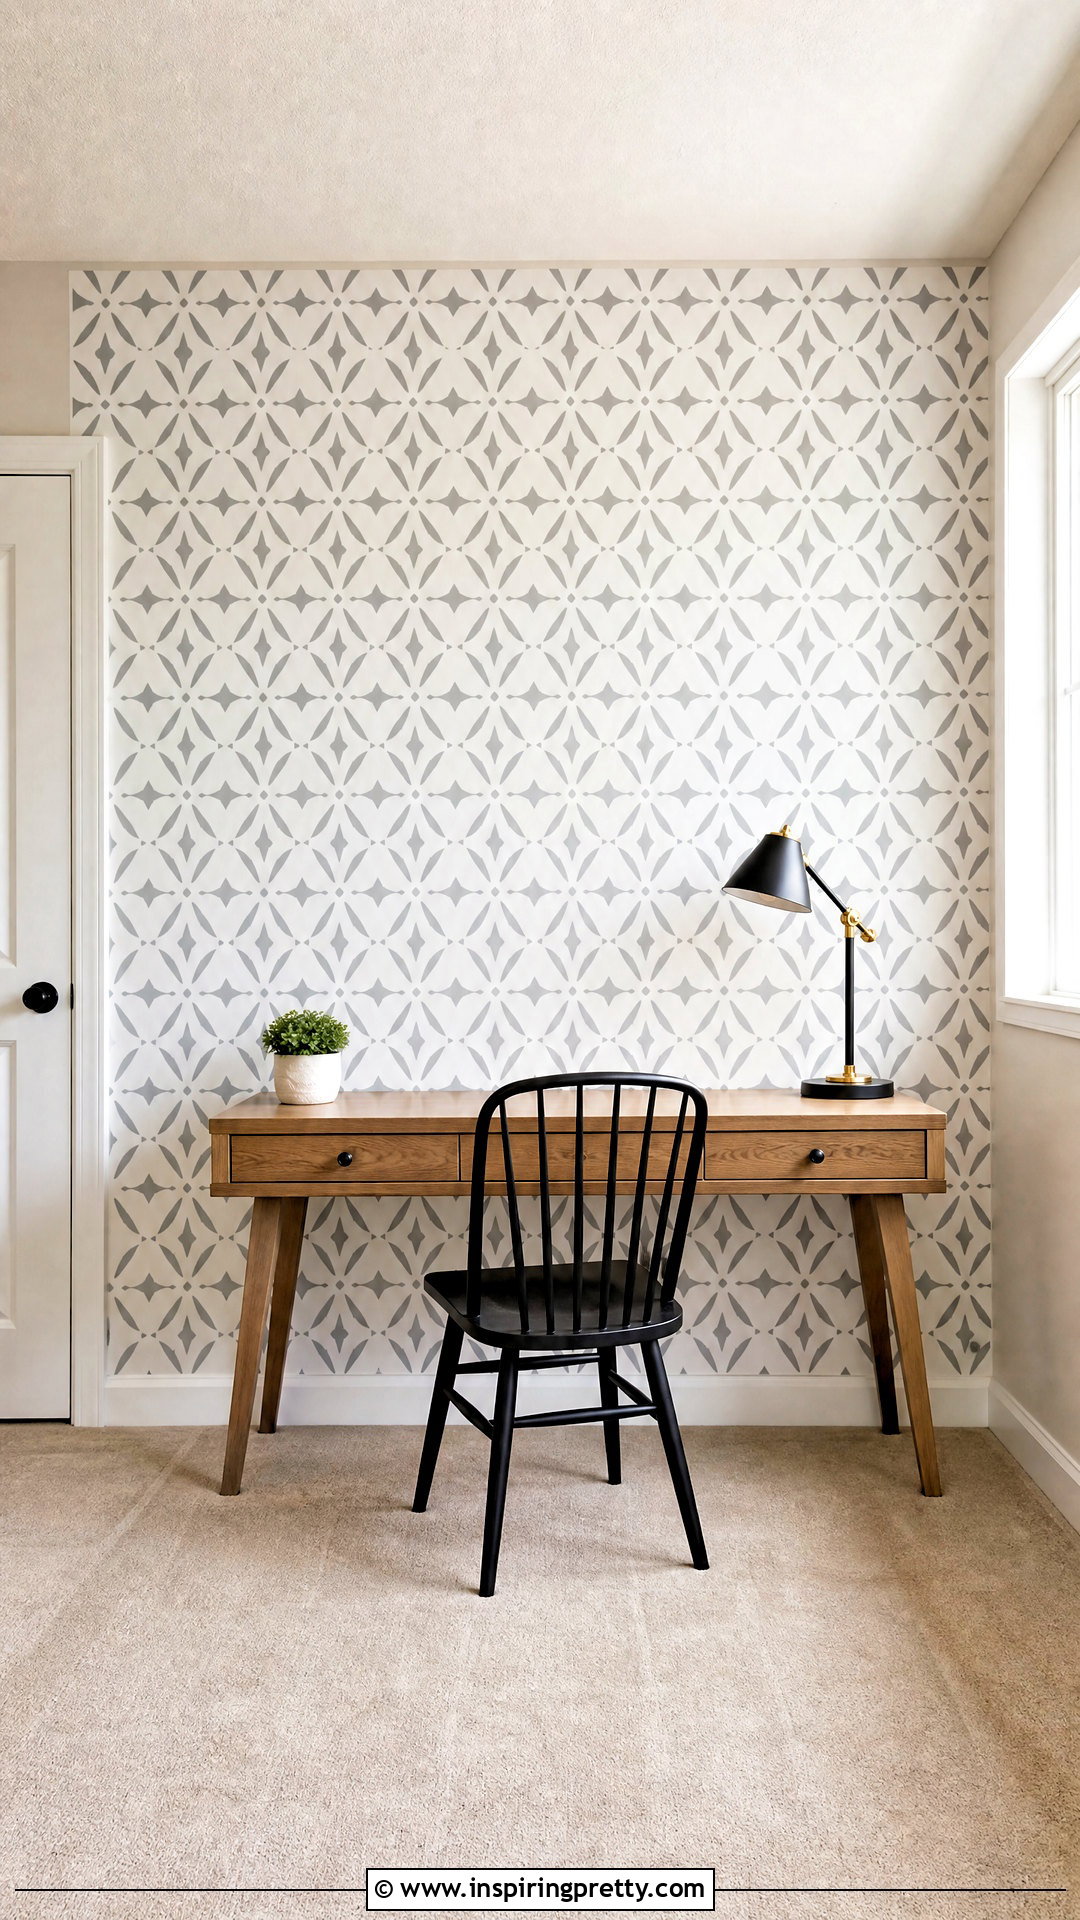
A stenciled wall can imitate patterned wallpaper while allowing complete control over color and scale. Prepare the wall by repairing imperfections and applying a fresh base coat if needed. Mark a level guideline near the center, then secure the stencil with low-tack adhesive. Load a foam roller lightly and remove excess paint before applying it through the design. Too much paint may seep beneath the edges. Align the registration marks carefully as you repeat the pattern across the wall. Use a small stencil brush near corners, ceilings, and trim. Step back regularly to catch alignment problems early. Clean the stencil whenever dried paint begins affecting the pattern. Finish the project by touching up small gaps with an artist’s brush after the wall has dried.





20. DIY Kitchen Herb Garden
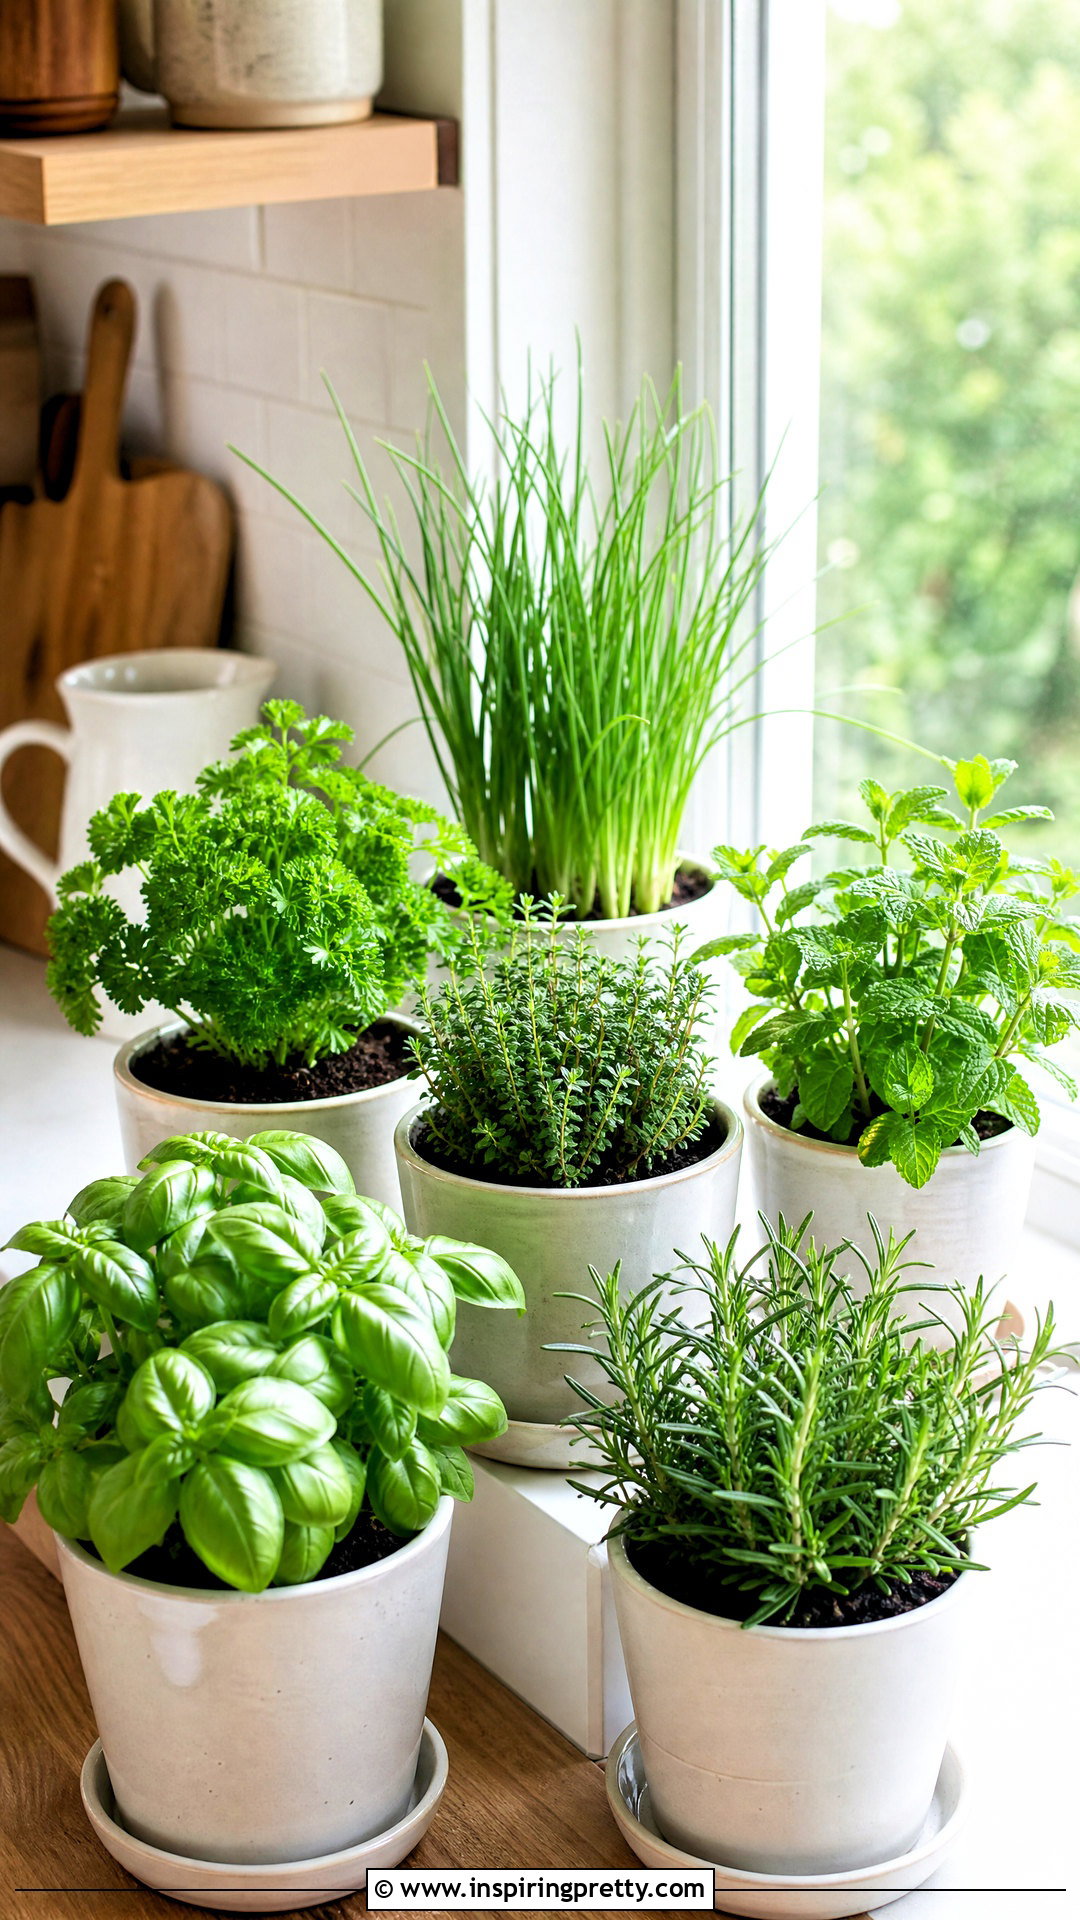
A compact herb garden brings useful greenery to a sunny kitchen window, balcony, or patio. Choose containers with drainage holes and place them on waterproof saucers. Fill them with fresh potting mix, then plant herbs suited to your available light. Basil, parsley, chives, mint, thyme, and rosemary offer different growth habits, so check each plant’s needs before combining varieties. Label every pot with painted craft sticks, stamped tags, or small slate markers. Water according to the plant rather than following one schedule for every container. Mint generally grows best in its own pot because it spreads quickly. Keep leaves away from hot appliances and wash harvested herbs before use. Rotate the containers periodically if the plants begin leaning strongly toward the window.
21. DIY Framed Bathroom Mirror
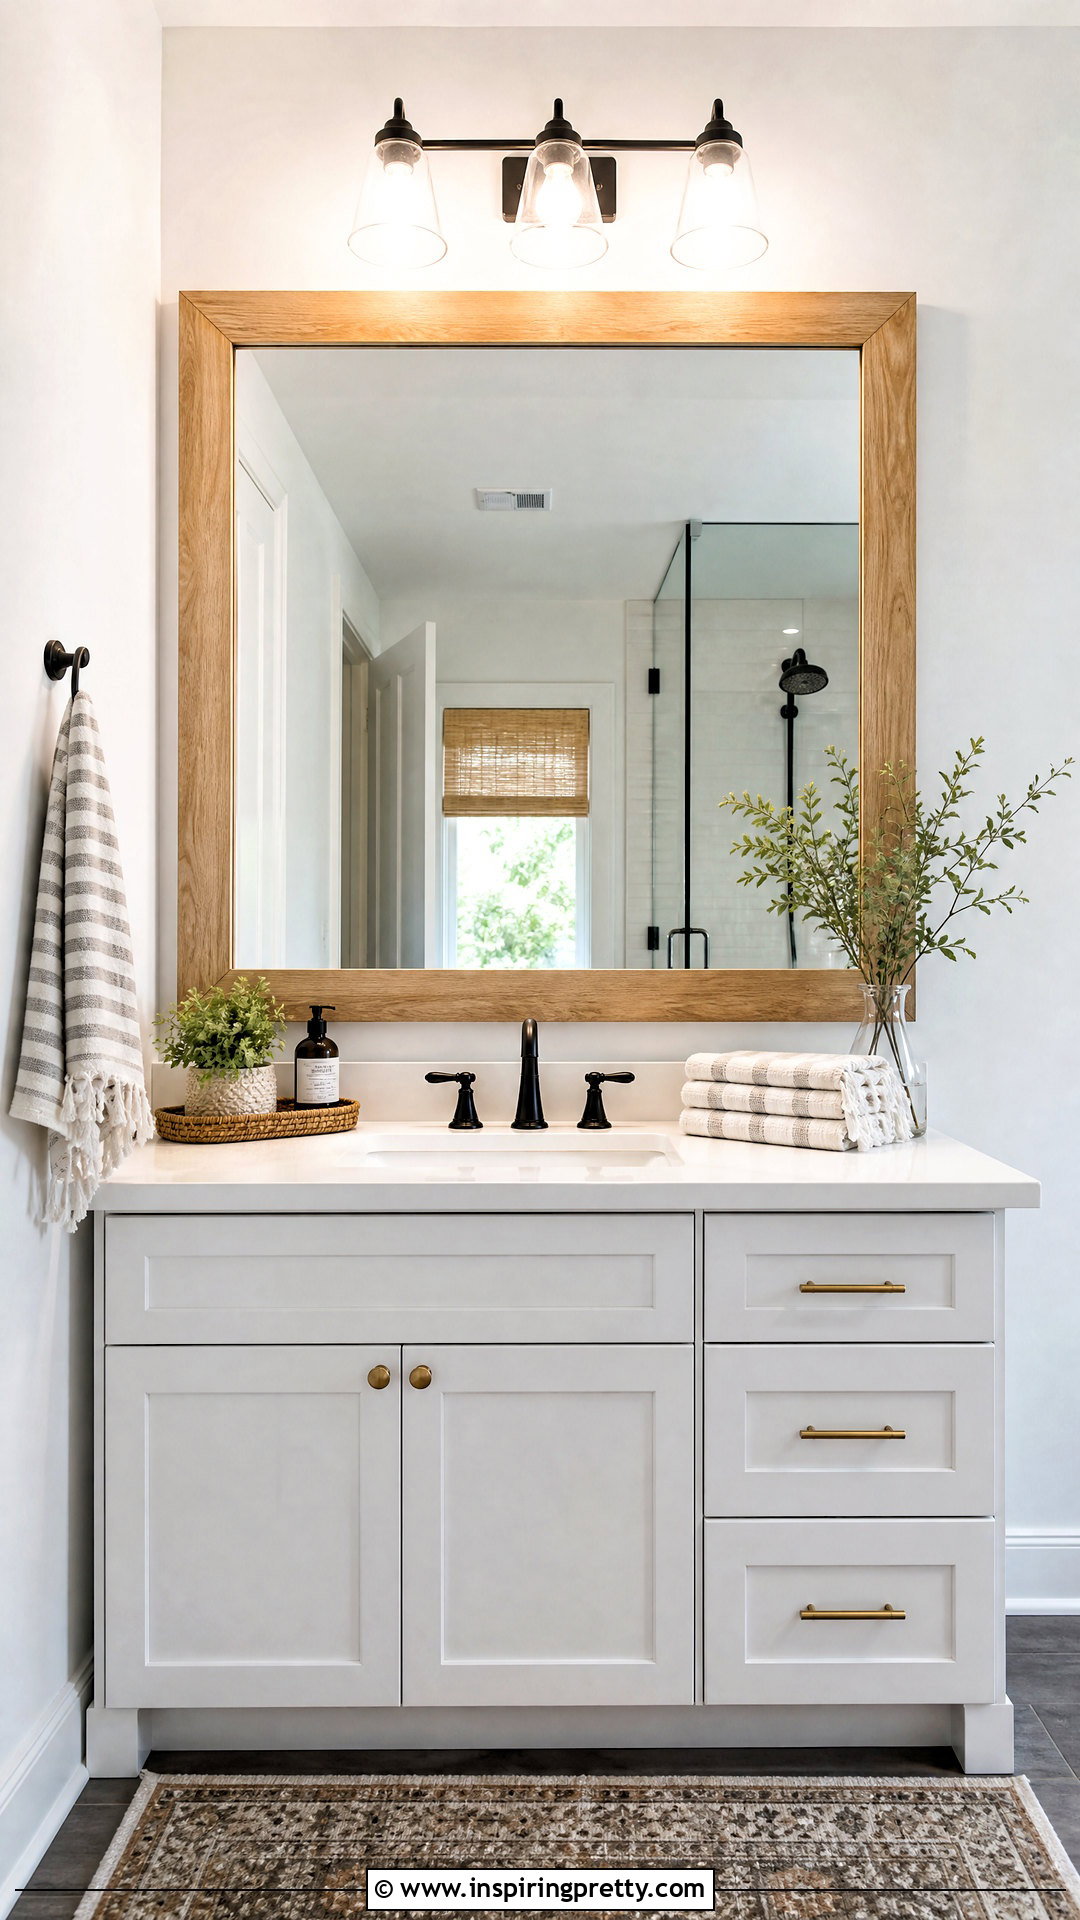
Adding a frame around a plain bathroom mirror can make it appear more substantial and finished. Measure the mirror carefully, including the location of clips, outlets, lights, and nearby trim. Cut lightweight molding to size with mitered or straight corners. Sand, prime, and paint every side that might be reflected, not just the visible front. Use an adhesive specifically compatible with mirrors, since unsuitable products may damage the reflective backing. Temporary supports or painter’s tape can hold pieces in position while the adhesive cures. If clips prevent the molding from sitting flat, notch the back carefully or use a trim profile with enough depth. Keep the finished frame clear of faucets and regularly wipe away moisture to protect the surface.
22. DIY Painted Floor Pattern
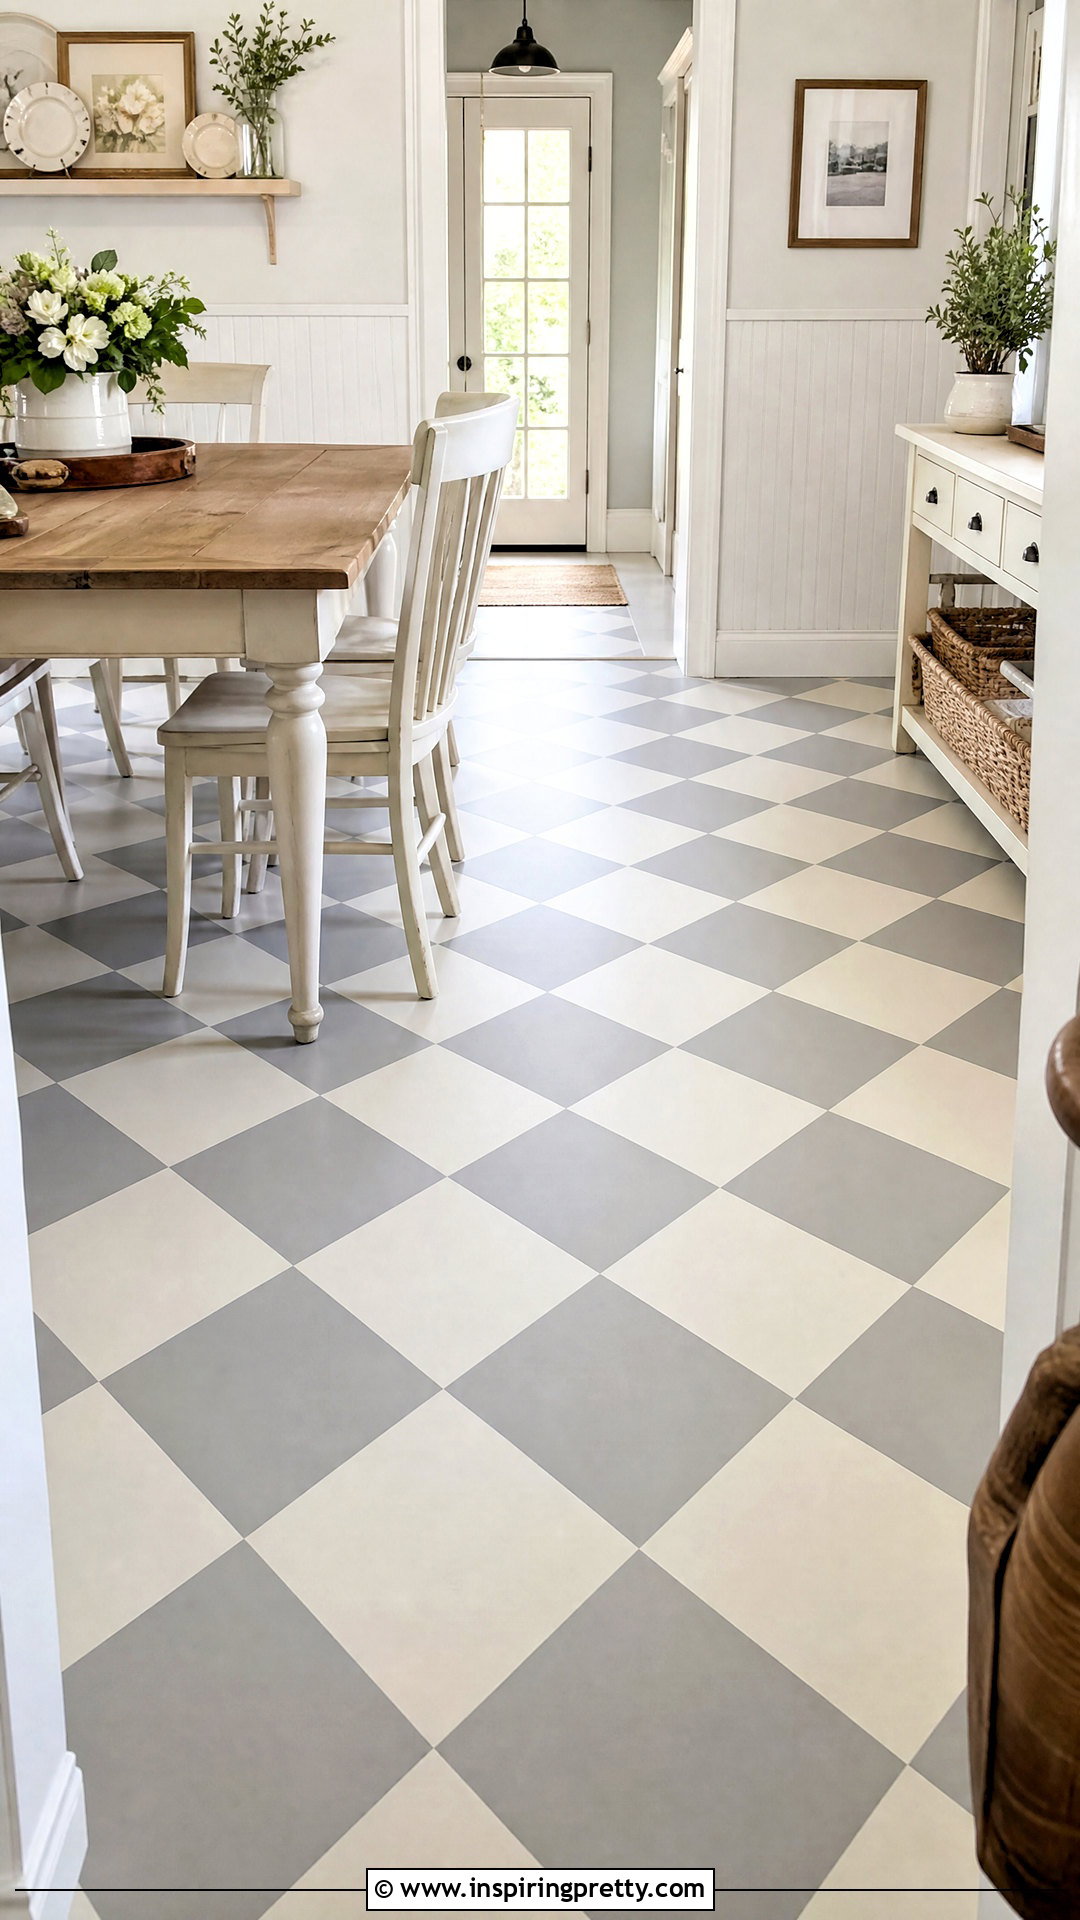
Paint can transform a worn wood or concrete floor when replacement is outside the budget. Confirm that the surface is suitable for painting, then repair cracks, remove grease, and sand or etch as directed. Apply the recommended primer before adding porch-and-floor paint. A solid color is the easiest option, while checkerboard, border, and stencil patterns create more personality. Measure the layout carefully and use painter’s tape designed for crisp lines. Work toward an exit so you do not trap yourself in the room. Apply thin coats and observe all drying and curing times. Protect the finished floor from heavy furniture until fully cured. Add felt pads underneath movable pieces to reduce scratching and preserve the design for longer.
23. DIY Window Seat Cushion
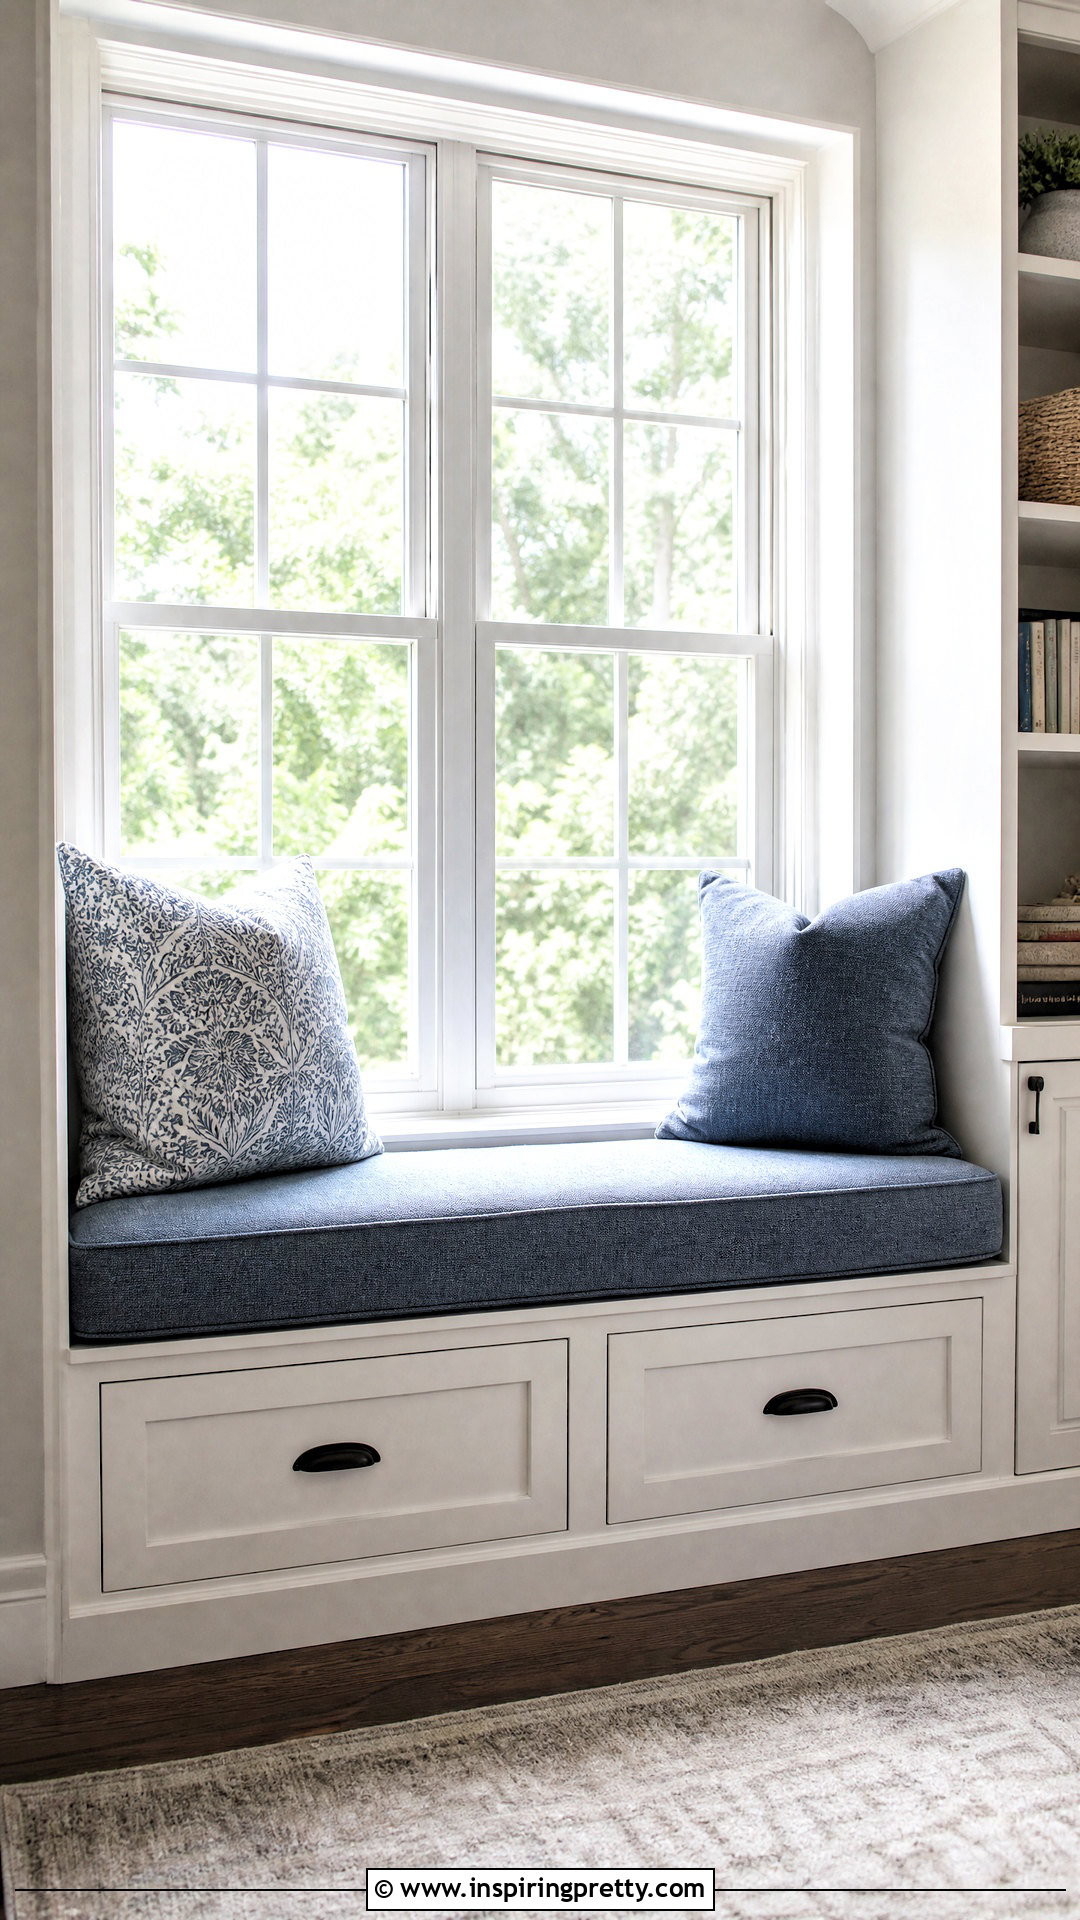
A custom window-seat cushion makes an awkward bench or deep sill more comfortable. Measure the seating area at several points because walls and built-ins may not be perfectly square. Cut high-density upholstery foam with an appropriate knife, then wrap it in batting to soften the edges. Create a removable fabric cover with a zipper, hook-and-loop closure, or envelope-style overlap. If sewing is not an option, use a carefully wrapped plywood base and secure upholstery fabric underneath with staples. Choose a durable, washable textile, especially in a sunny or frequently used space. Add nonslip material beneath the cushion to reduce movement. Complete the seat with a small number of pillows, leaving enough room for someone to sit without immediately rearranging the entire display.
24. DIY Jewelry Organizer
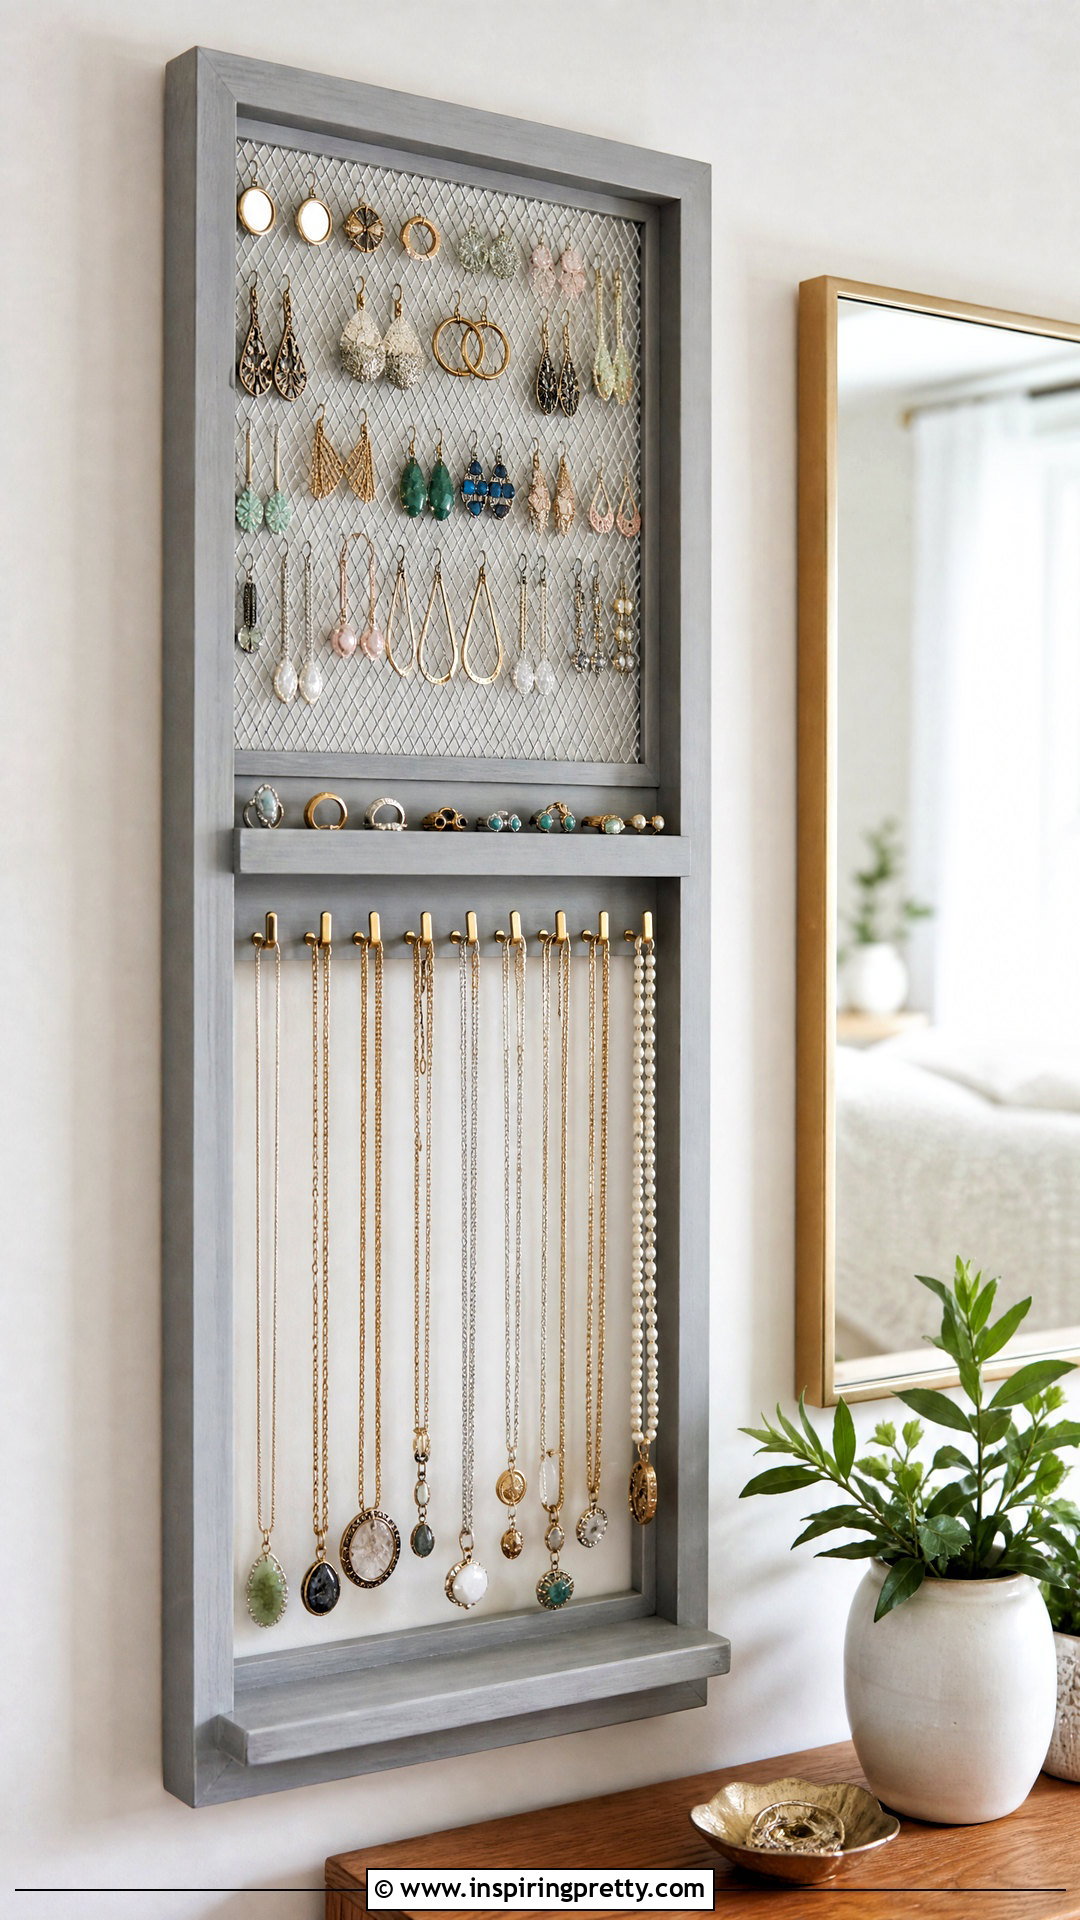
A wall-mounted jewelry organizer keeps necklaces untangled and makes favorite pieces easier to find. Repurpose a shallow frame, wood panel, or cabinet door as the base. Paint or stain it, then add small cup hooks for necklaces and bracelets. Stretch fine wire mesh, cork, or linen across one section for earrings and pins. A narrow ledge or small dishes can hold rings. Plan the layout around your actual collection before installing hardware, leaving enough distance between hooks for longer necklaces. Mount the organizer near a mirror but away from direct moisture and strong sunlight. Secure valuable pieces separately if necessary. Smooth rough edges, tighten every hook, and confirm the organizer is firmly attached to the wall before adding heavier statement jewelry.




25. DIY Picture Frame Tray
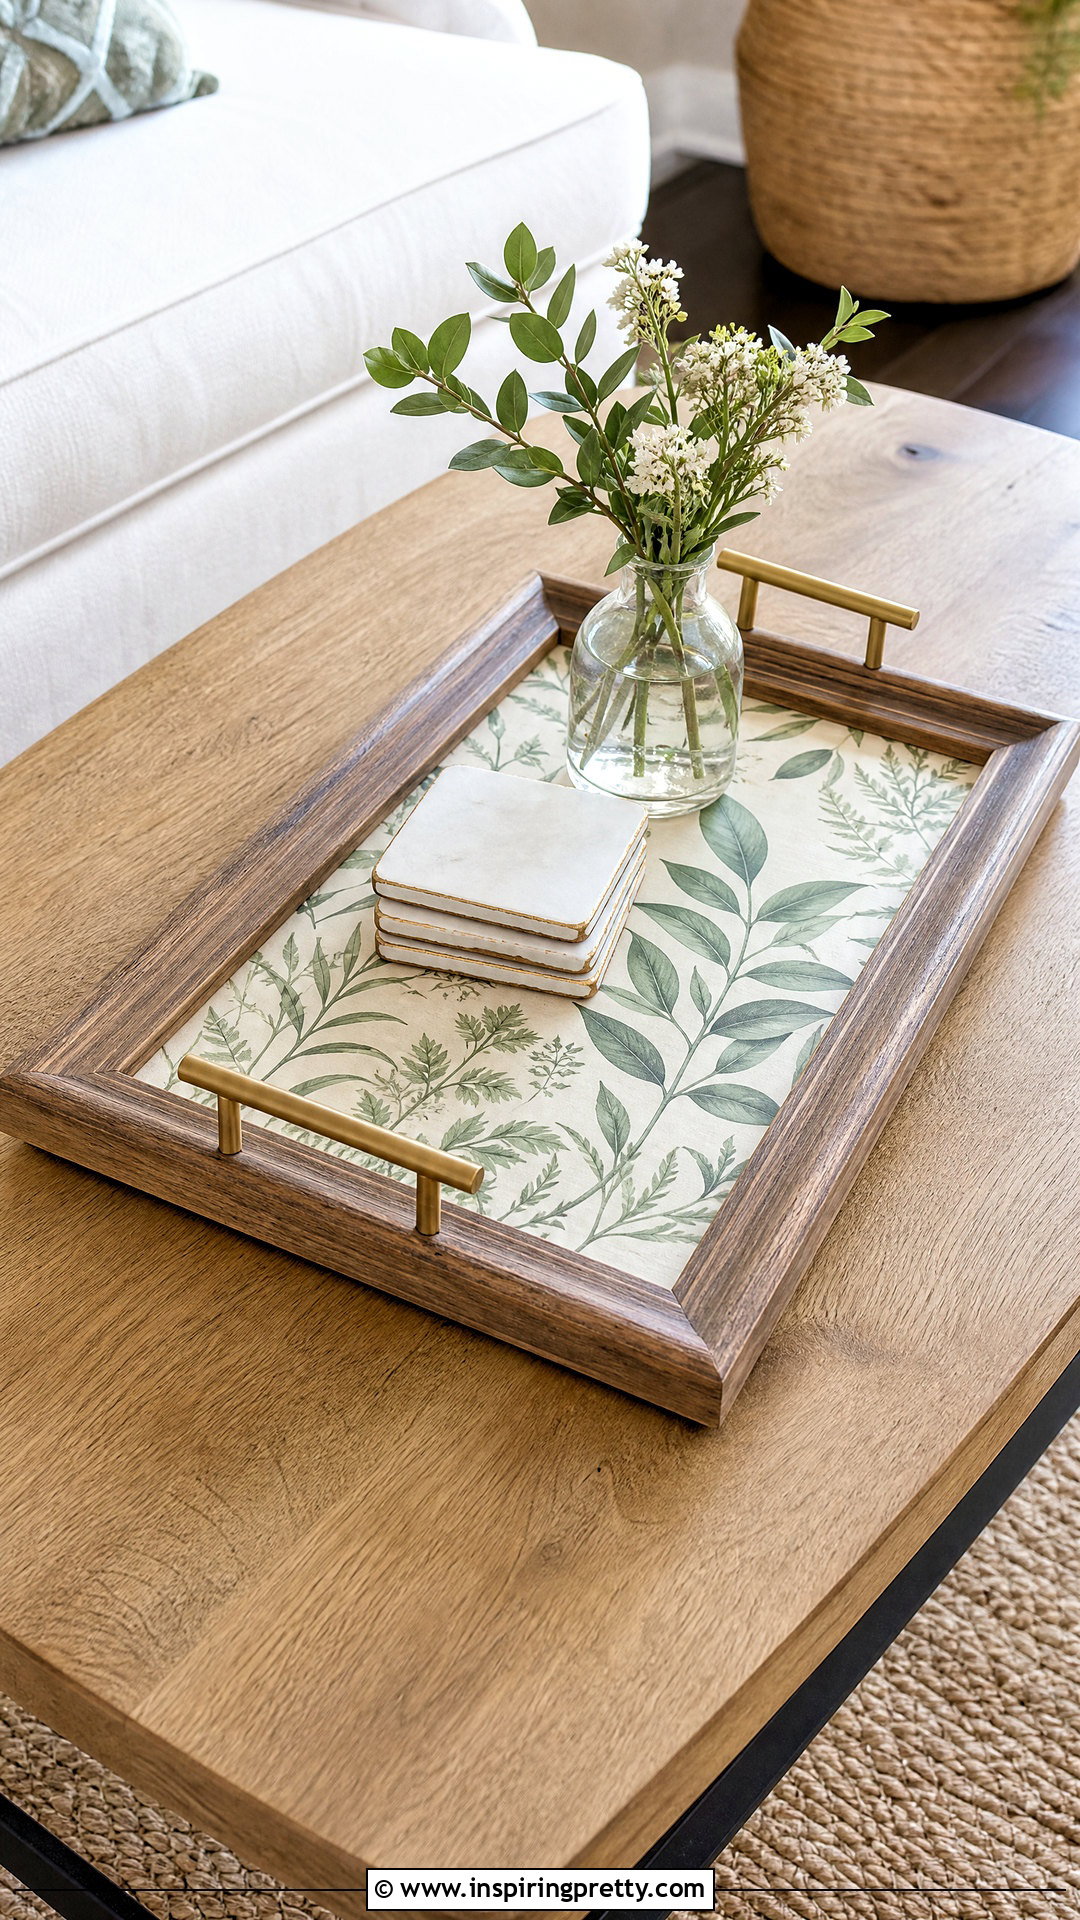
An old picture frame can become a decorative tray for a coffee table, vanity, or entryway. Choose a frame with a sturdy back and remove any fragile glass if the tray will receive frequent use. Replace it with thin plywood or another durable insert cut to size. Cover the insert with wallpaper, fabric, paint, or a favorite paper print, then seal it if needed. Secure the backing firmly inside the frame. Attach small cabinet pulls to opposite sides, drilling pilot holes to reduce splitting. Add felt pads underneath to protect furniture. This tray is best for organizing lightweight objects rather than carrying food or heavy drinks. Style it with a small vase, coasters, and one decorative item while preserving open space.
26. DIY Pegboard Craft Station
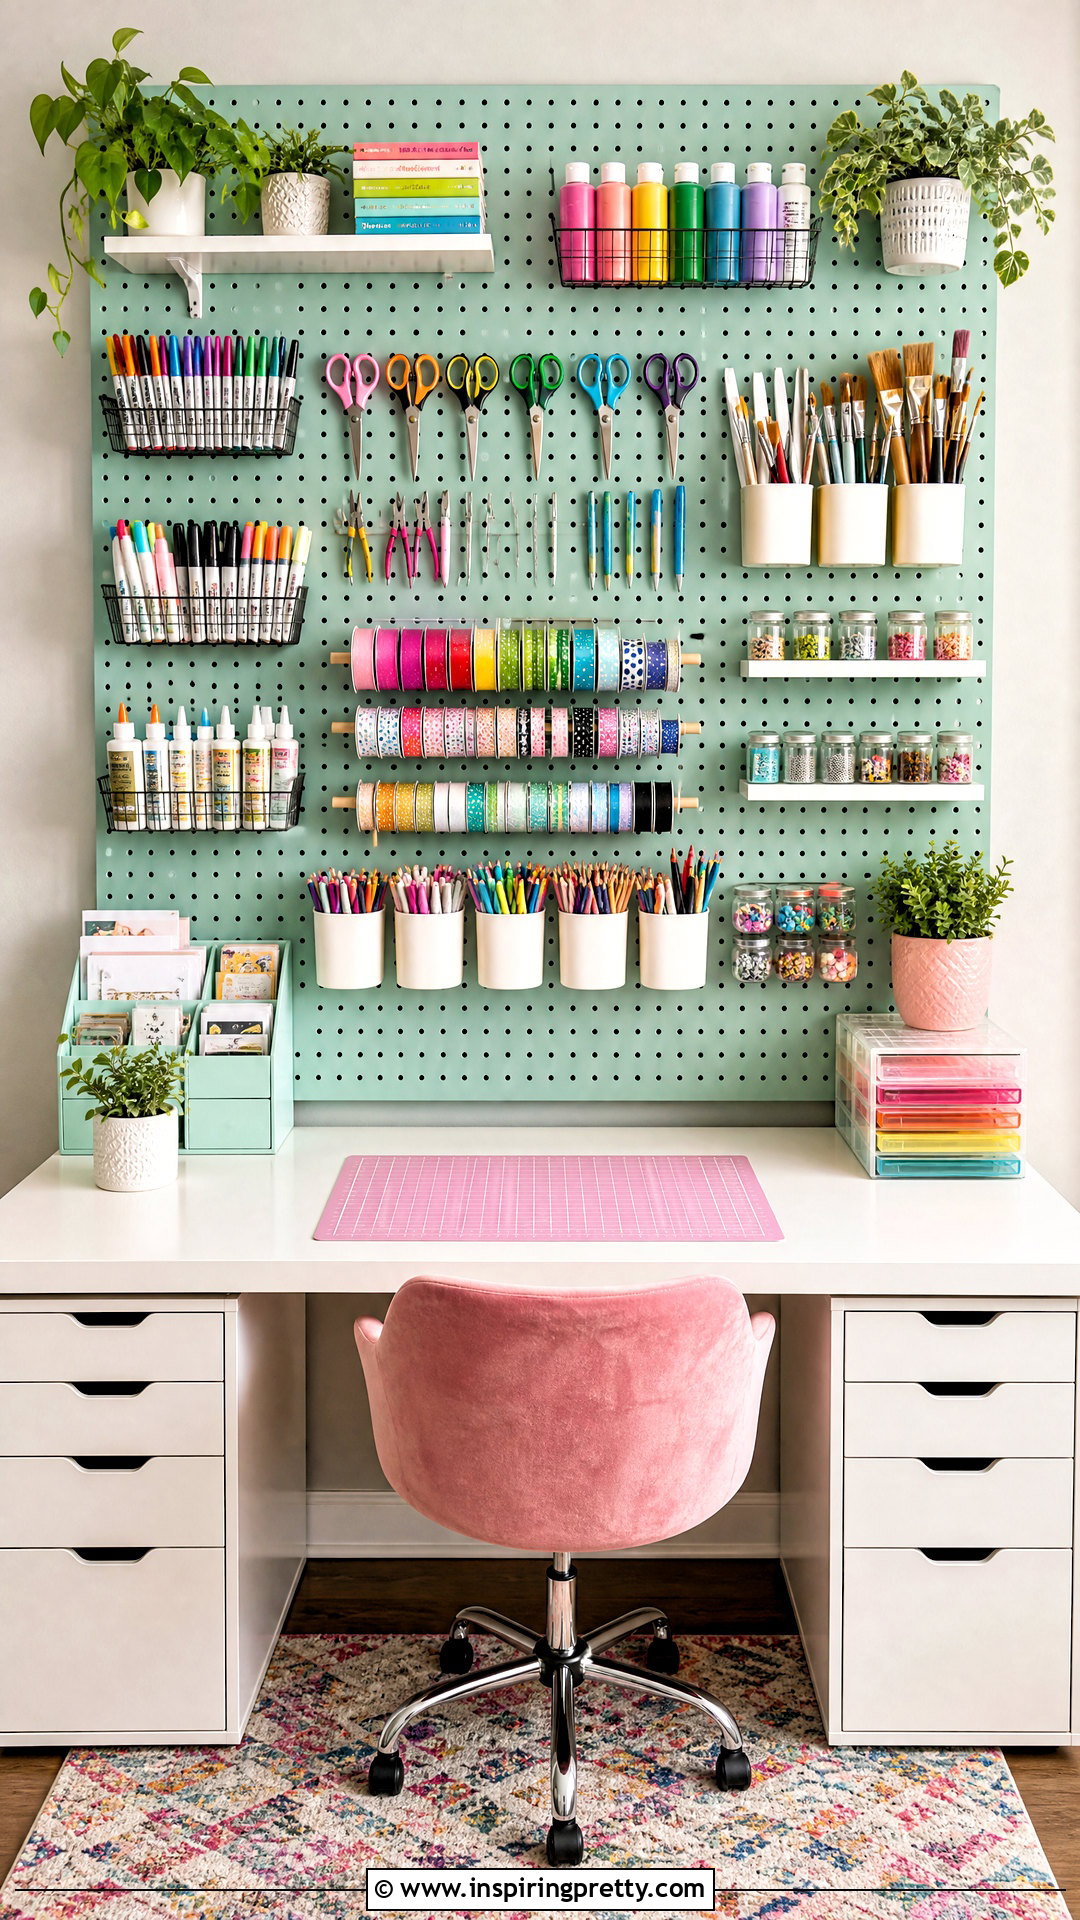
A pegboard craft station places tools and supplies within reach while freeing the work surface below. Measure the wall area and install wood furring strips behind the pegboard so hooks have enough clearance. Attach the frame securely to studs or appropriate anchors. Paint the board before mounting if you want a customized color. Use hooks, baskets, small shelves, and tool holders to organize scissors, ribbon, brushes, tape, and frequently used materials. Trace larger tools or add simple labels so everything returns to the correct location. Store heavy equipment lower on the board and keep sharp objects out of children’s reach. Leave some open space for future supplies. A coordinated arrangement can make the station feel decorative while supporting efficient, enjoyable creative work.
27. DIY Terrazzo Plant Stand
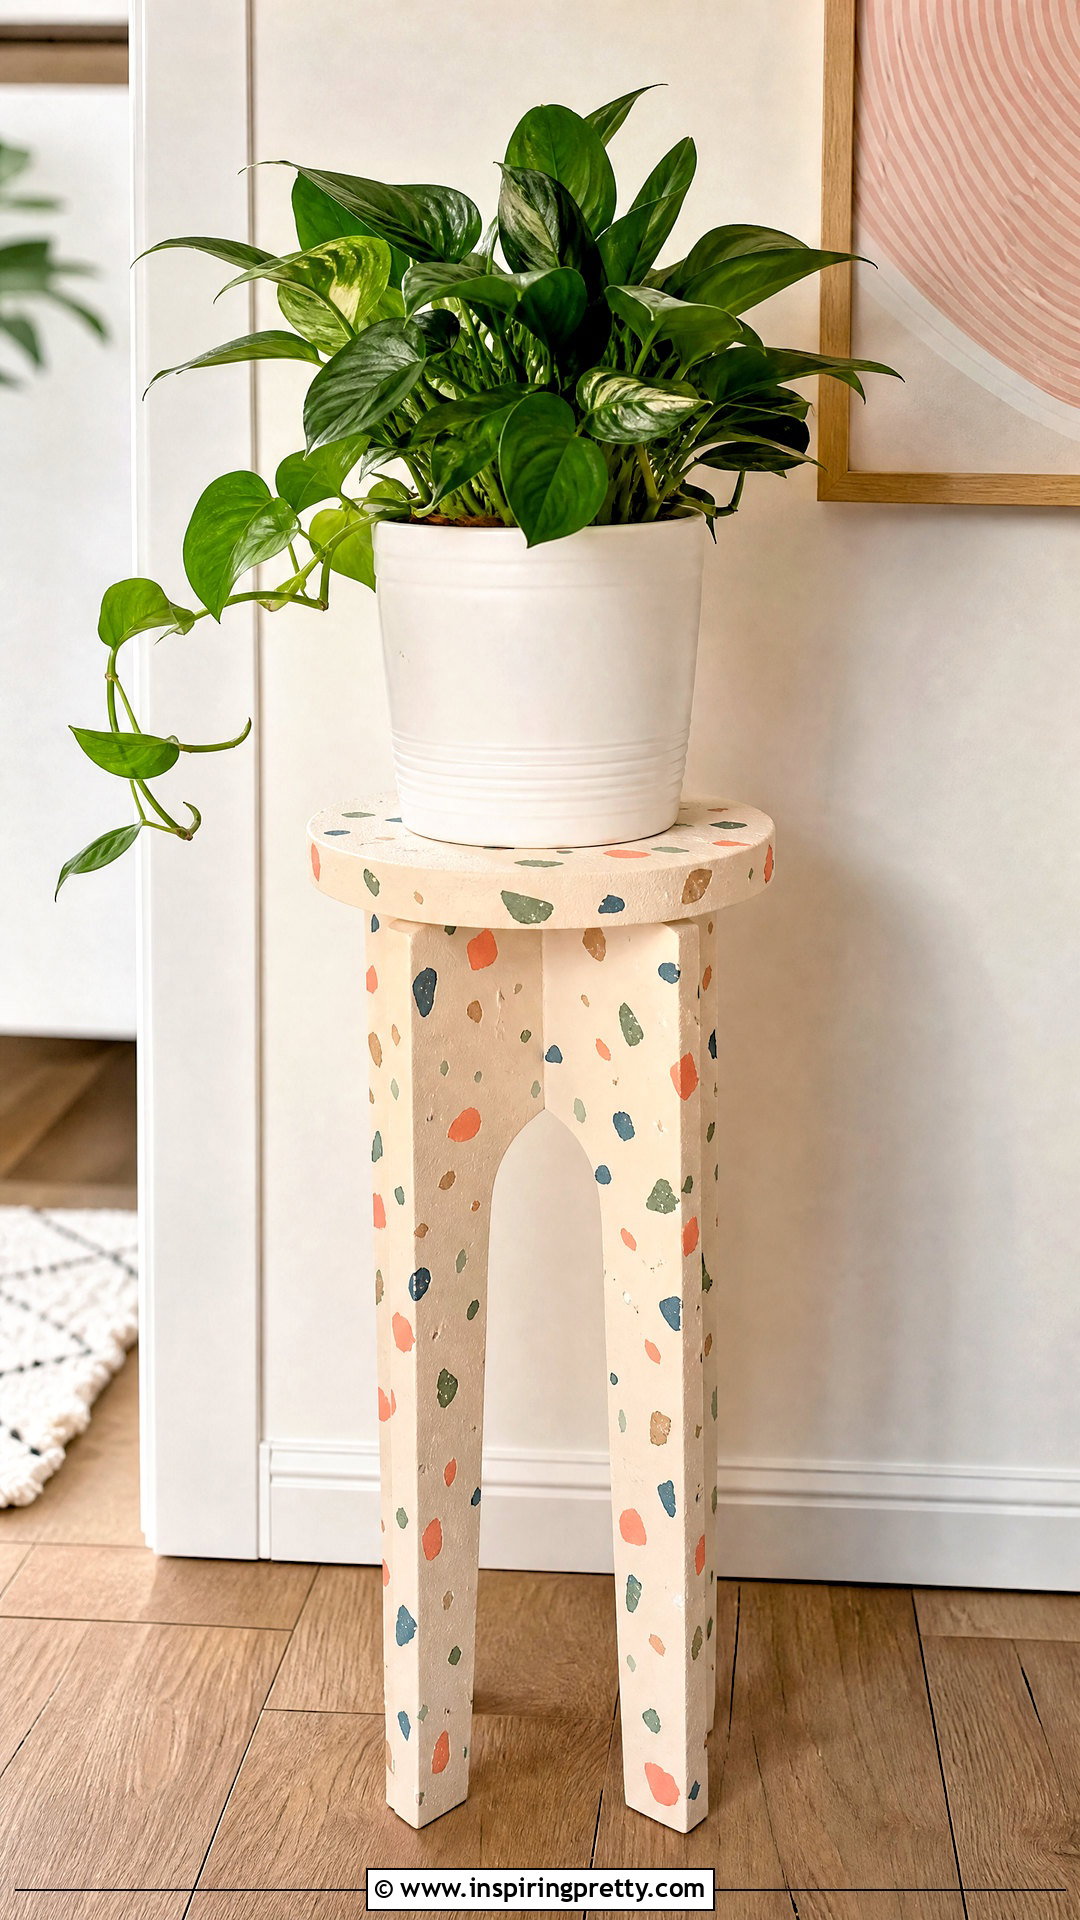
A terrazzo-inspired plant stand adds playful pattern without requiring real stone. Begin with a sturdy wood stool, small table, or sealed concrete stand. Paint the base in a light neutral shade and allow it to dry. Use small artist’s brushes to add irregular chips in several coordinating colors, varying their size and direction. Avoid making every mark identical, since natural terrazzo has an uneven appearance. Once the pattern is dry, apply a protective clear coat compatible with the paint. Add nonslip pads under the legs and a waterproof saucer beneath the planter. Confirm the stand can support the pot’s weight after watering. Keep the decoration balanced by pairing the detailed surface with a simple planter and a healthy, well-proportioned plant.
28. DIY Decorative Storage Boxes
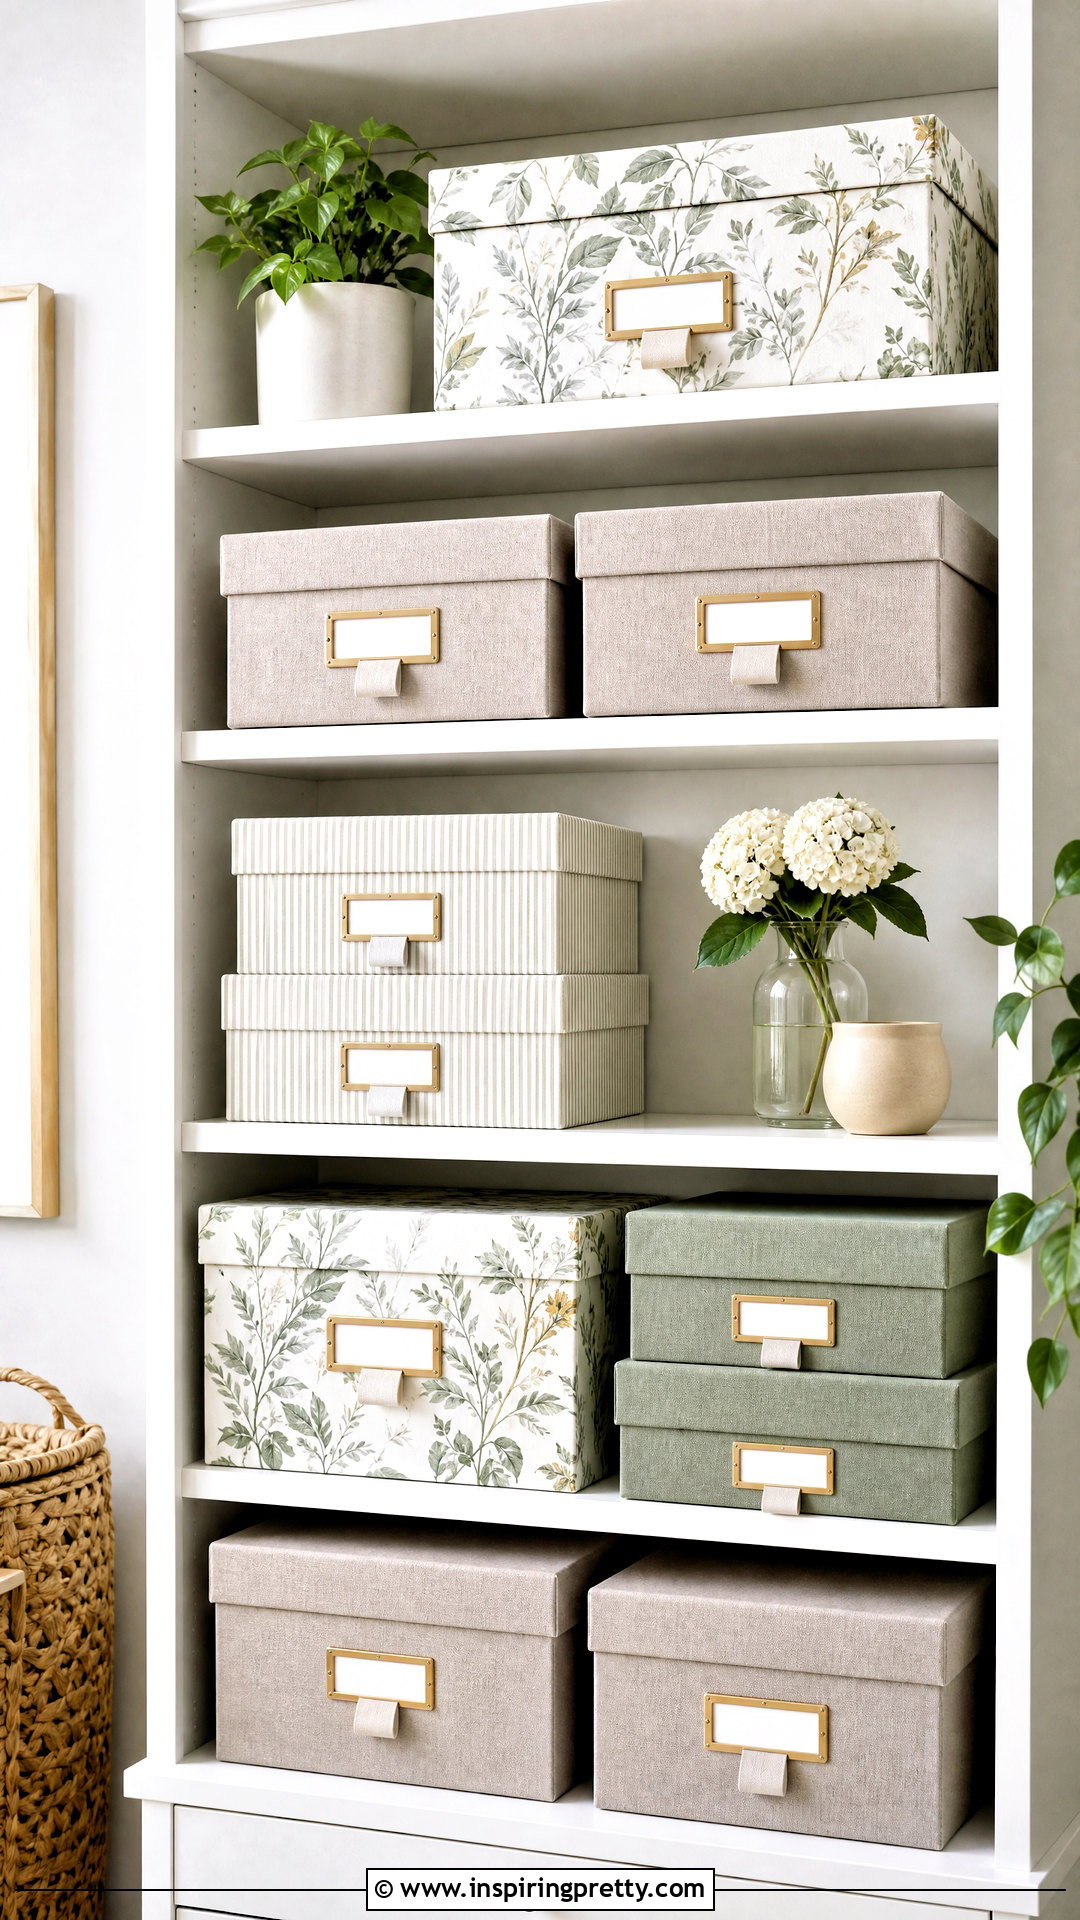
Decorative boxes hide paperwork, cables, photographs, and small household supplies while improving the look of open shelves. Repurpose sturdy shoe boxes or purchase plain papier-mâché boxes in coordinating sizes. Cover them with fabric, durable paper, removable wallpaper, or paint. Apply adhesive in thin, even layers to avoid bubbles and warped cardboard. Fold corners carefully, trim excess material, and line the interior if you want a finished appearance. Add label holders, leather-look tabs, or simple cord handles. Assign each box one category instead of mixing unrelated items. Keep heavier supplies in reinforced containers on lower shelves. Use repeated colors or patterns so multiple boxes look like a planned collection, even when their original shapes and sizes are slightly different.
29. DIY Macrame Wall Hanging
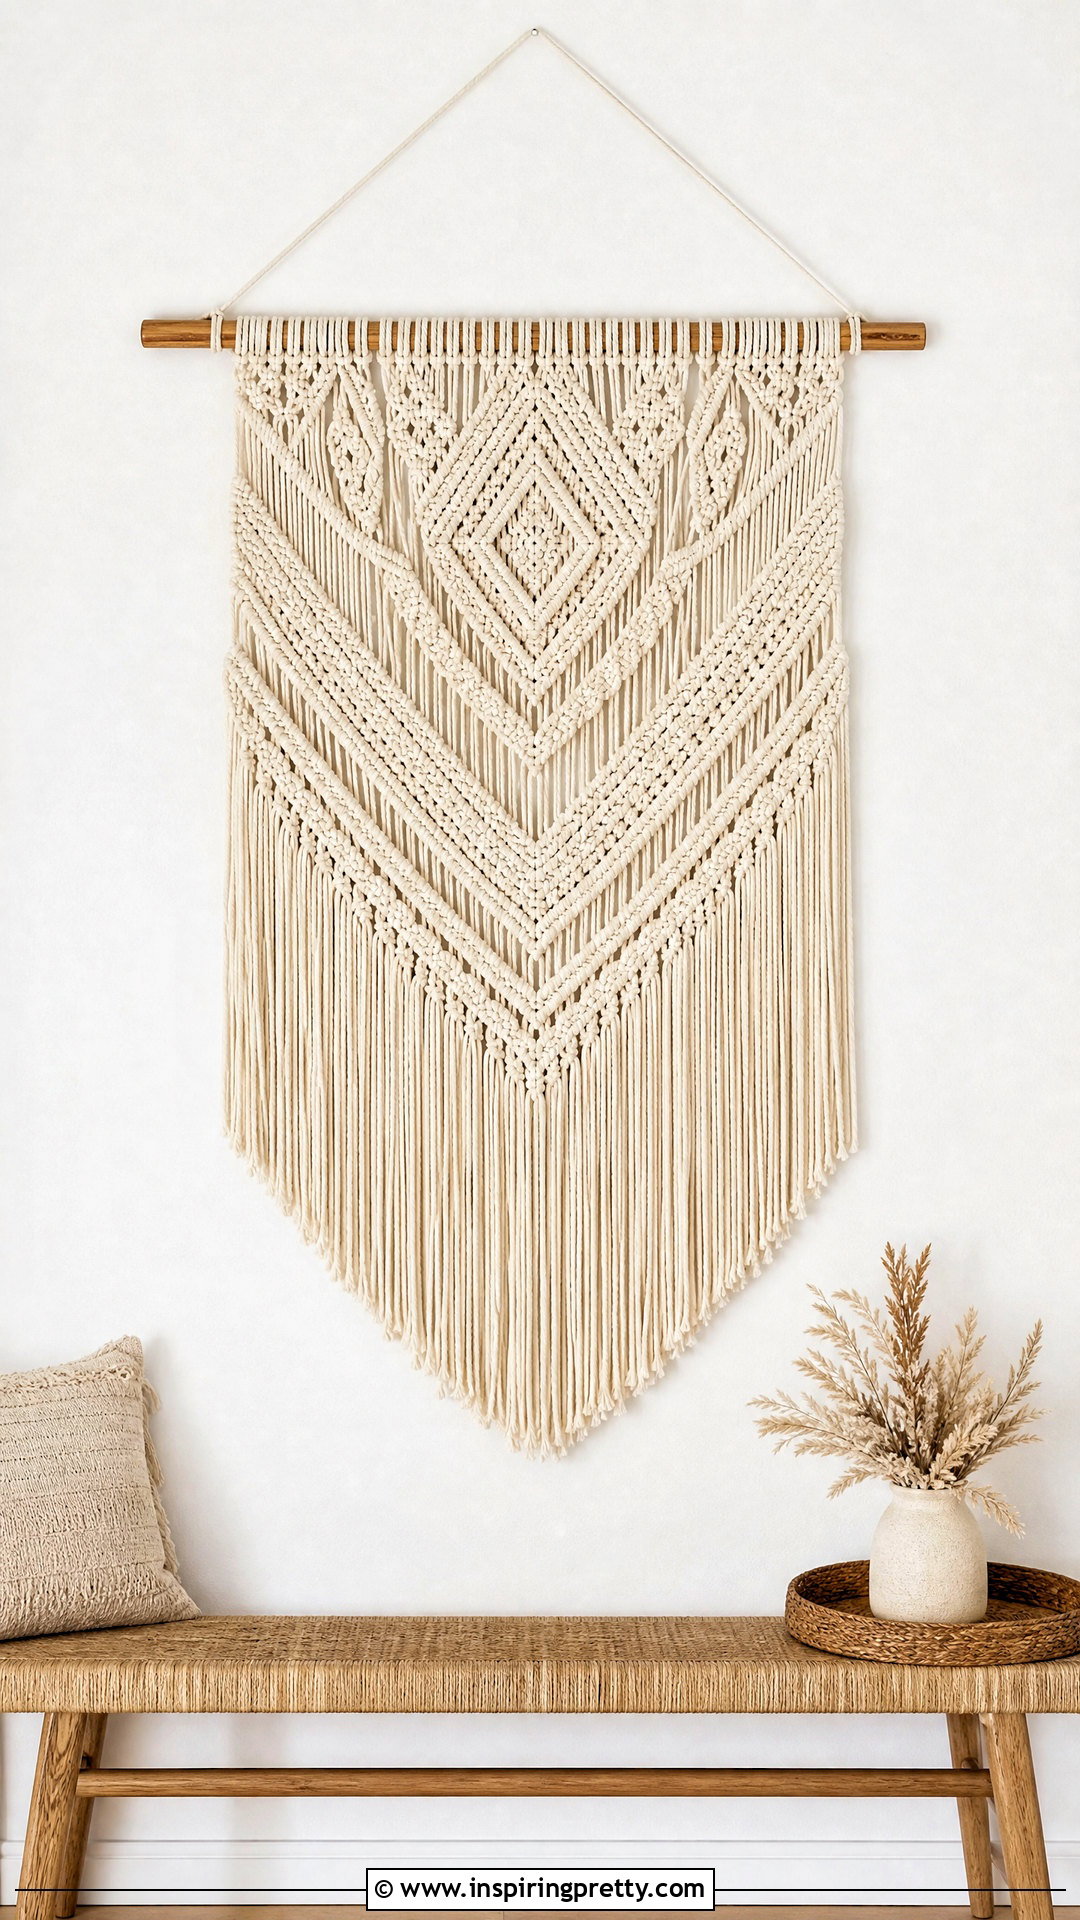
A simple macramé wall hanging adds texture to a blank wall using cotton cord and a wood dowel. Cut cords longer than the final piece because knots consume significant length. Attach them to the dowel with lark’s head knots, then create rows of square knots or alternating half knots. Work from the center outward and check the design frequently for symmetry. When the knotting is complete, comb the loose ends and trim them into a straight, curved, or pointed shape. Hang the dowel from strong cord attached at both ends. Natural wood and cream cord create a neutral look, while dyed cord adds color. Keep long cords away from cribs, play areas, open flames, and locations where pets may pull them.





30. DIY Outdoor String Light Poles
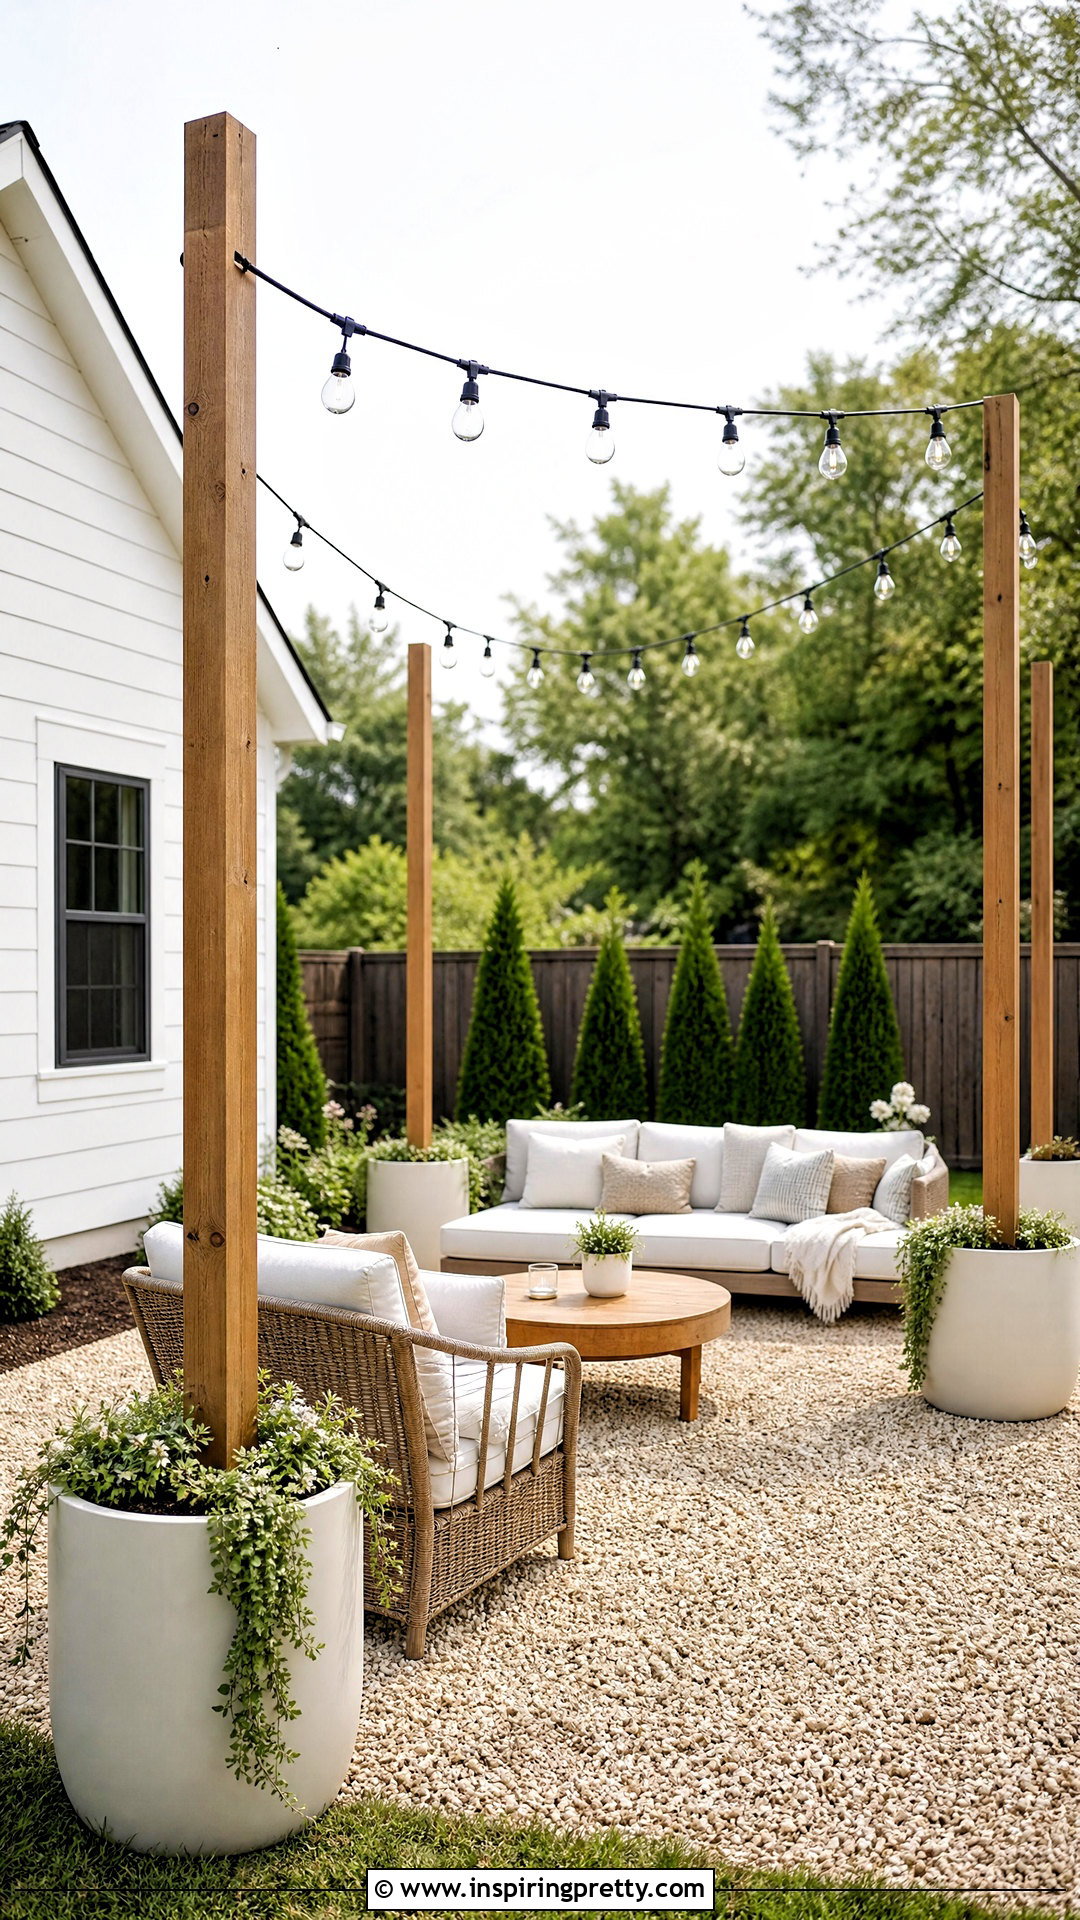
Freestanding poles make it possible to hang string lights over a patio without attaching them to the house. Place pressure-treated posts or metal poles inside large, stable planters and secure them with concrete according to the product instructions. Allow the base to cure before adding soil, decorative gravel, or shallow plants around the top. Install exterior-rated hooks and use outdoor string lights approved for your location. Keep the strands high enough to prevent accidental contact while maintaining gentle tension between poles. Connect lights only to properly protected outdoor electrical outlets and follow the manufacturer’s limits for linked strands. Position cords away from standing water and walking paths. The completed lighting should define the seating area while remaining safe, balanced, and weather appropriate.
31. DIY Drawer Dividers
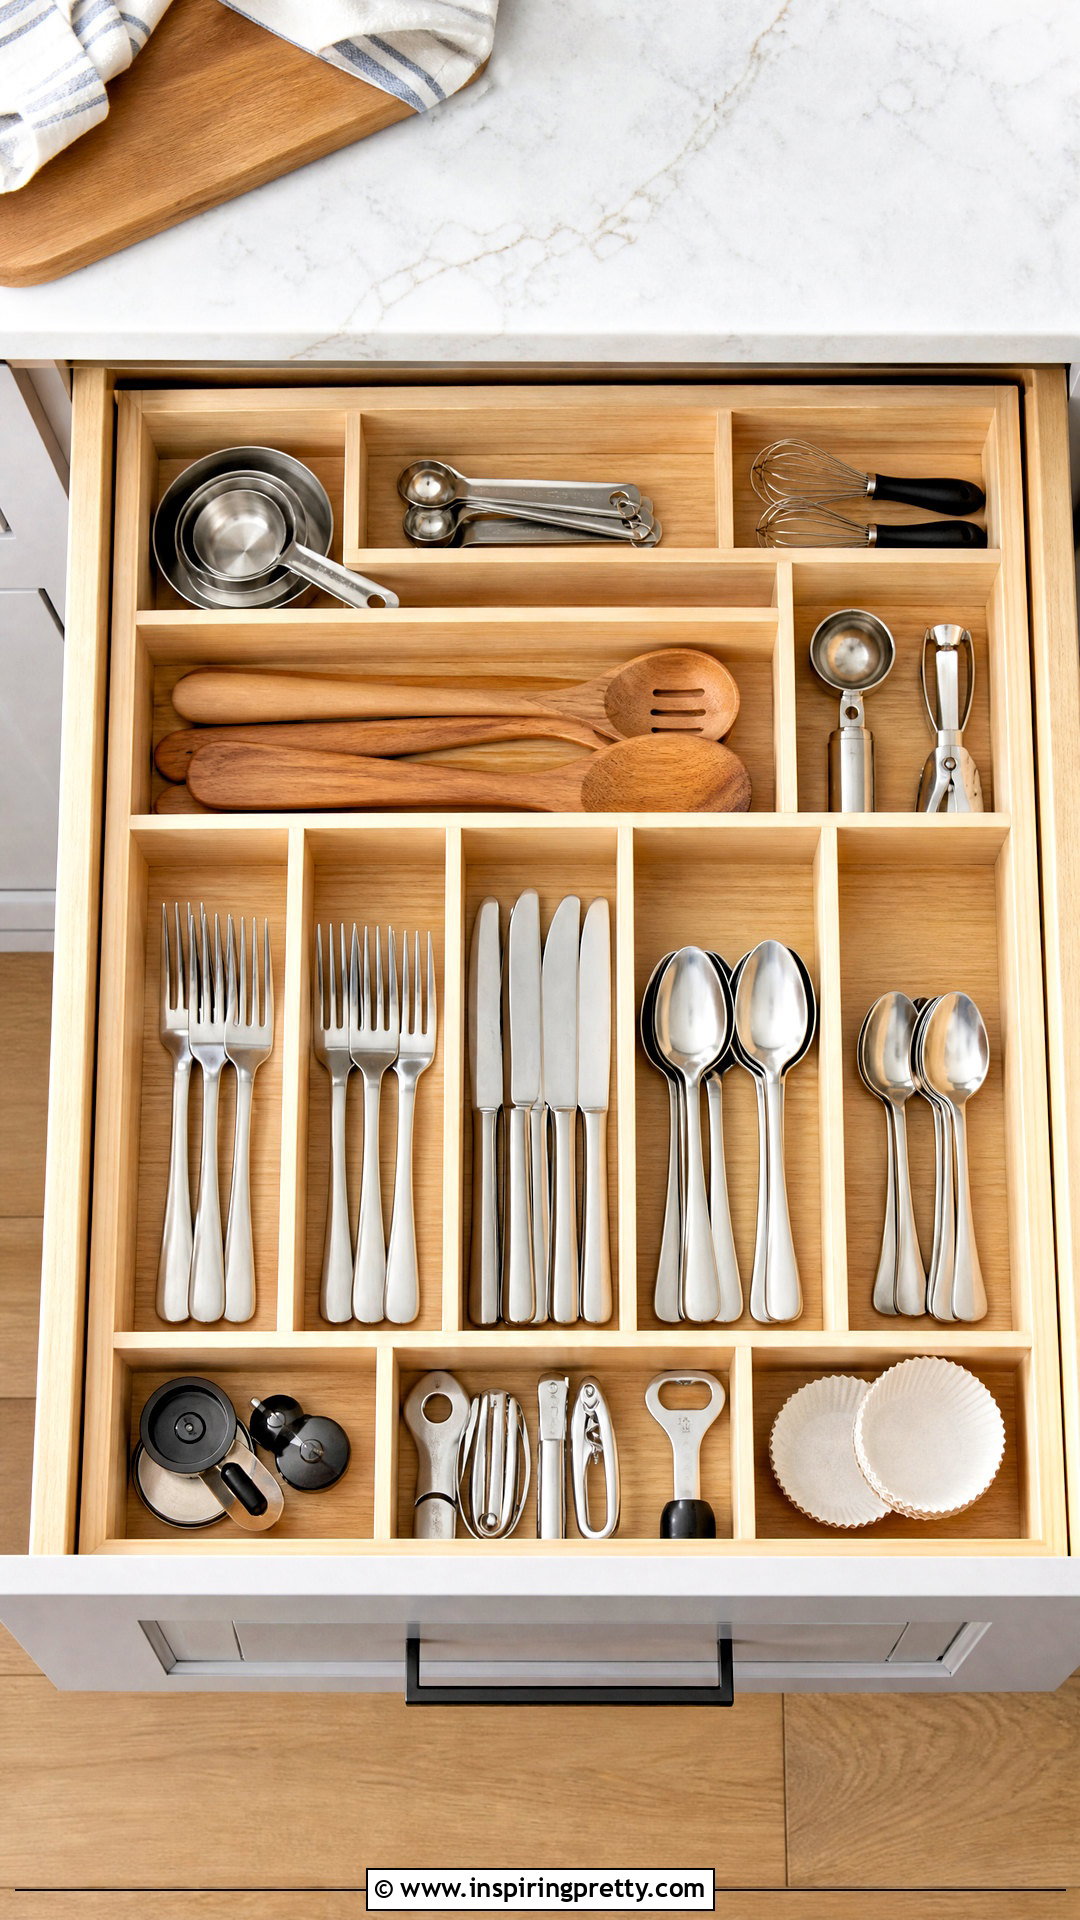
Custom drawer dividers prevent utensils, office supplies, cosmetics, and clothing accessories from becoming mixed together. Empty the drawer and measure its interior width, depth, and height. Decide which categories need compartments, then cut thin wood strips, foam board, or sturdy plastic to create the layout. Wood dividers can be joined with notches or adhesive, while removable materials can be pressure-fitted. Sand every wood edge before painting or sealing it. Test the arrangement inside the drawer before making permanent connections. Avoid creating compartments so exact that slightly larger items no longer fit. Line the bottom with washable paper or nonslip material for a cleaner finish. Label hidden sections if several household members use the same storage area.
32. DIY Ladder Blanket Rack
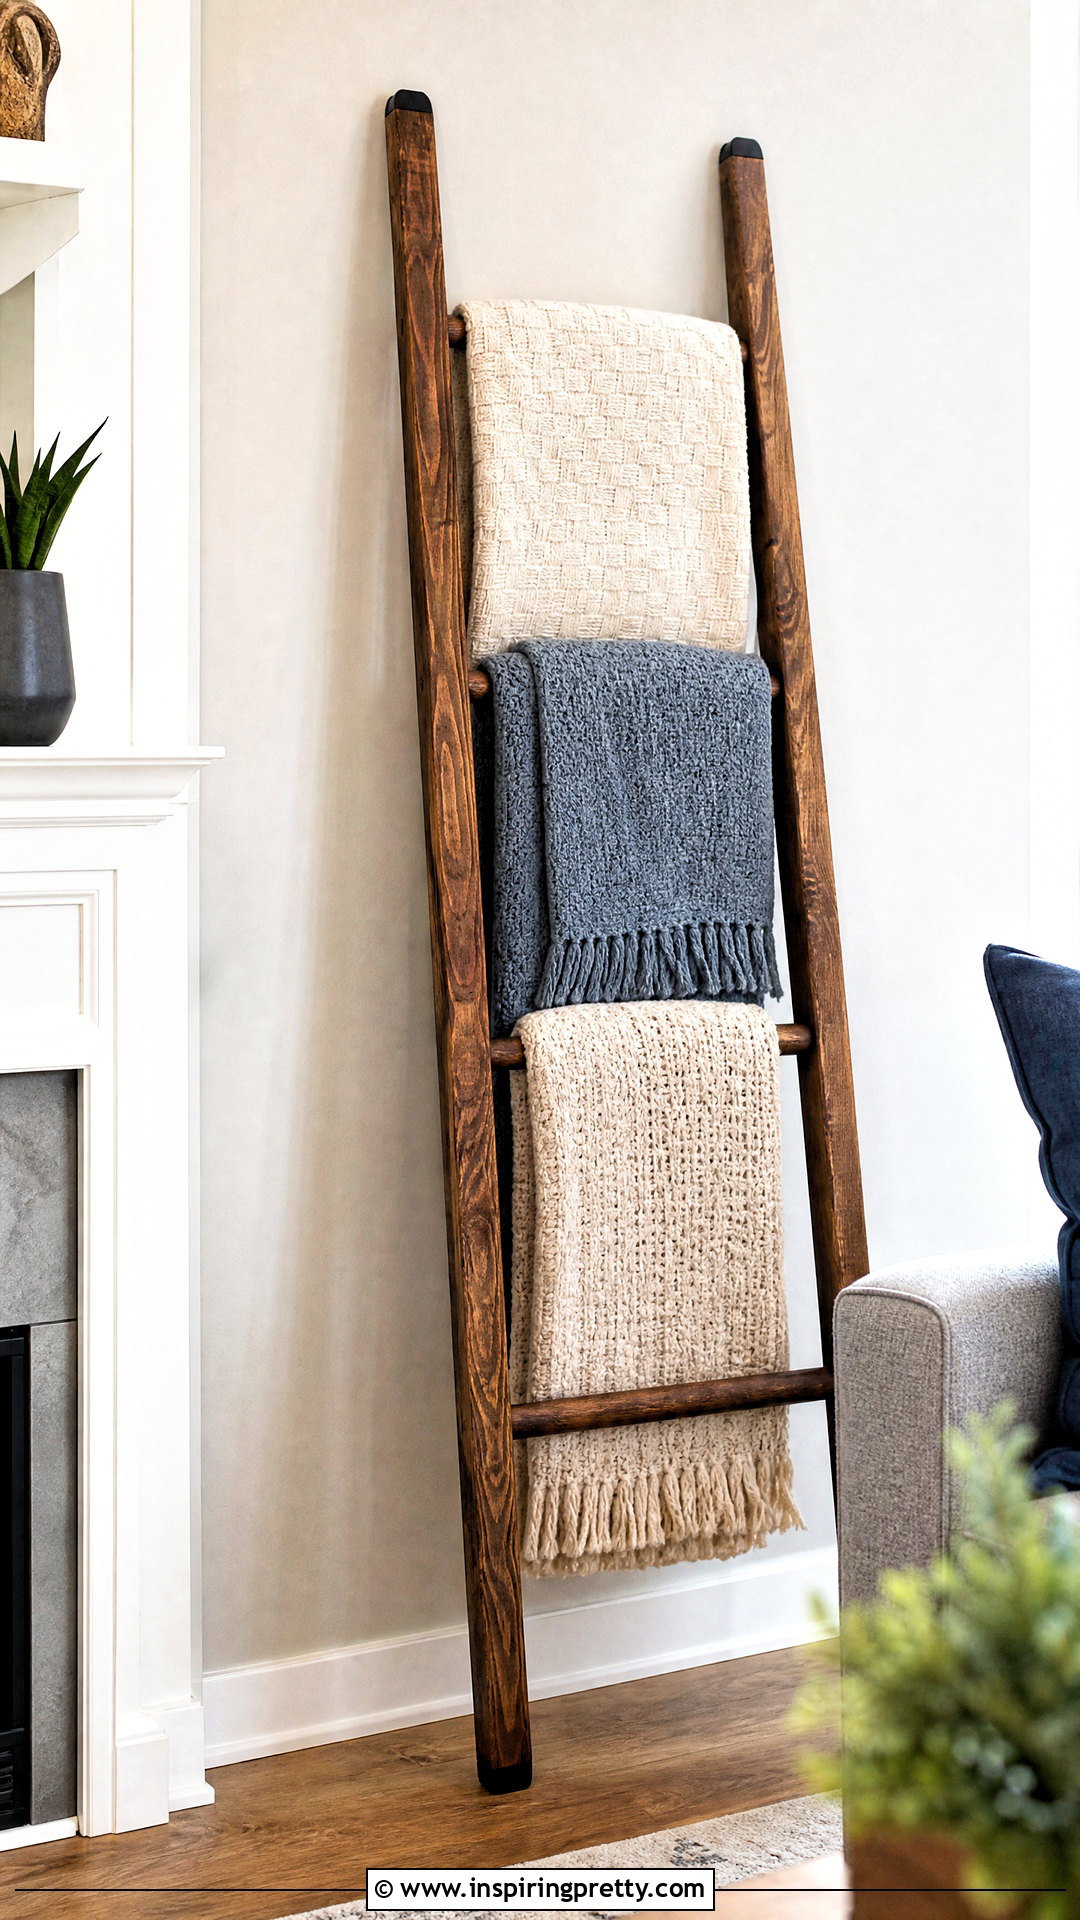
A leaning ladder rack displays blankets without occupying much floor space. Cut two long side rails and several evenly sized rungs from smooth wood. Mark each rung position carefully so the finished ladder appears level. Drill pilot holes before using screws, or join the pieces with strong wood glue and appropriate fasteners. Sand the entire structure, rounding rough corners, then apply stain, paint, or a clear finish. Add rubber pads where the rails touch the wall and floor. This decorative ladder should hold lightweight textiles only; it is not designed for climbing. Place it outside busy walkways and secure it to the wall if children or pets could pull it over. Fold blankets evenly to create a tidy, layered display.
33. DIY Hand Painted Doormat
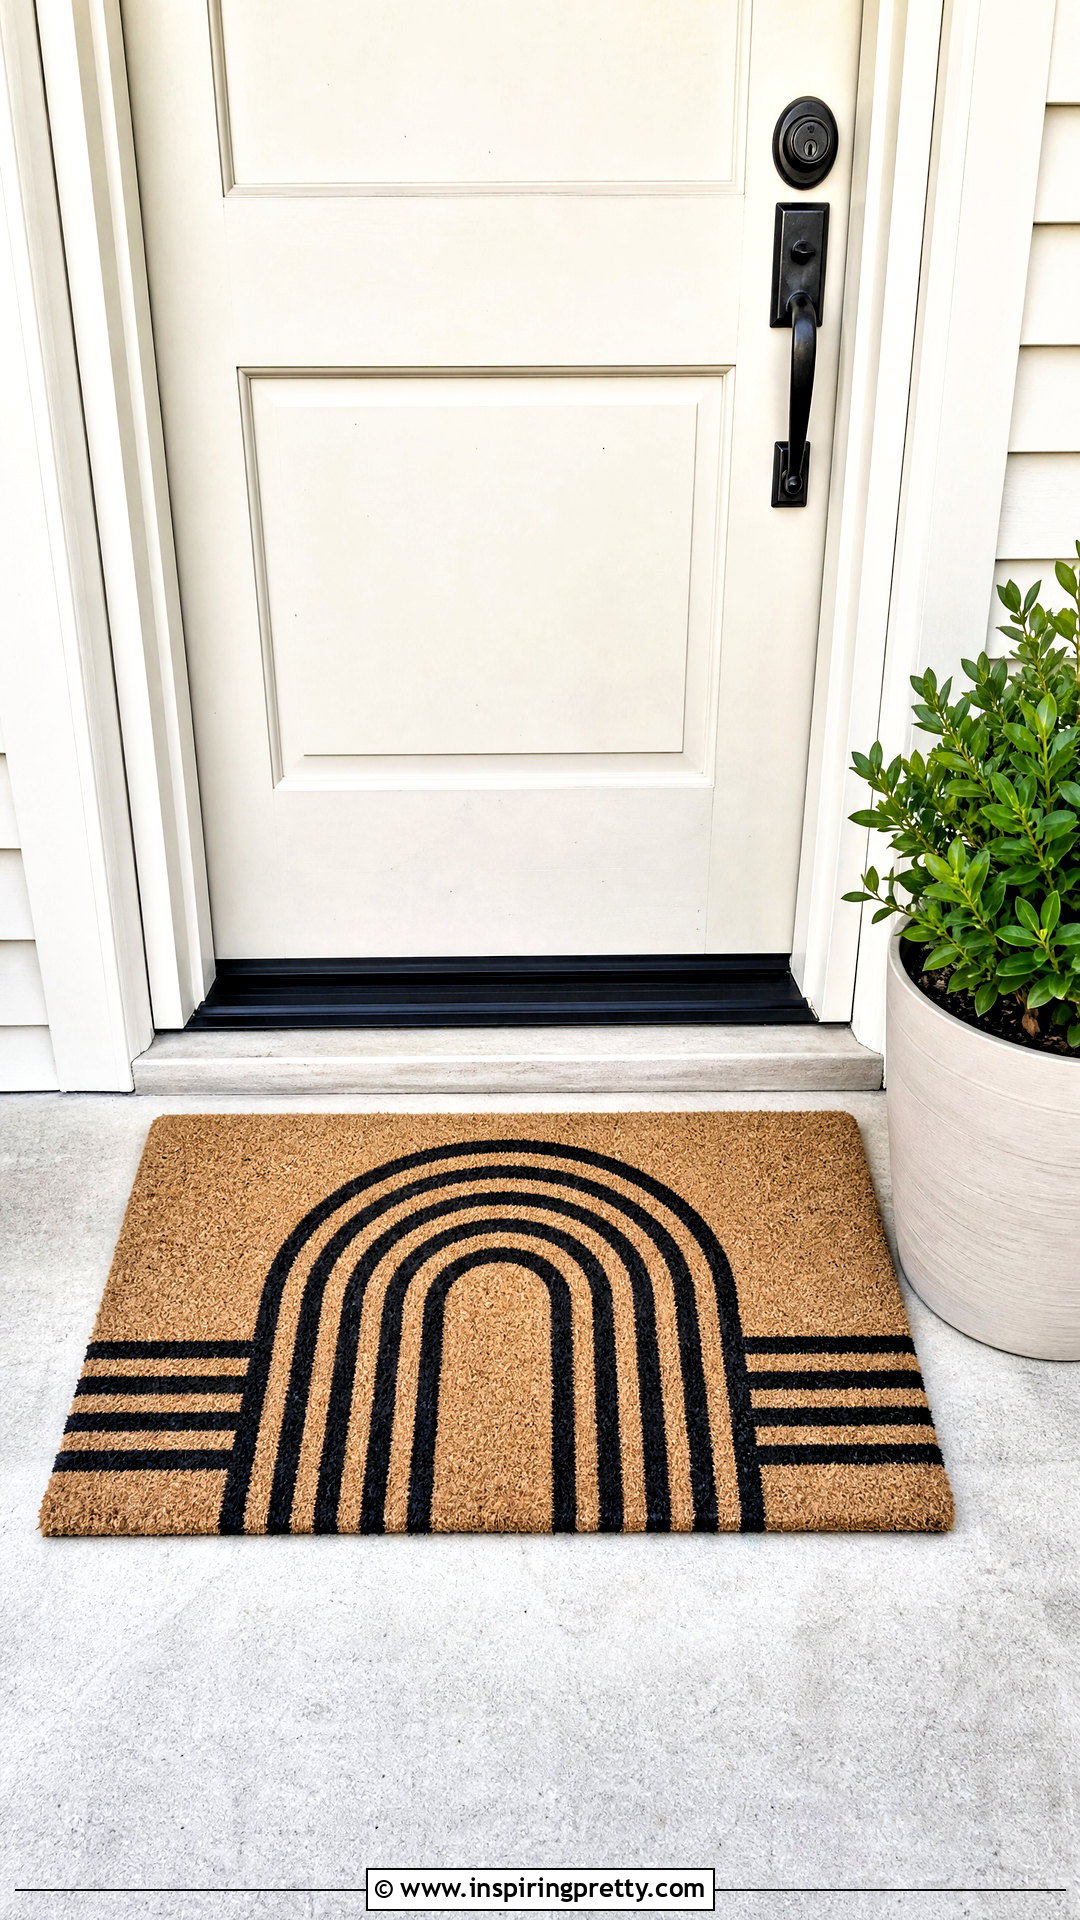
A hand-painted doormat gives an entrance a personalized update using a plain coir mat and outdoor paint. Create a simple design with large letters, stripes, arches, or geometric shapes. Cut a stencil from durable plastic or adhesive vinyl, then secure it firmly to the mat. Dab paint downward with a stiff stencil brush rather than brushing sideways, which can blur the edges. Apply several light layers until the design is visible. Remove the stencil carefully and let the mat dry completely. Use the finished piece in a covered location to slow fading and wear. Avoid overly fine details because the coarse fibers cannot hold them cleanly. Shake the mat outdoors and spot-clean it instead of soaking the painted surface.
34. DIY Air Dry Clay Trinket Dish
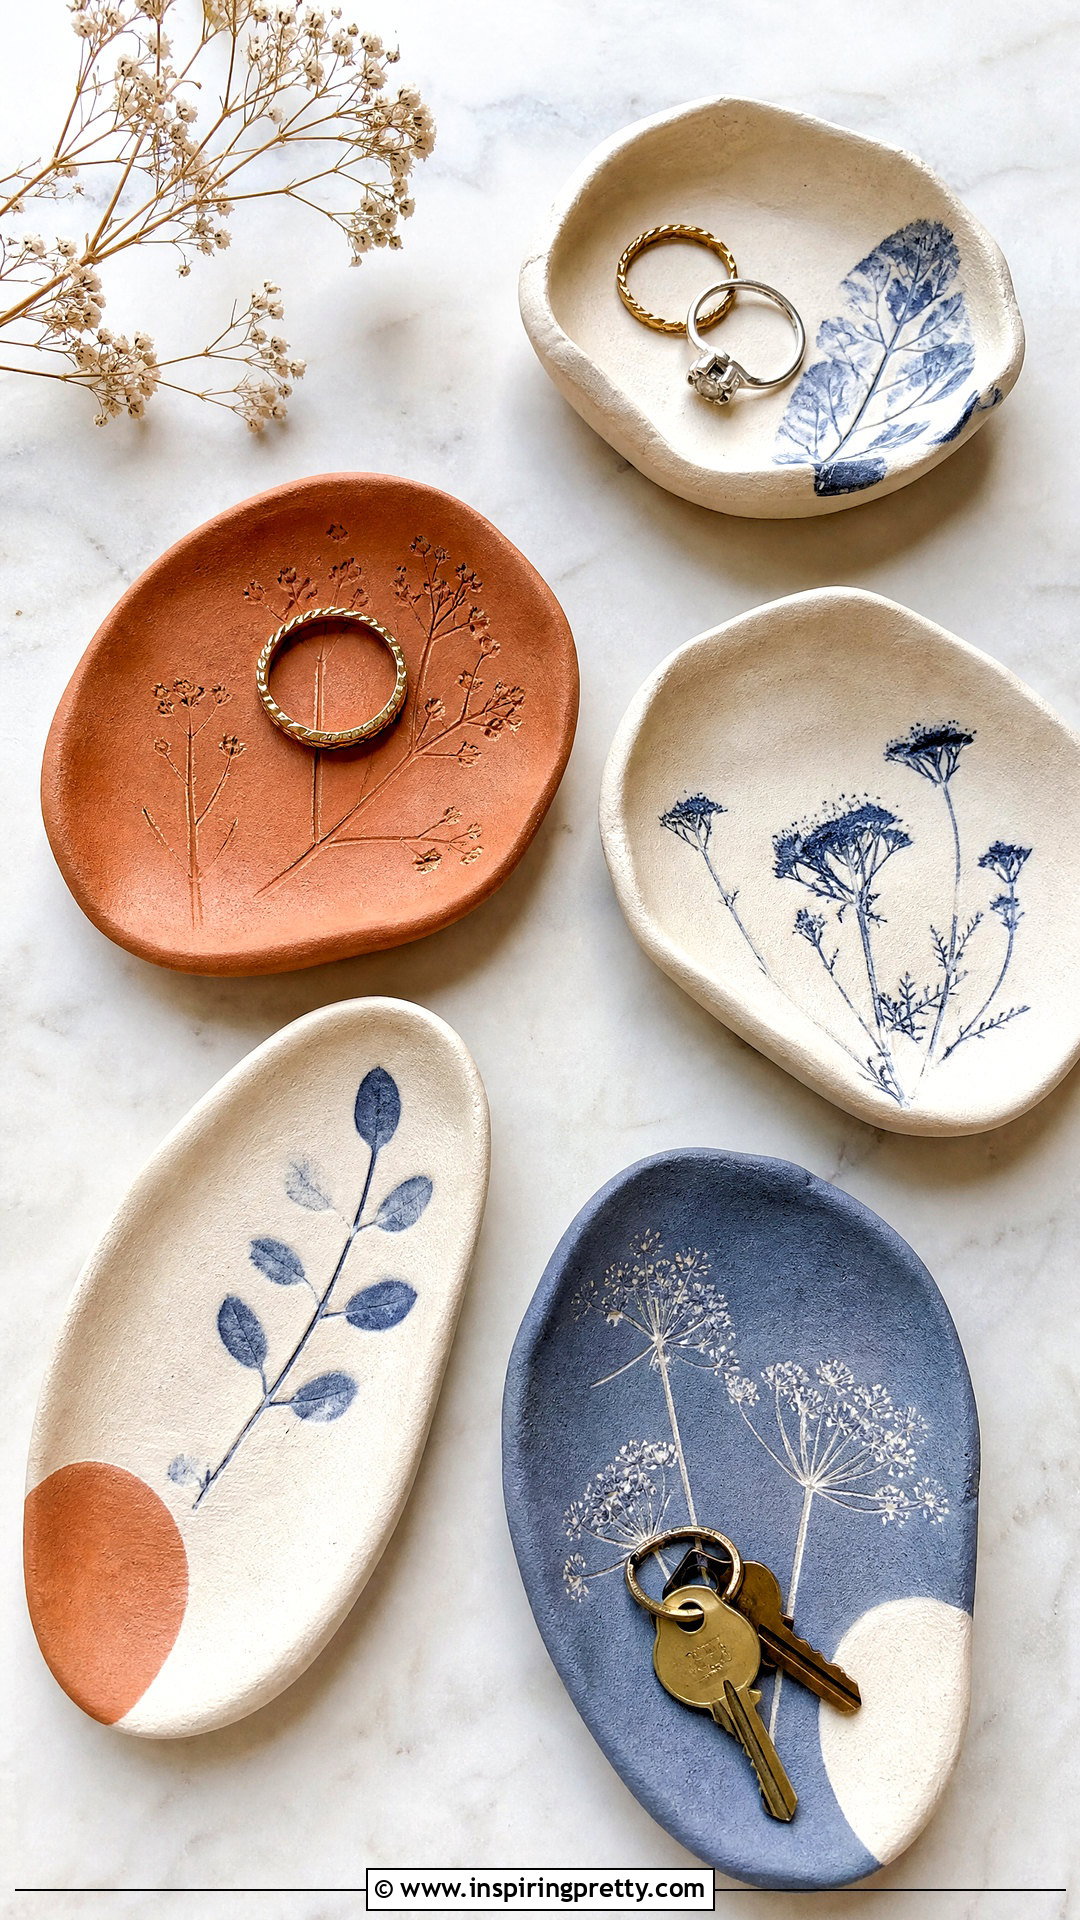
An air-dry clay dish provides a convenient place for rings, keys, or other small objects. Roll the clay evenly on a protected surface, then cut a circle or organic shape. Press it gently into a shallow bowl to create curved edges. Add texture with lace, leaves, stamps, or simple carved lines. Smooth cracks using a small amount of water, taking care not to oversaturate the material. Let the piece dry fully according to the clay instructions, turning it if needed so both sides receive airflow. Sand rough areas before painting with acrylic color. Finish with a compatible sealer for light protection. Air-dry clay is generally decorative, so do not use the dish for food, liquids, burning candles, or dishwasher cleaning.





35. DIY Cane Webbing Cabinet
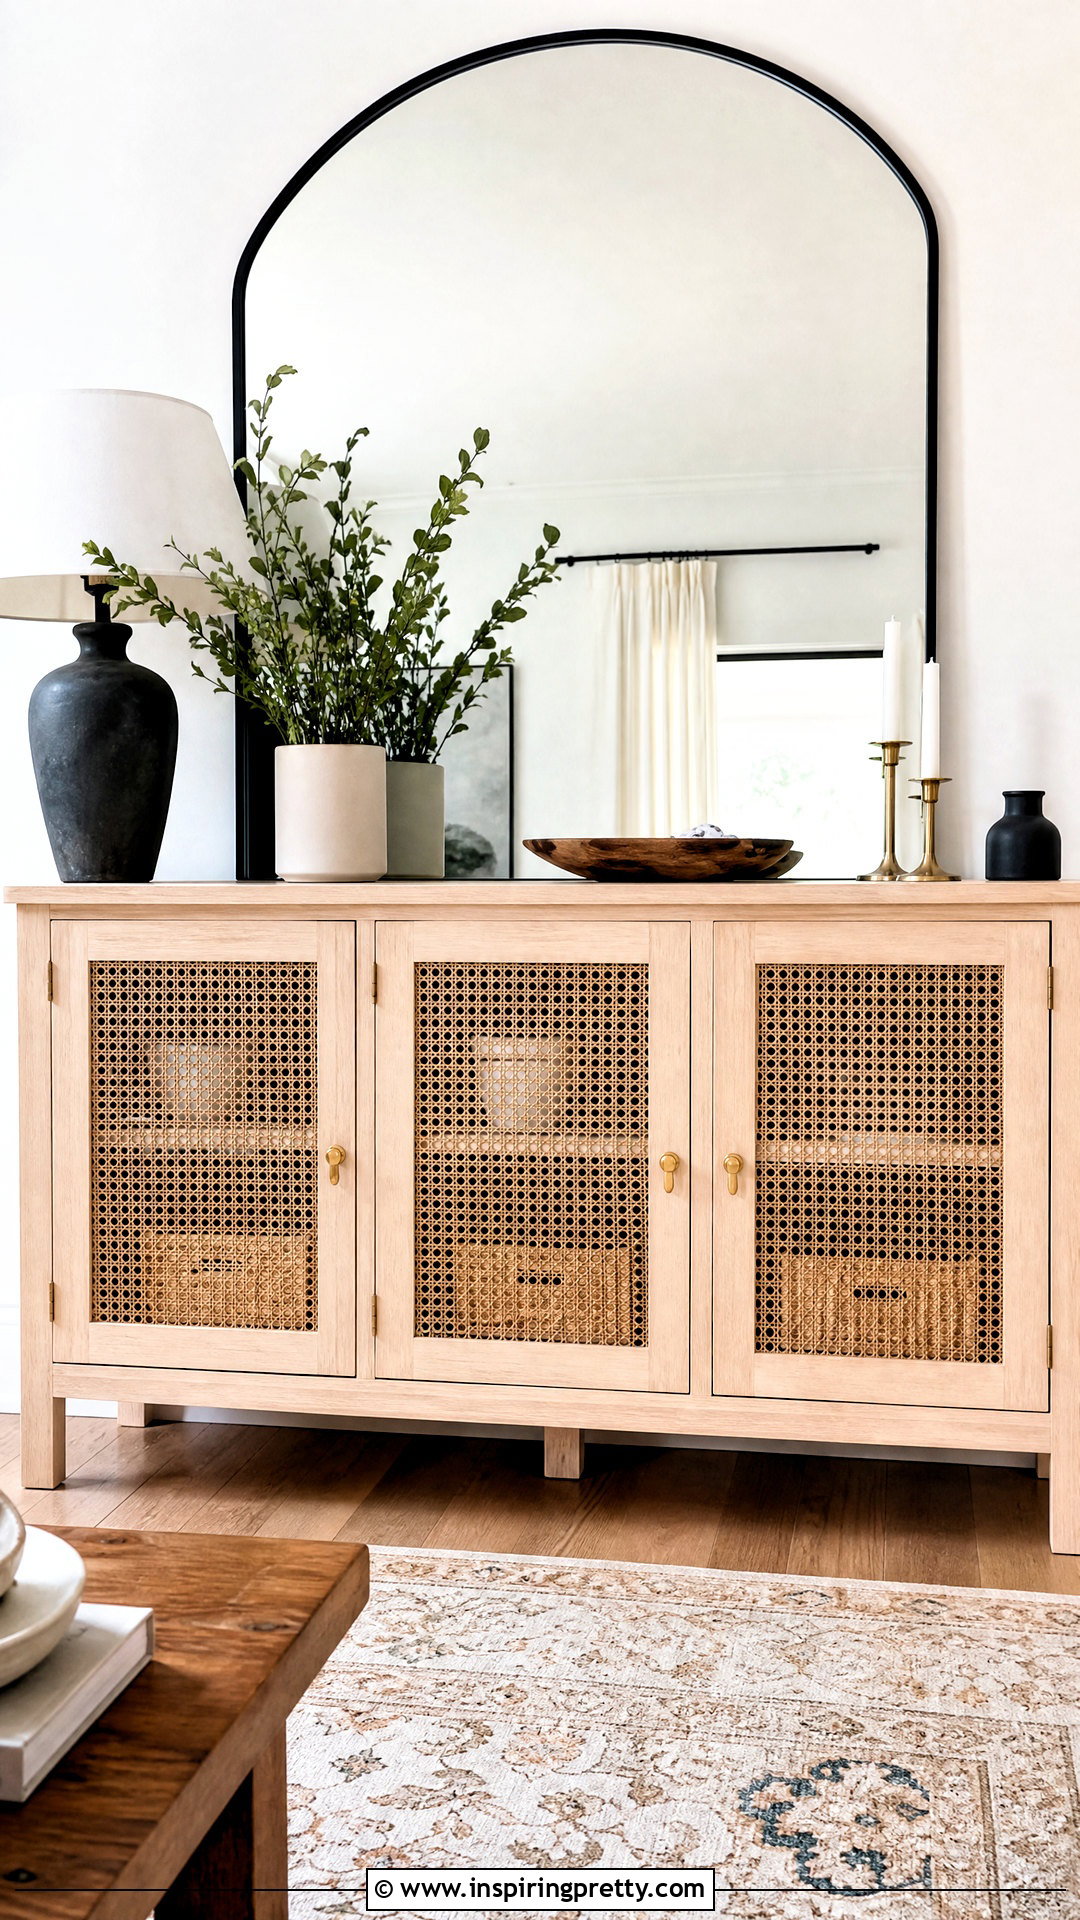
Cane webbing can update a cabinet door while adding light texture. Choose a door with a removable center panel or create an inset opening using suitable tools and woodworking experience. Soak natural cane only when the manufacturer recommends it, then stretch it evenly across the back of the opening. Secure the material with staples or narrow wood strips, keeping the pattern straight. Trim excess cane and cover raw edges for a professional finish. Paint or stain the cabinet frame before installing the webbing to prevent accidental marks. Reattach the door and check that it opens freely. This treatment works well on media cabinets, sideboards, and nightstands, but small objects inside may need baskets so they remain visually organized behind the woven surface.
36. DIY Painted Arch Wall
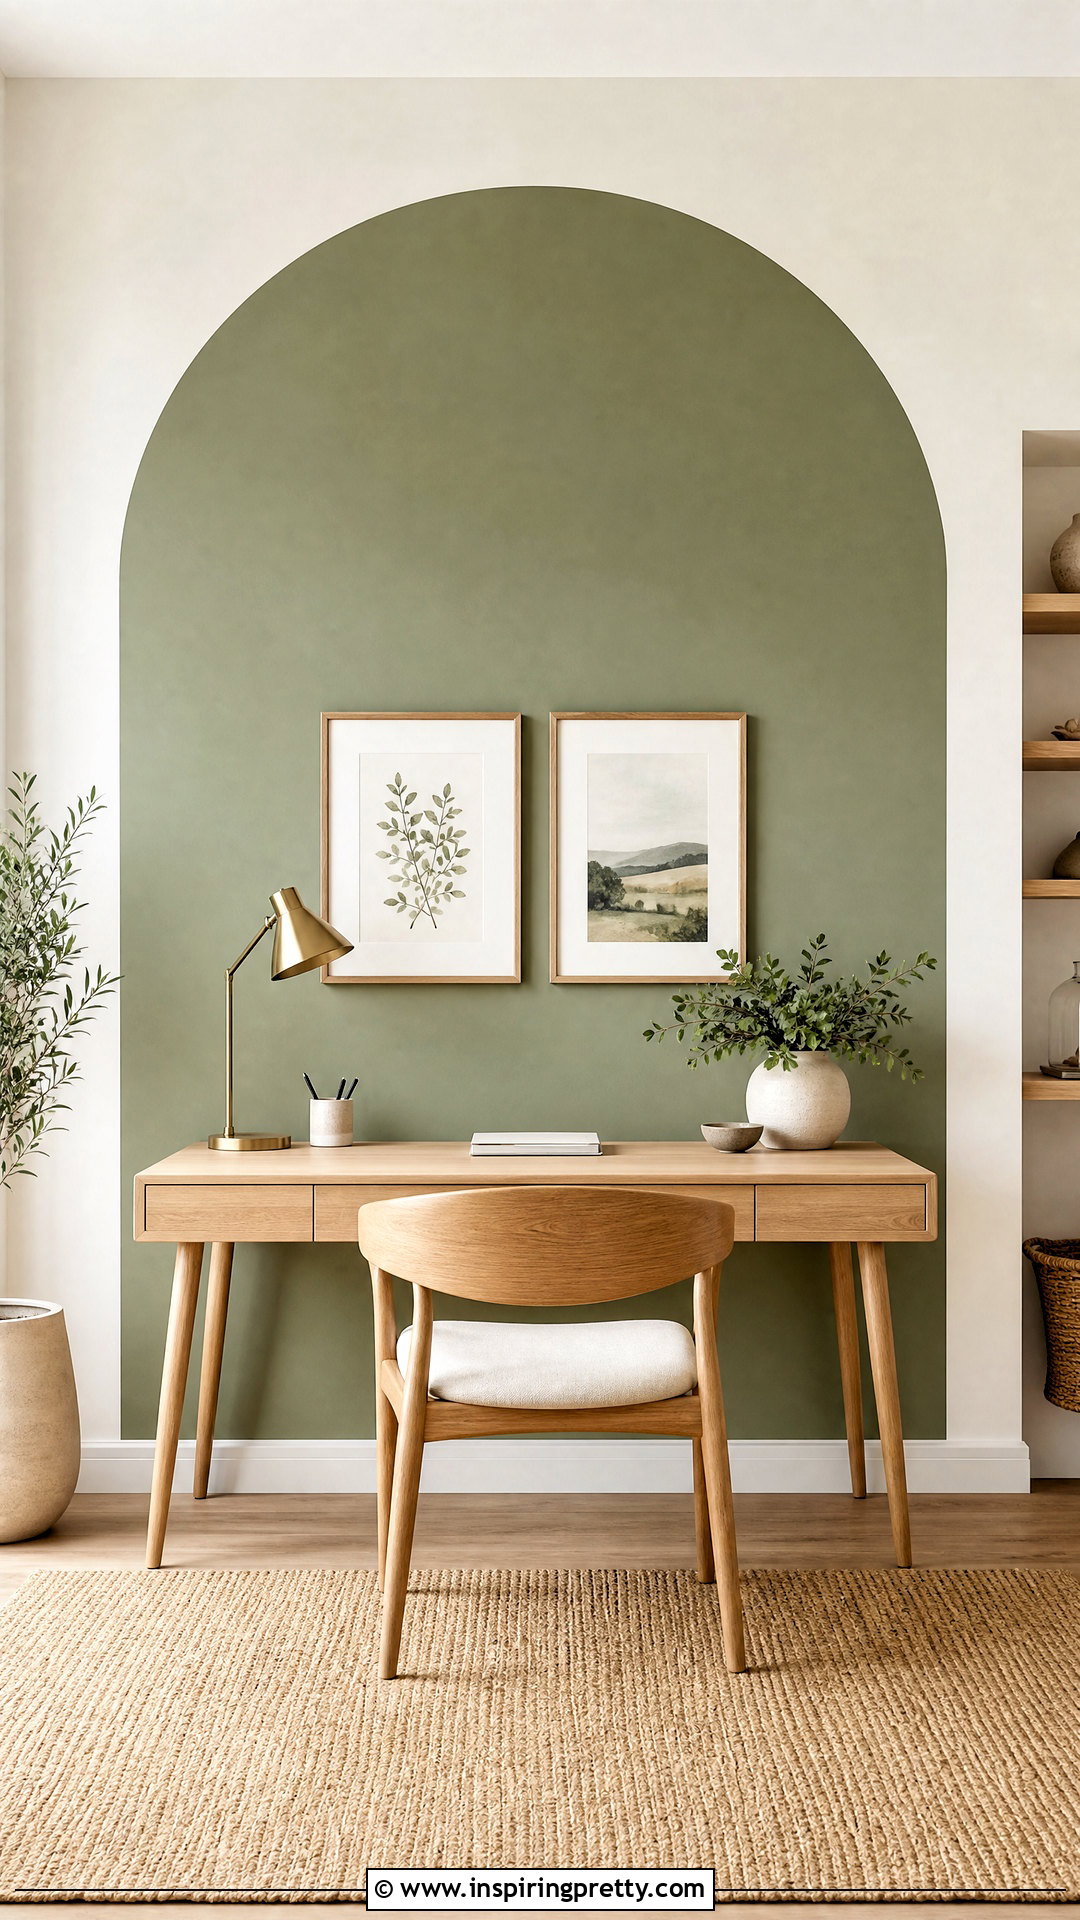
A painted arch can visually frame a desk, console table, bed, or reading chair. Determine the width and height, then mark straight vertical sides with a level and painter’s tape. Create the rounded top by tying a pencil to string anchored at the arch’s center point, using the string like a compass. Trace the curve lightly and paint the outline with an angled brush. Fill the larger area with a roller, applying a second coat after the first dries. Remove tape while the final coat is still slightly damp for cleaner edges. Choose a color with enough contrast to be visible without overwhelming nearby furniture. Position wall decor within the arch carefully so the painted shape remains clear and balanced.
37. DIY Pom Pom Throw Blanket
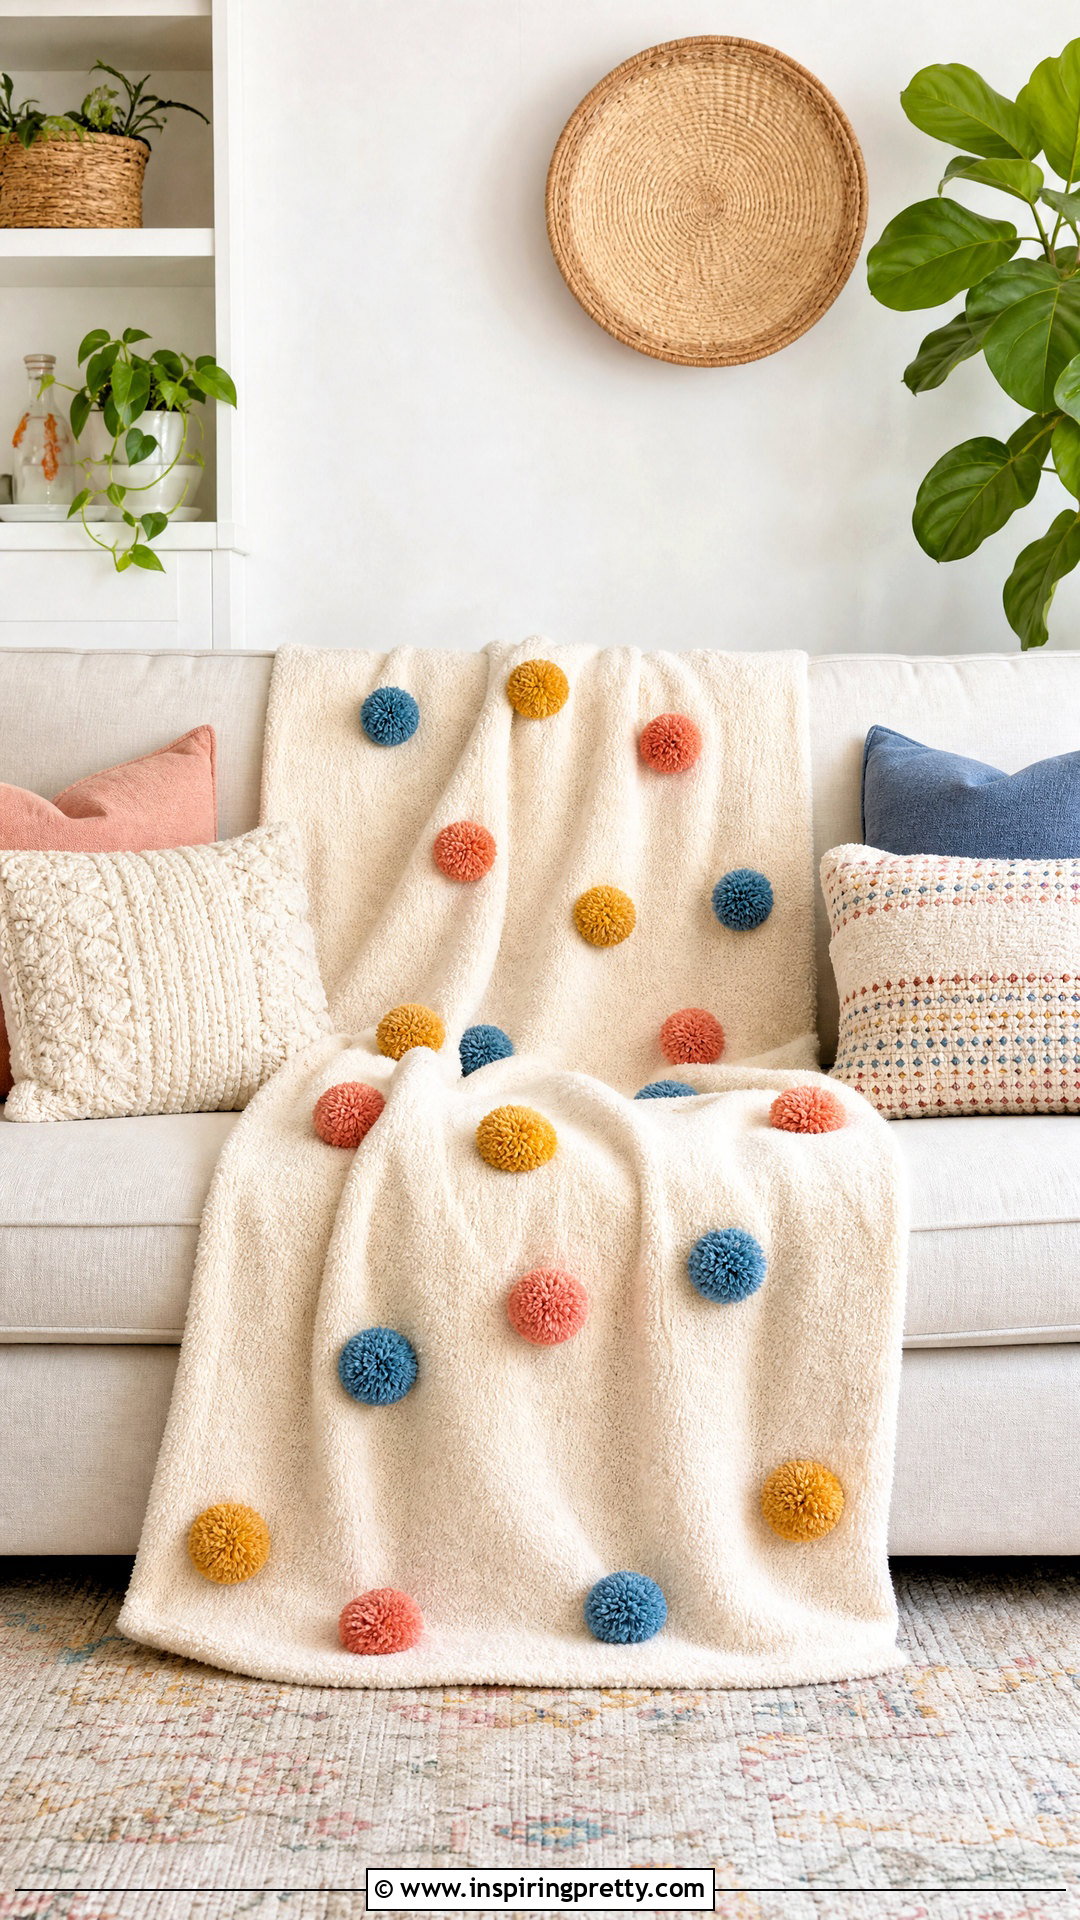
Colorful pom-poms can turn a plain throw blanket into a cheerful handmade accent. Purchase ready-made pom-poms or create your own by wrapping yarn around a pom-pom maker or sturdy cardboard template. Tie the center tightly, cut the loops, and trim the yarn into a rounded shape. Arrange the pom-poms around the blanket’s border before attaching them with strong hand stitches. Space them evenly and knot every stitch securely. Choose washable yarn with care instructions similar to the blanket. Large, loosely attached pom-poms may not withstand frequent machine washing, so gentle cleaning may be necessary. Keep embellished blankets away from infants and pets that might chew or pull loose fibers. Select two or three colors for a coordinated finished design.
38. DIY Wooden Bath Tray
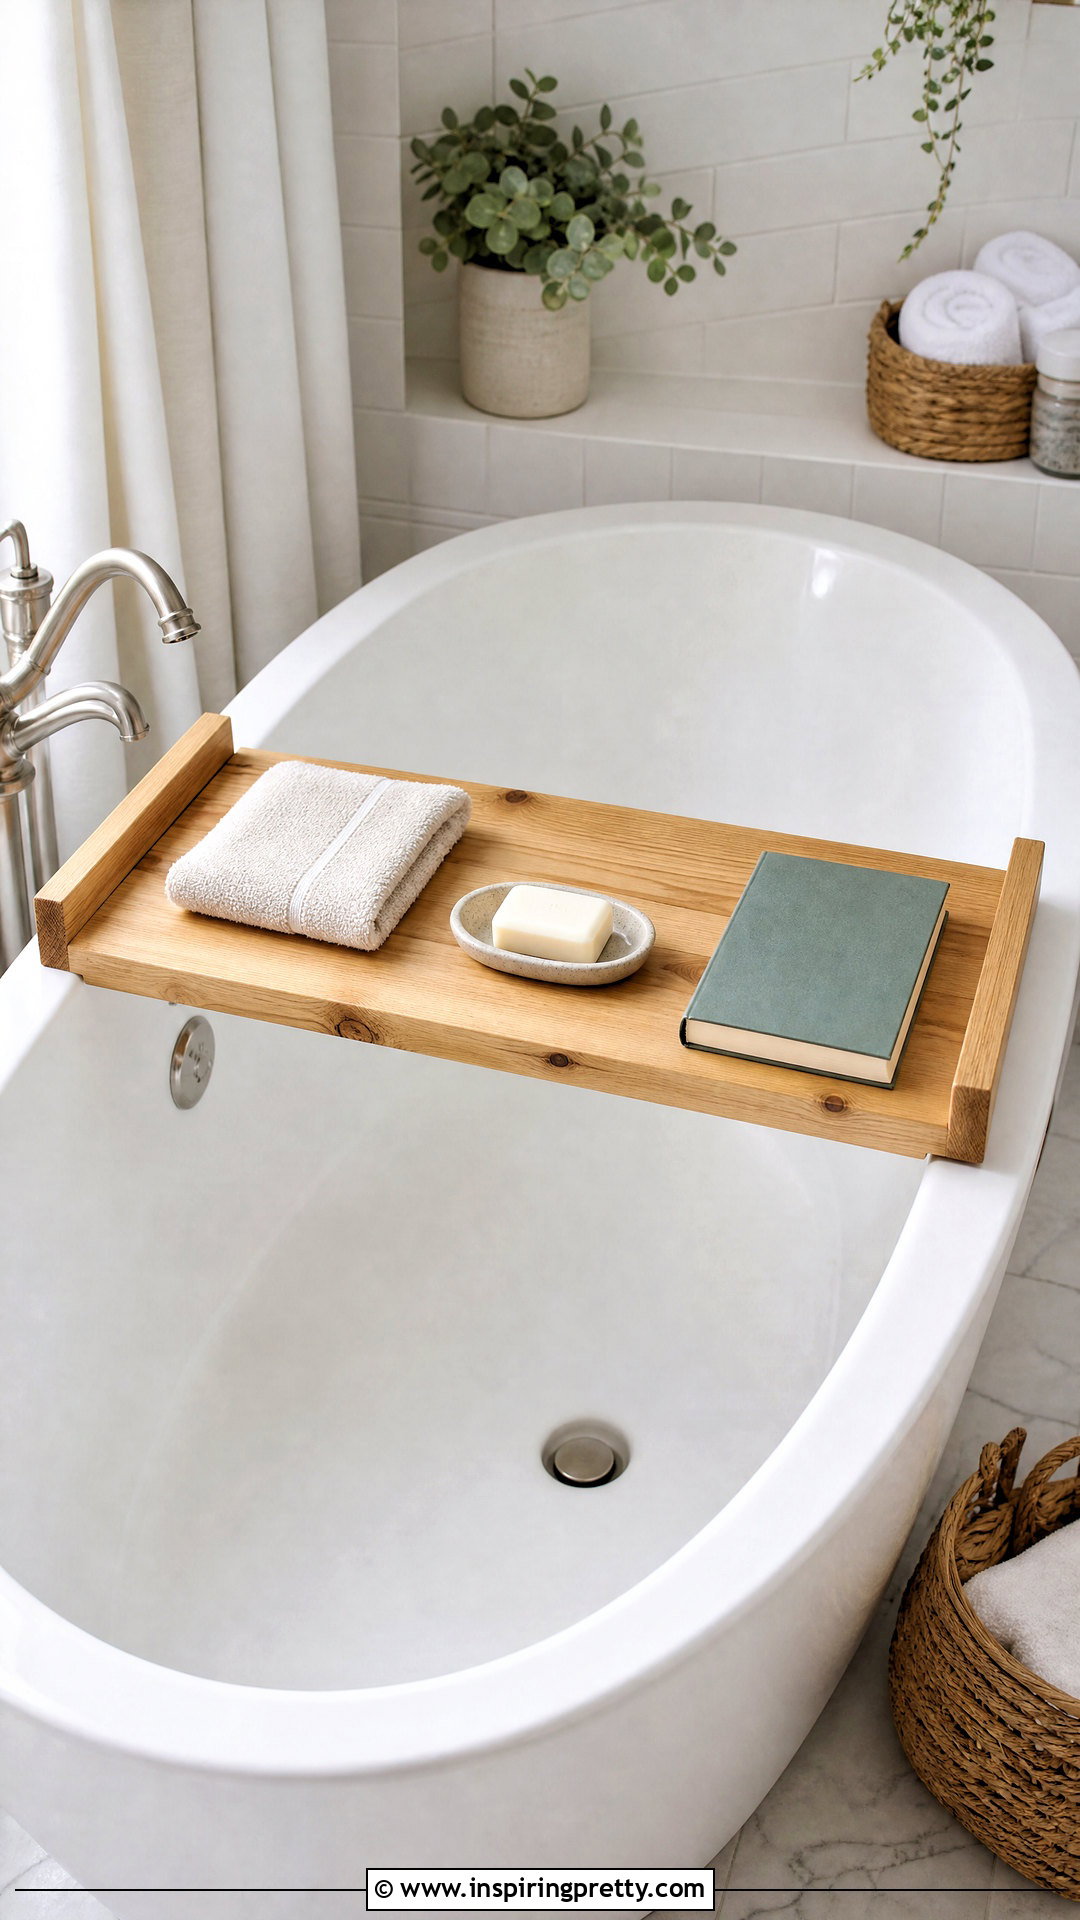
A wooden bath tray provides a stable surface for lightweight bathing essentials. Measure across the outer edges of the tub and cut a board long enough to rest securely on both sides. Sand it thoroughly, paying particular attention to corners and edges. Attach narrow stops underneath so the tray is less likely to slide sideways. Apply several coats of a water-resistant finish, covering the top, bottom, and cut ends. Allow the finish to cure completely before exposing it to moisture. Add a small recessed area or raised strip if you want to keep objects from rolling. Never place plugged-in electronics on or near the tray, and avoid open flames. Wipe the wood dry after use and store it where air can circulate.
39. DIY Tiled Side Table
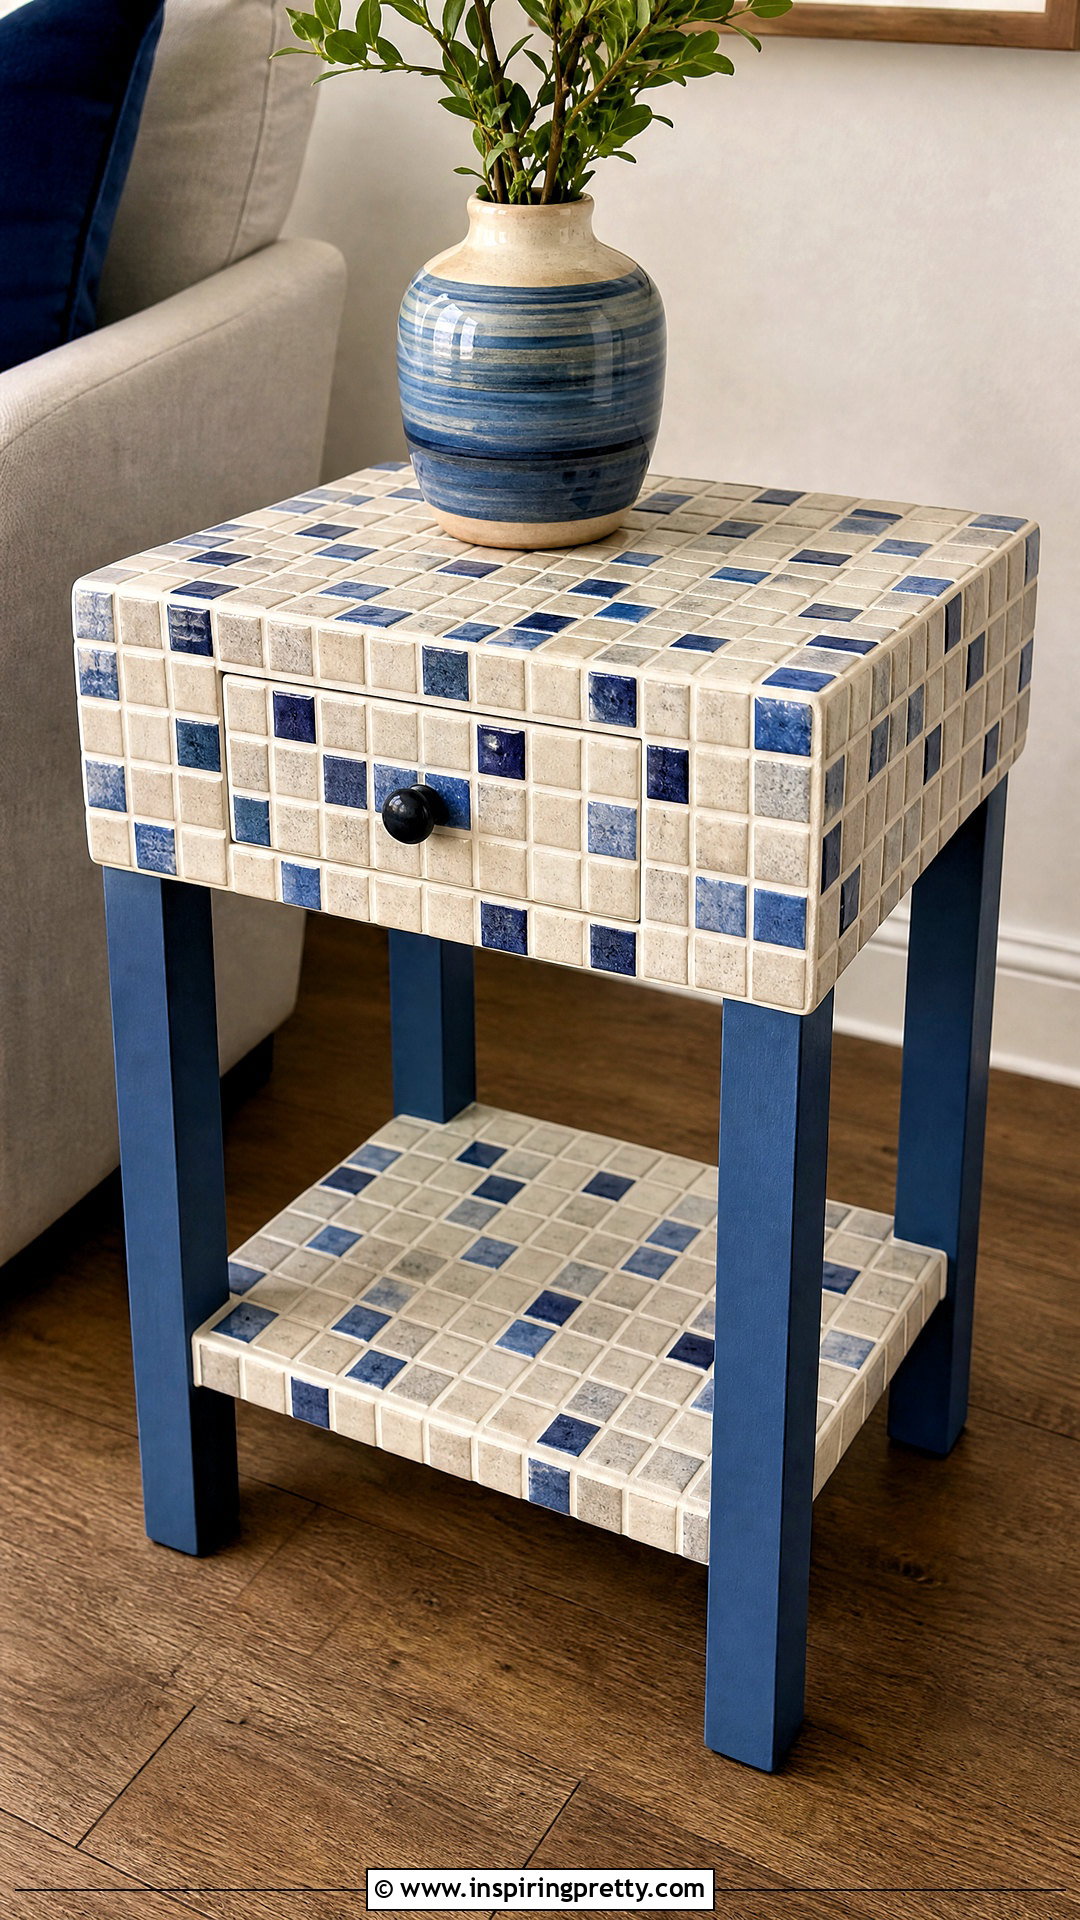
A tiled side table introduces pattern and durability to an old or inexpensive piece of furniture. Select a stable table with a top that can support the added weight. Arrange small tiles in a dry layout first, adjusting the pattern and edge spacing. Attach them with an adhesive suitable for both the tile and tabletop materials. Once cured, apply grout between the joints and wipe away residue before it hardens. Seal the grout if required for easier cleaning. Paint the legs in a coordinating color and add protective floor pads. Mosaic sheets simplify spacing, while individual tiles allow custom patterns. The finished tabletop should remain level, with smooth edges that will not snag clothing or scratch anyone using the table.
40. DIY Hanging Plant Shelf
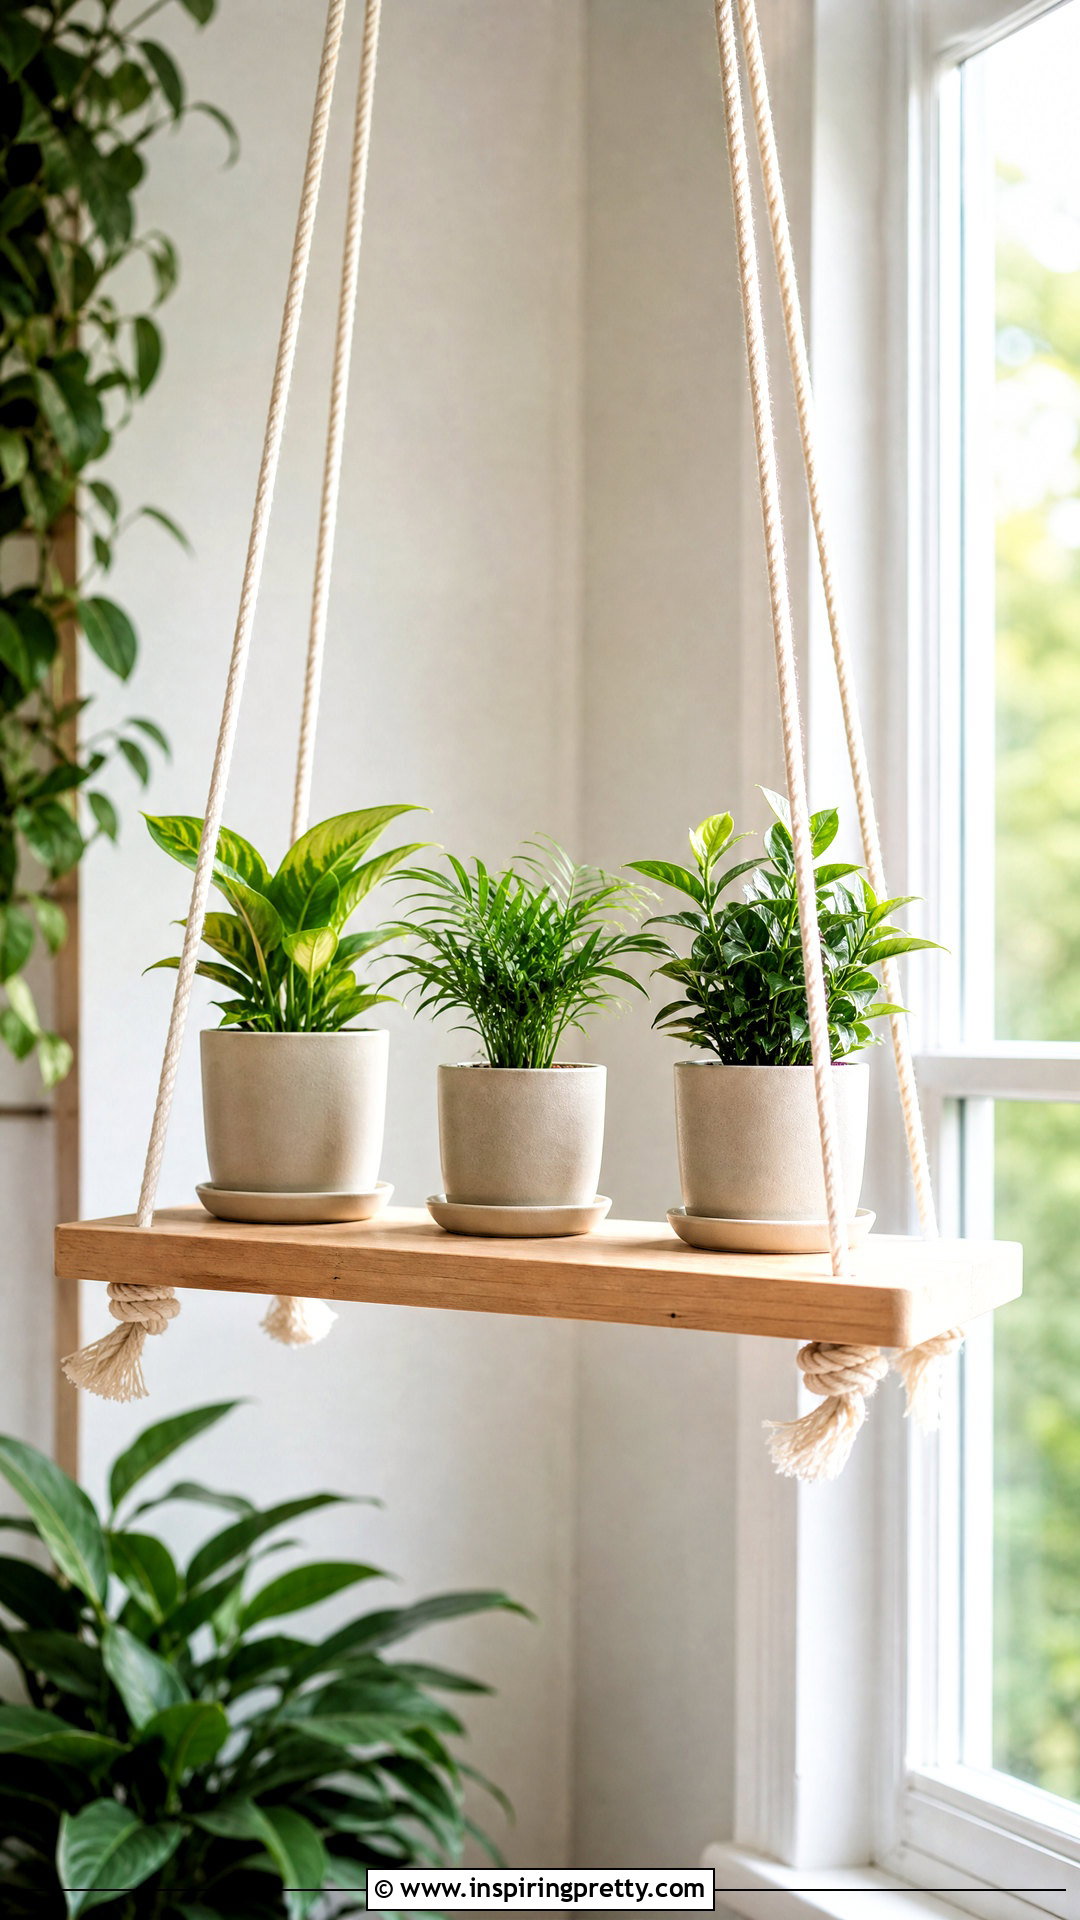
A hanging shelf creates a compact display for small plants near a bright window. Cut a solid wood board and drill matching holes near all four corners. Sand and seal the wood to help protect it from occasional moisture. Thread strong rope through the holes and tie secure knots beneath the shelf, checking that every section is equal in length. Join the ropes above and suspend them from ceiling hardware rated for the full loaded weight. Locate a ceiling joist or use an approved anchor rather than relying on a lightweight hook. Choose small planters with saucers and avoid overloading the shelf. Keep it away from doors, walkways, fans, and locations where people might bump it. Confirm the shelf remains level after watering.
41. DIY Denim Tote Bag
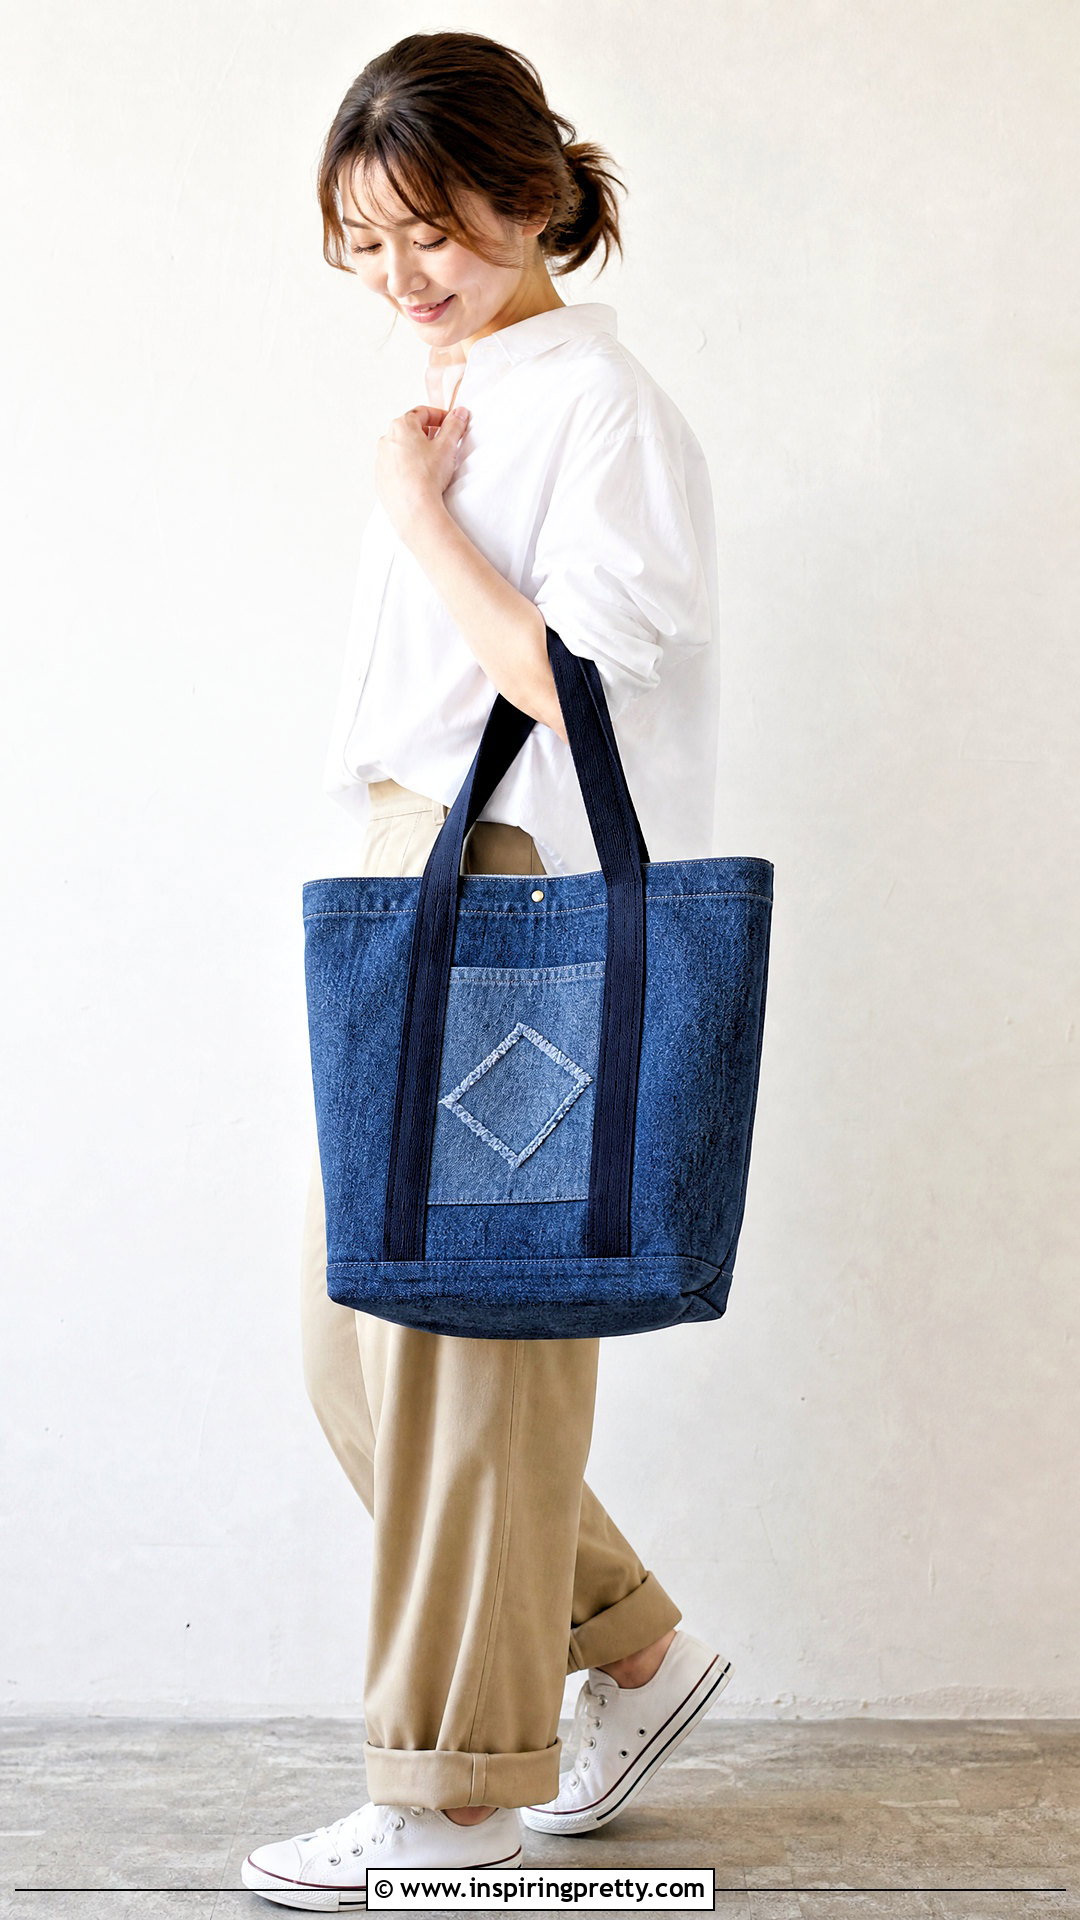
A worn pair of jeans can become a durable tote for books, groceries, or everyday supplies. Cut usable fabric from the legs, avoiding areas that are extremely thin or stretched. Sew two matching panels together with strong seams, then box the lower corners if you want a wider base. Make handles from folded denim strips or sturdy cotton webbing and stitch them securely to both sides. Reinforce each handle attachment with a square-and-cross pattern. Add a lining and interior pocket for a more finished bag. Decorative patches or visible mending can cover stains while adding personality. Check every seam before carrying heavier items. Wash the completed tote according to the original denim care instructions and air-dry it when possible to reduce shrinkage.
42. DIY Painted Glass Bottles
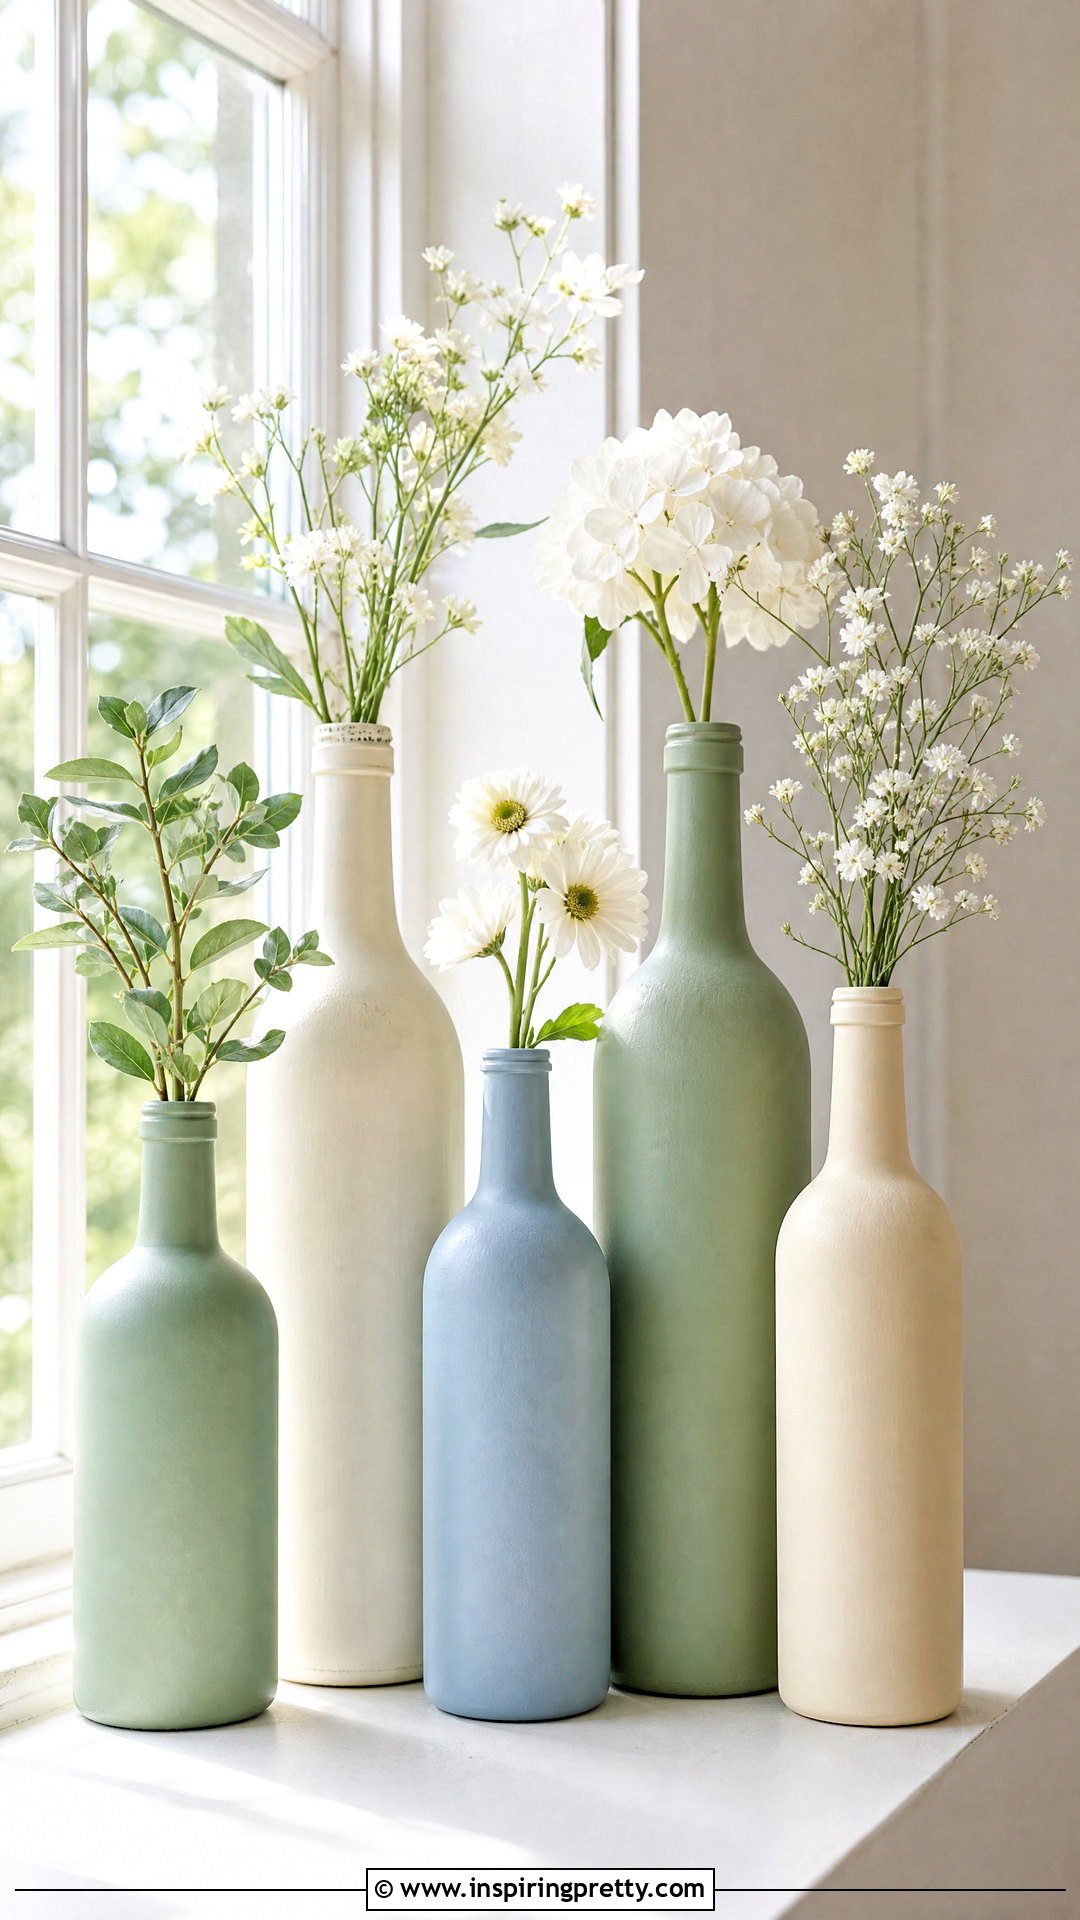
Clean glass bottles can be transformed into coordinated bud vases or shelf decor. Remove labels by soaking the bottles and gently scraping away adhesive. Wash and dry the glass, then wipe the exterior with rubbing alcohol if recommended for the paint. Apply glass-compatible spray paint outdoors or brush on a suitable craft coating in several thin layers. Create an ombré effect, color block, or matte stone finish. Keep paint away from the bottle opening and interior if you plan to use fresh stems. Allow the coating to cure fully before arranging the bottles. Group odd numbers in varied heights for a balanced display. Do not reuse decorated bottles for drinking, and place protective pads underneath if the painted base could mark furniture.
43. DIY Book Page Wall Art
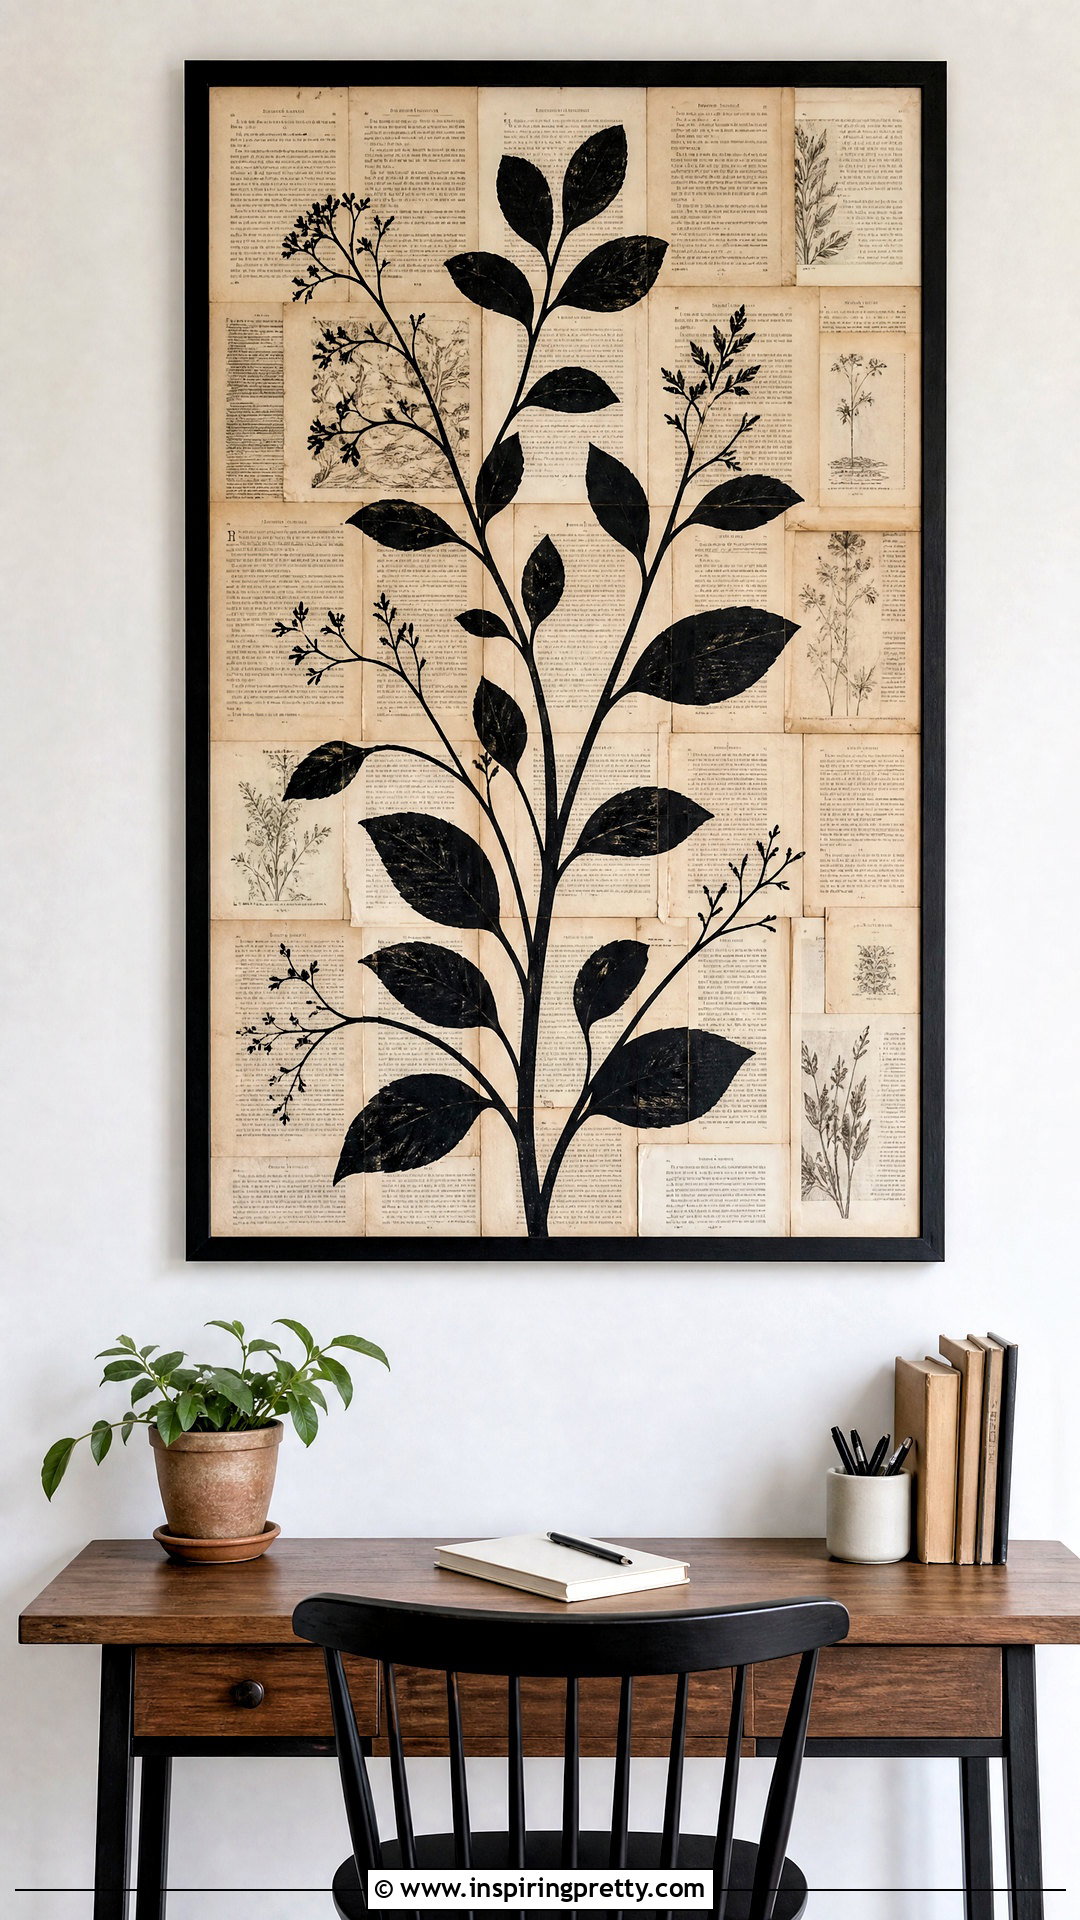
Damaged or unwanted books can supply paper for layered wall art without sacrificing readable favorites. Select pages from materials you own and no longer need, then arrange them on a sturdy backing board. Overlap the edges to create a complete background and attach them with decoupage medium. Once dry, add a painted silhouette, botanical shape, geometric design, or meaningful short word. Keep the composition bold enough to remain visible over printed text. Apply a thin protective topcoat if desired, watching for wrinkles or ink bleeding. Place the finished panel in a simple frame that complements the aged paper. You can achieve a similar look with photocopied pages when you prefer not to cut an actual book.
44. DIY Woven Wall Basket Display
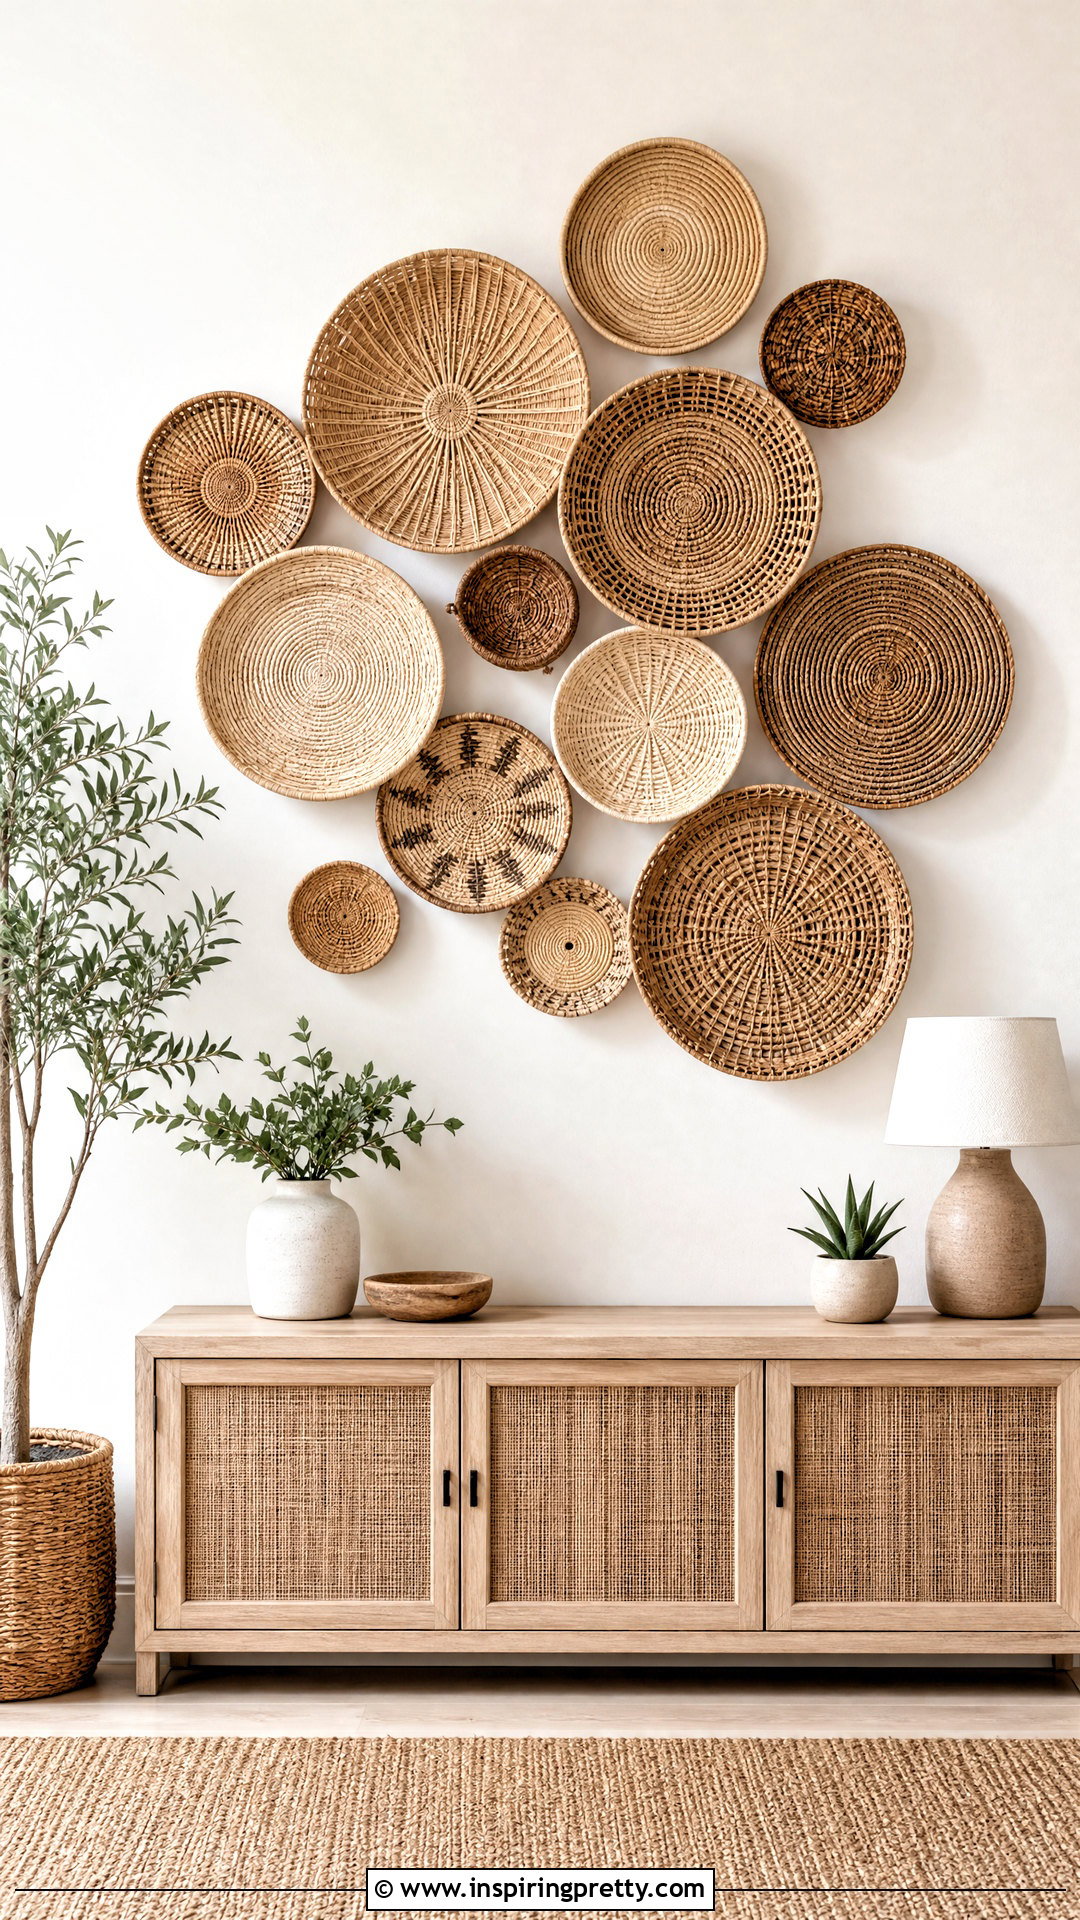
Flat woven baskets create dimensional wall decor while introducing natural texture. Collect baskets in several sizes but limit the colors and materials so the arrangement feels connected. Lay them on the floor first and build the display around one larger focal piece. Overlap a few edges and vary the direction of the weaving patterns. Trace the arrangement or take a reference photo before moving it to the wall. Use plate hangers, small hooks, or secure loops depending on each basket’s construction and weight. Avoid puncturing fragile fibers near the rim. Position the collection away from moisture, cooking grease, and intense sunlight. Dust it gently with a soft brush or low-suction vacuum attachment to protect the woven surfaces.
45. DIY Refinished Nightstand
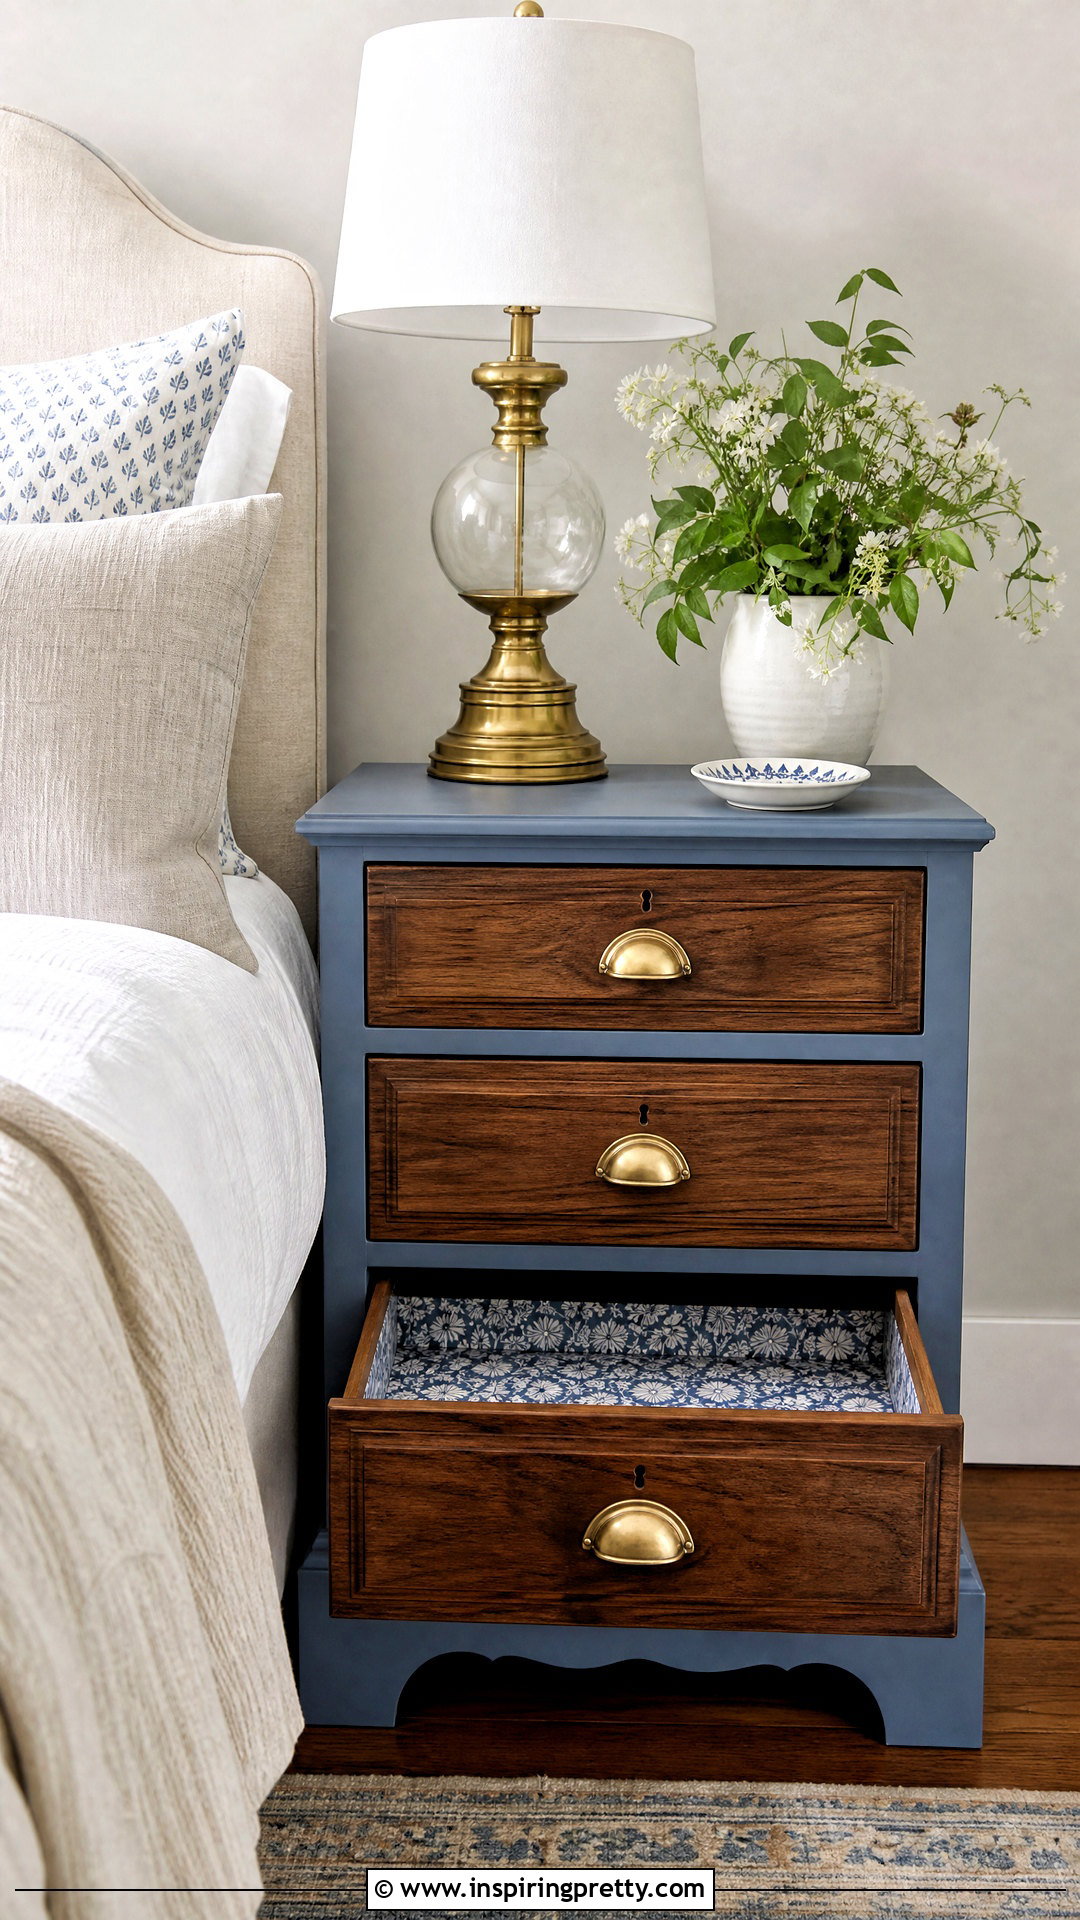
A refinished nightstand can provide both storage and character beside the bed. Inspect the piece for structural damage, loose joints, odors, and unstable drawers before beginning. Remove the hardware and clean every surface thoroughly. Sand the finish enough to promote adhesion, using extra care on veneer. Repair chips and fill unwanted holes, then apply primer and furniture paint or a compatible stain. Replace basic knobs with updated pulls, or clean and reuse the originals. Line the drawers with removable paper for a fresh interior. Let the finish cure before placing lamps or accessories on top. Keep styling functional with a light, a small dish, and one decorative object. Secure tall or unusually narrow furniture if tipping could be a concern.
46. DIY Concrete Planter
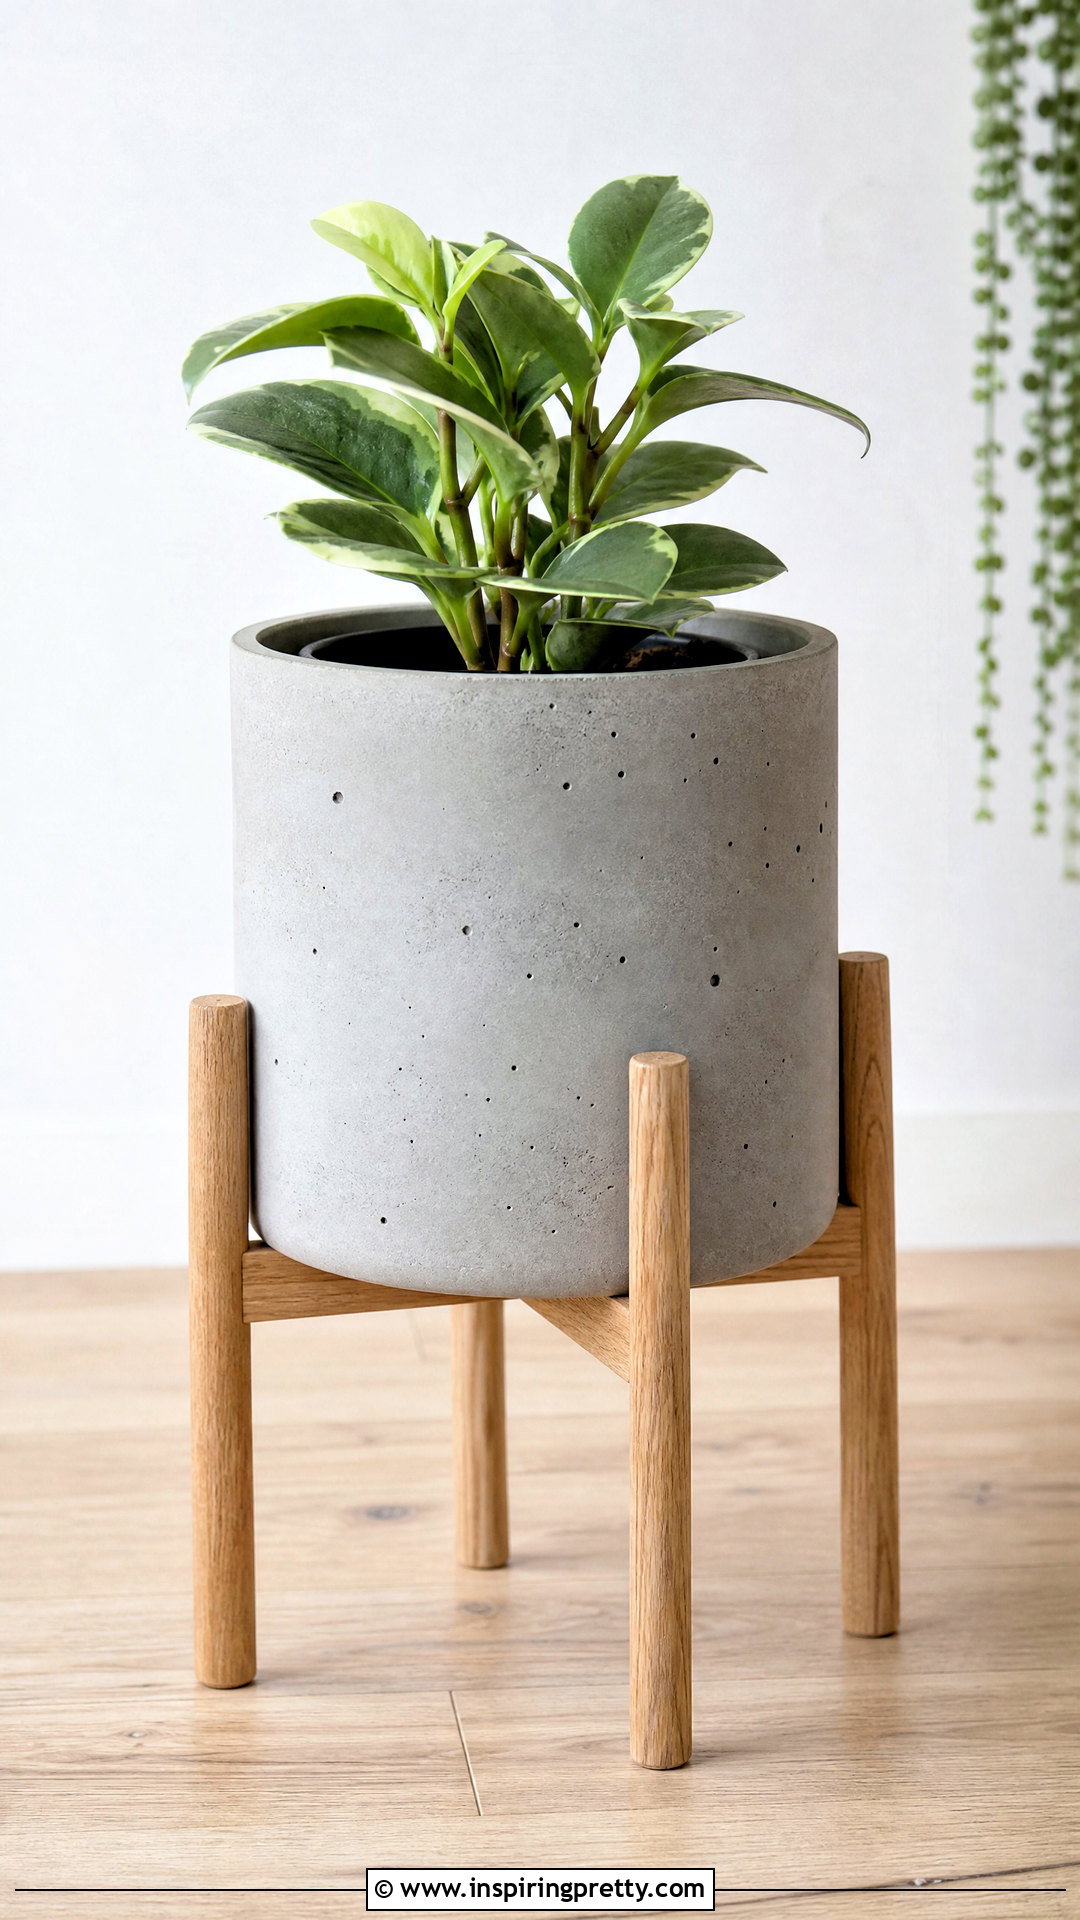
A small concrete planter has a clean, modern appearance and works indoors or outside. Use two reusable containers as molds, with the smaller one creating the planting cavity. Coat the molds with an appropriate release agent, then prepare the concrete mix according to its directions. Pour it into the larger mold, press the smaller container into the center, and add weight to keep it in place. Tap the sides gently to release trapped air. After curing, remove the molds and sand sharp edges while wearing suitable protection. Drill or form a drainage hole when possible. Concrete can affect moisture and soil conditions, so use an interior nursery pot if preferred. Lift larger planters carefully because the finished material may be unexpectedly heavy.
47. DIY Fabric Covered Lampshade
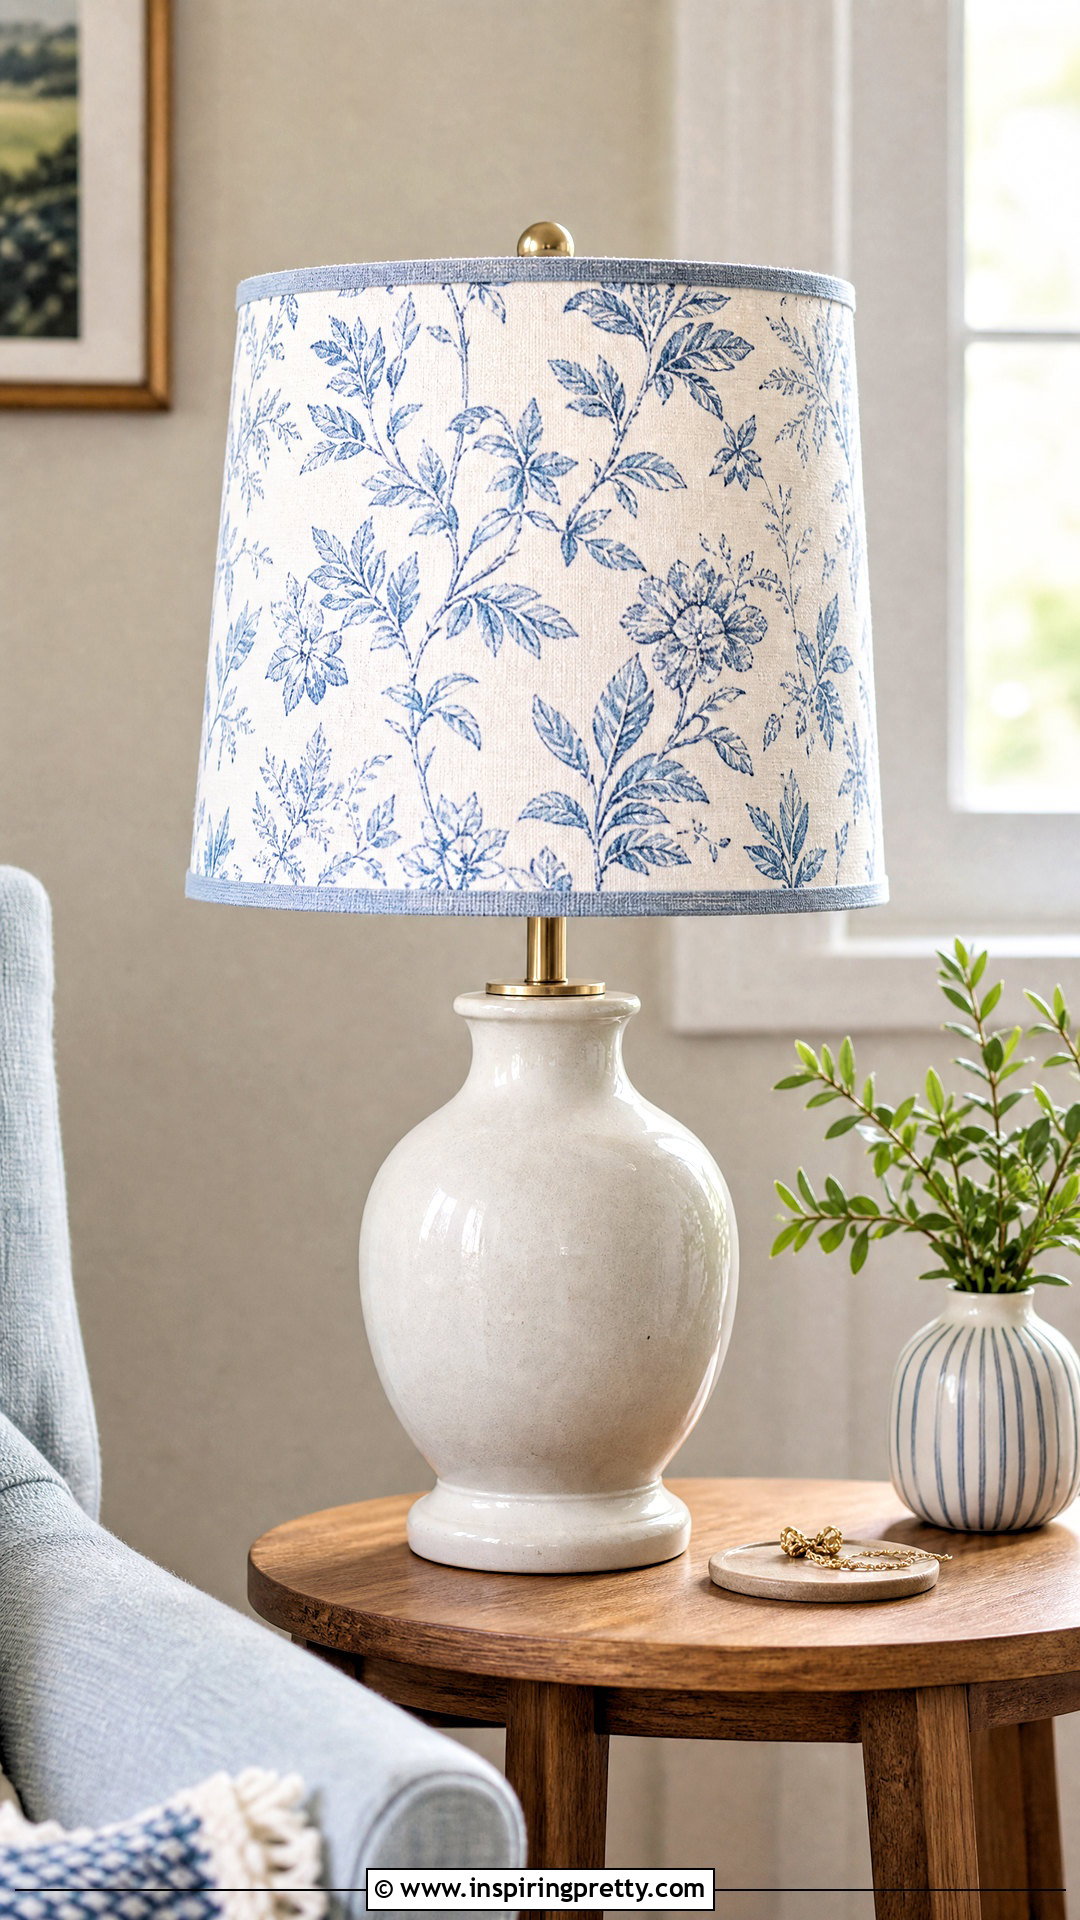
Covering a plain lampshade with fabric introduces pattern without replacing the entire lamp. Choose a simple shade and lightweight fabric that allows suitable light transmission. Roll the shade across paper to create a curved template, adding extra material for overlapping edges. Cut the fabric accurately and apply spray adhesive or fabric glue in a thin, even coat. Smooth the material around the shade gradually to prevent bubbles and wrinkles. Fold raw edges inward and finish them with narrow trim if desired. Keep fabric and adhesive away from the bulb and interior electrical components. Use only bulbs within the lamp’s recommended wattage, preferably a low-heat option. Never cover ventilation openings, and discontinue use if the shade becomes unusually hot.
48. DIY Garden Stepping Stones
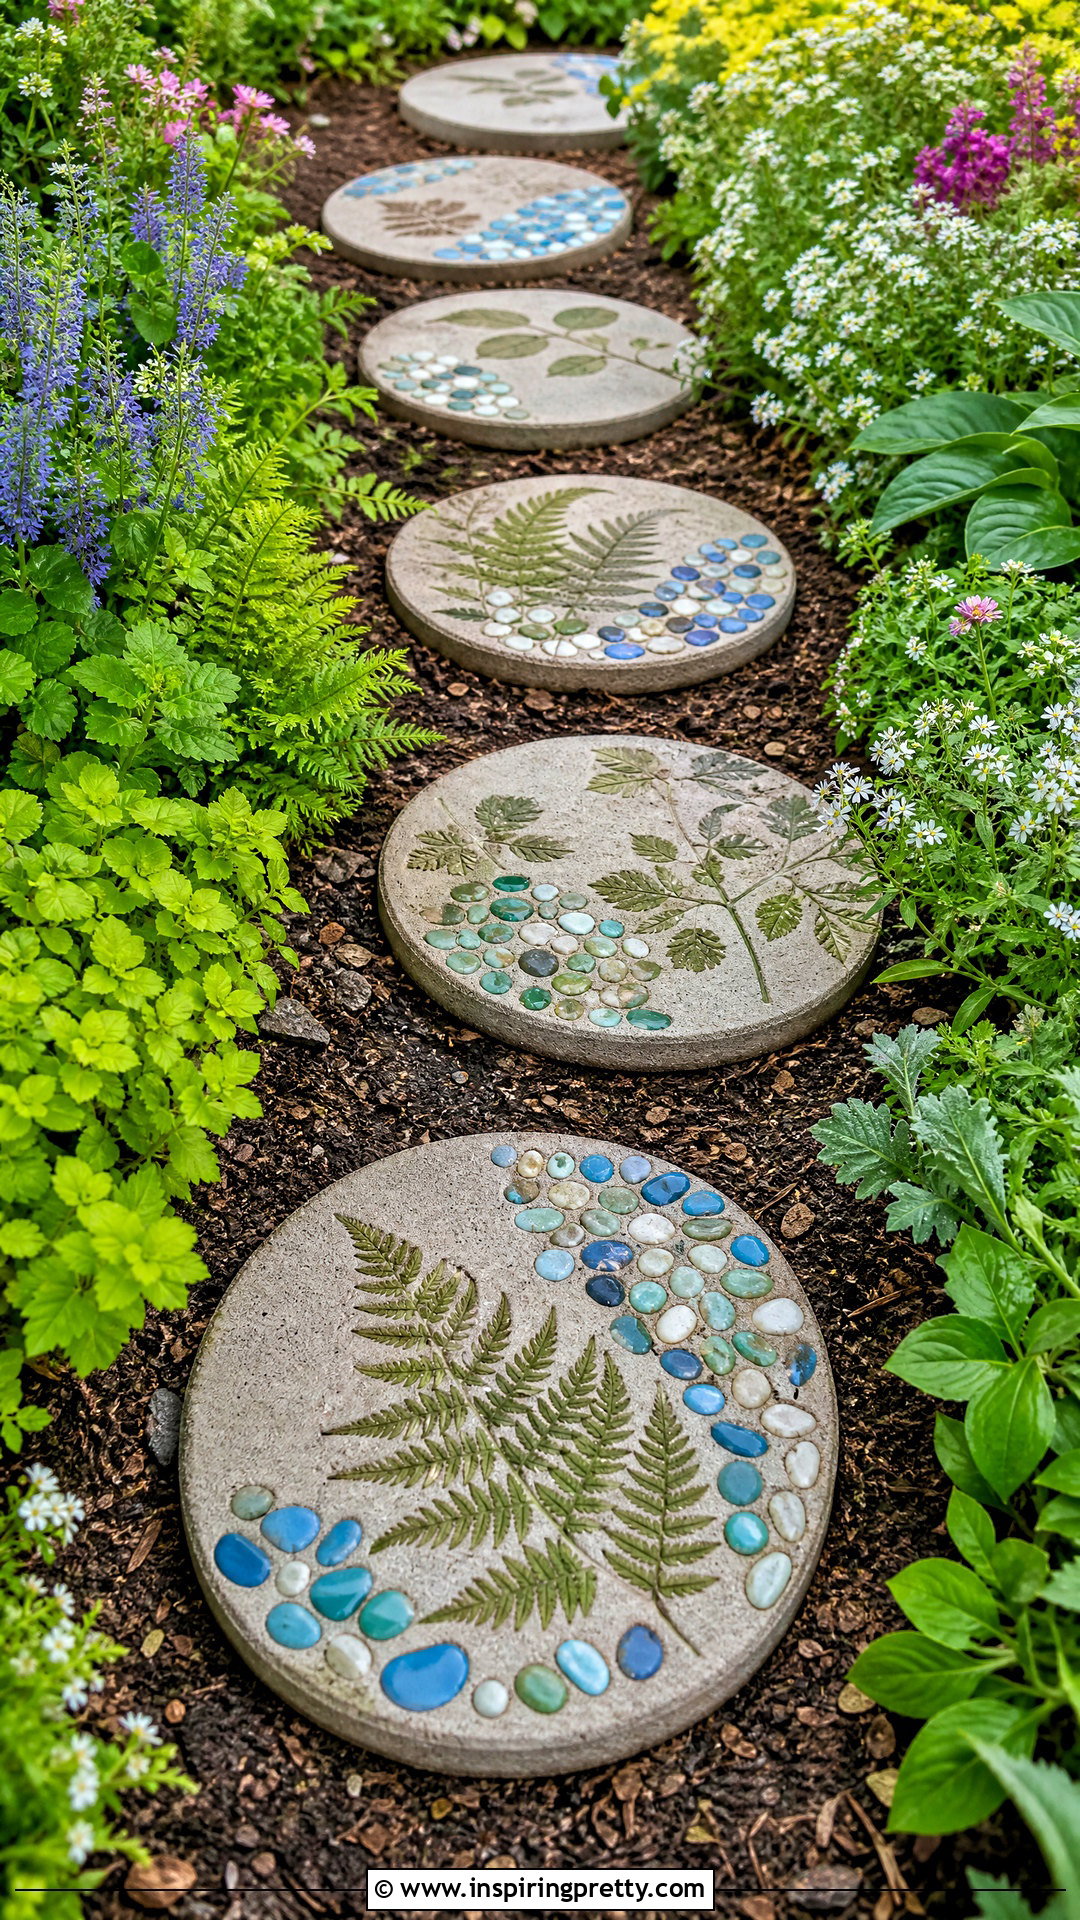
Personalized stepping stones add color and function to a garden path. Use a reusable mold and prepare concrete according to the package instructions. Pour the mixture evenly and gently tap the mold to reduce air pockets. Decorate the surface with smooth pebbles, weather-resistant mosaic pieces, leaf impressions, or stamped patterns. Keep embellishments level so the finished stone remains comfortable to walk on. Allow the concrete to cure fully before removing it from the mold or placing it outdoors. Set each stone on a compacted, level base to prevent rocking. Wear gloves and eye protection while working with concrete. Avoid using sharp, delicate, or slippery decorations. Space the stones according to a natural walking stride for a safer and more comfortable path.
49. DIY Personalized Serving Board
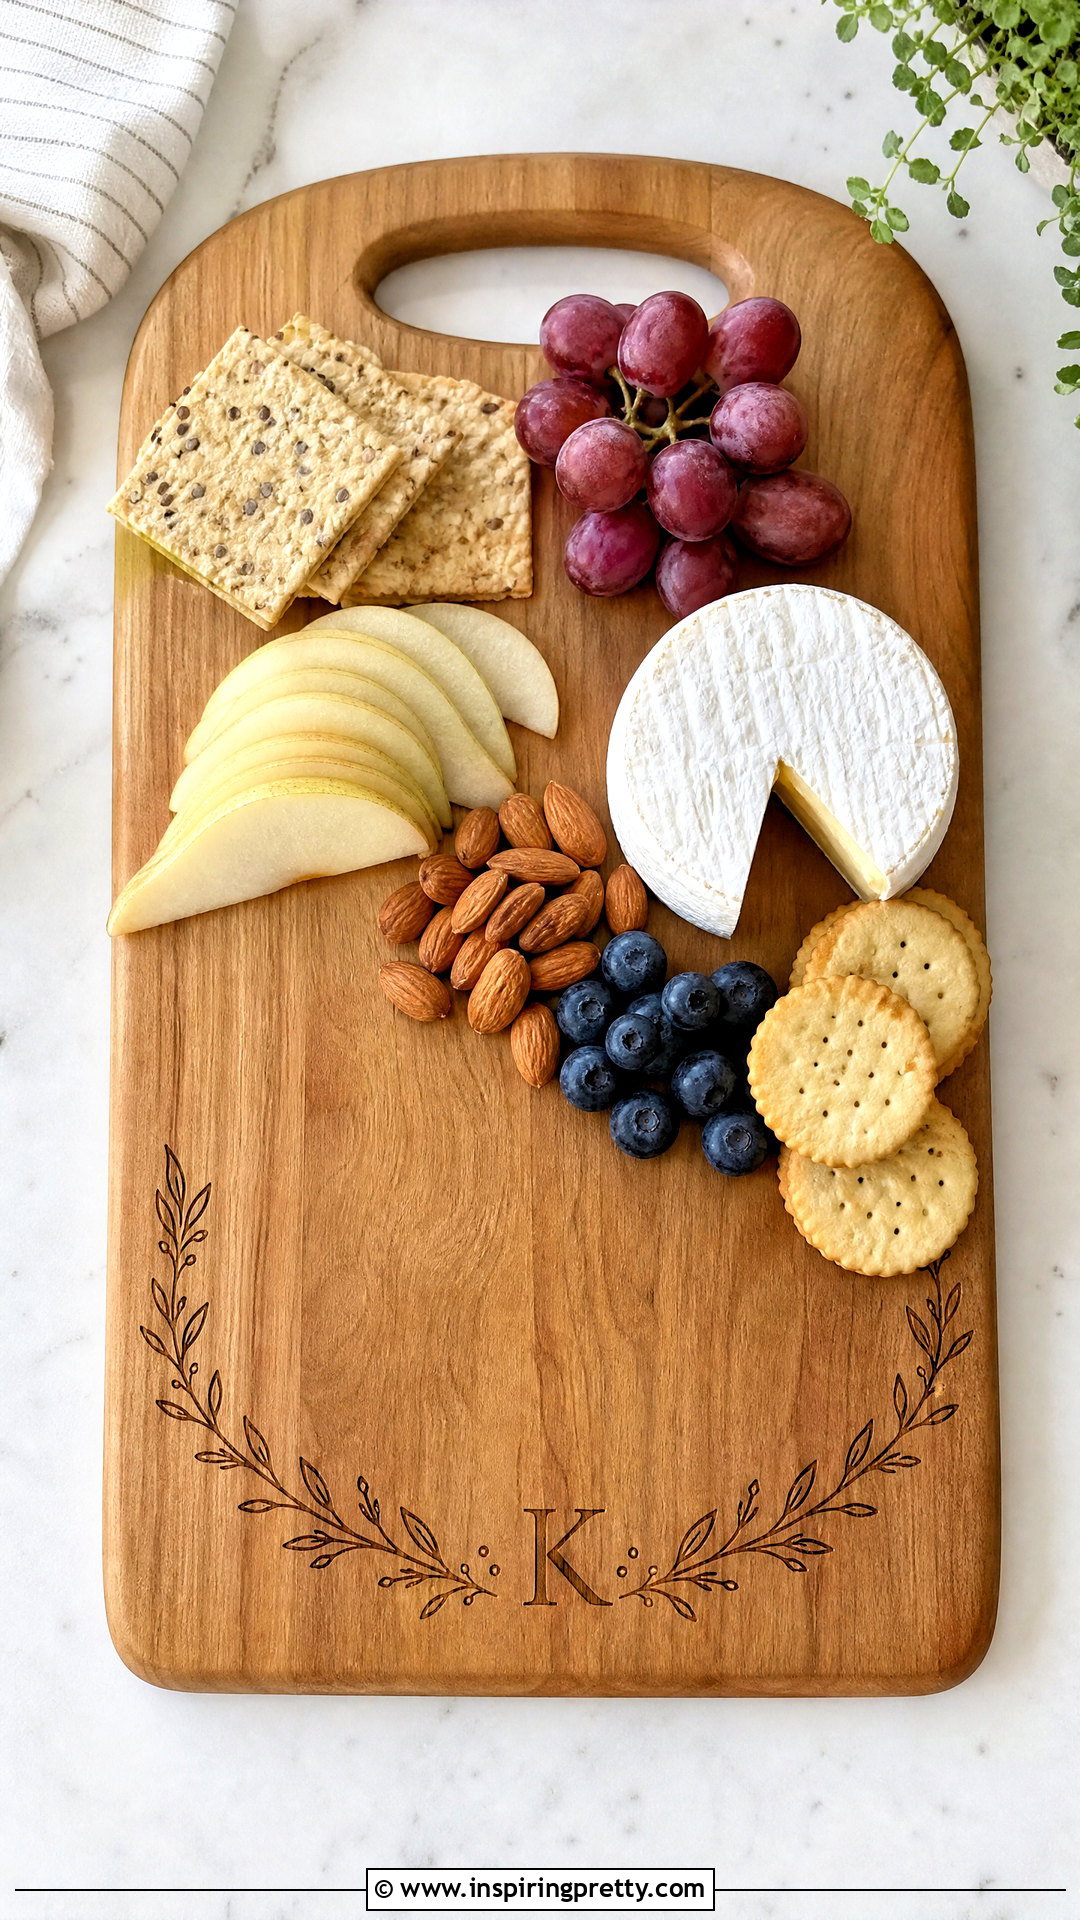
A plain wood board can become a personalized display piece with a painted, burned, or engraved design. Choose an unfinished board and sand it until every surface feels smooth. Sketch a simple monogram, border, botanical motif, or geometric pattern in pencil. Apply the design using food-surface-appropriate methods and follow all tool instructions if wood burning or engraving. Keep decorative paint confined to areas that will not contact food unless the product is specifically approved for that use. Condition exposed wood with an appropriate board oil. Wash the finished piece by hand without prolonged soaking and dry it upright. Use one side for serving and reserve a heavily decorated side for display if you are uncertain about direct food contact.
50. DIY Rolling Storage Cart
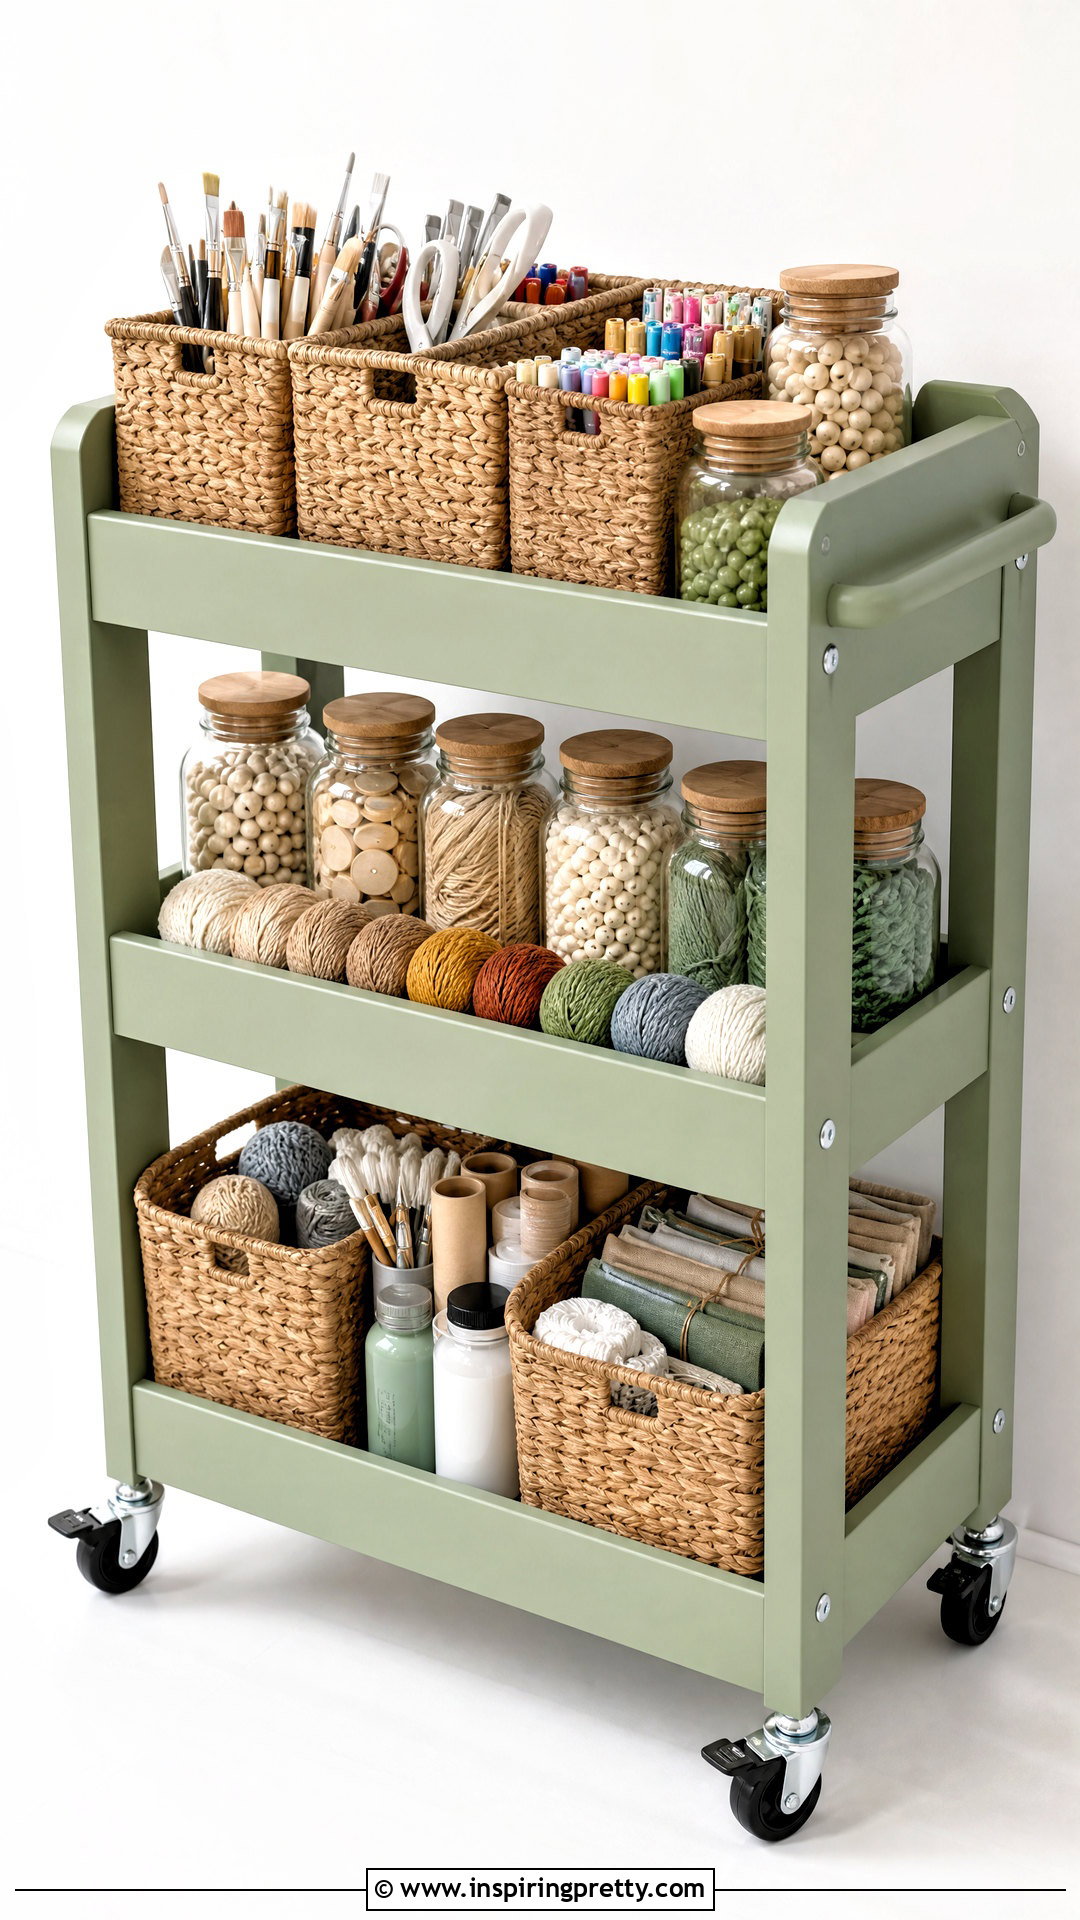
A rolling cart offers flexible storage for art supplies, bathroom products, pantry goods, or home-office equipment. Begin with a small shelving unit or build a simple wood frame with two or three shallow shelves. Sand the components and apply a durable painted or clear finish. Attach locking casters rated to support more than the cart’s expected load. Install handles on the sides if you want easier movement. Use matching bins or jars to separate categories and prevent small items from falling. Store heavier objects on the bottom shelf to improve stability. Do not make the cart excessively tall or narrow, and lock the wheels when it is parked. Label each container so the system remains organized after the initial makeover.
Conclusion:
These 50 top diy ideas show how practical materials and thoughtful planning can produce useful, attractive results. Start with a project that matches your current tools, available space, and confidence level. Small crafts such as painted pots, clay dishes, and storage boxes are excellent for beginners. Furniture makeovers and wall treatments require more preparation but can create a dramatic change. Measure carefully, work in a ventilated area, follow product instructions, and never rush required drying or curing times. You can also adjust colors, patterns, and finishes to complement your home rather than copying a design exactly. Most importantly, enjoy the process. A successful DIY project should feel personal, achievable, and genuinely useful once it is complete.
Related posts:










Leave a Reply